중요
번역은 여러분이 참여할 수 있는 커뮤니티 활동입니다. 이 페이지는 현재 36.36% 번역되었습니다.
25.2.1. 데이터베이스 관리자 플러그인
The DB Manager Plugin is intended to be the main tool to integrate and
manage spatial database formats supported by QGIS (PostgreSQL, SpatiaLite,
GeoPackage, Oracle Spatial, Virtual layers) in one user interface.
The  DB Manager Plugin provides several features.
You can drag layers from the QGIS Browser into the DB Manager, and it
will import your layer into your spatial database.
You can drag and drop tables between spatial databases and they will
get imported.
DB Manager Plugin provides several features.
You can drag layers from the QGIS Browser into the DB Manager, and it
will import your layer into your spatial database.
You can drag and drop tables between spatial databases and they will
get imported.
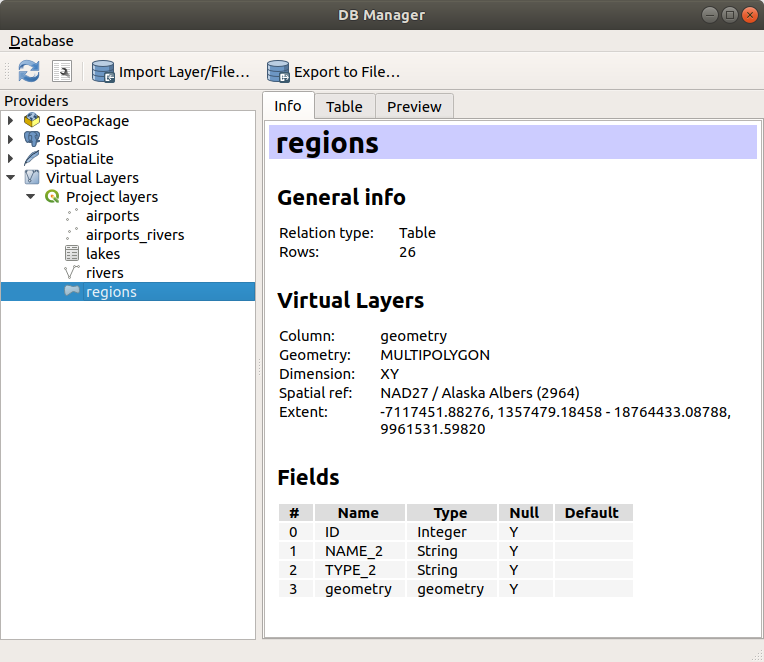
그림 25.4 데이터베이스 관리자 대화창
The menu allows you to connect to an existing database, to start the SQL window and to exit the DB Manager Plugin. Once you are connected to an existing database, the menus (relevant for DBMSs, such as PostgreSQL) and will appear.
메뉴는 스키마를 생성하고 (비어 있는 경우에만) 삭제할 수 있는 도구를 포함하고 있습니다. 그리고 (예를 들어 PostGIS 토폴로지 확장 기능처럼) 데이터베이스가 위상을 지원하는 경우, TopoViewer 를 구동할 수 있습니다.
메뉴를 통해 테이블을 생성/편집할 수 있고 테이블 및 뷰를 삭제할 수 있습니다. 테이블의 내용을 완전히 지우거나 어떤 스키마에서 다른 스키마로 테이블을 옮길 수도 있습니다. Run Vacuum Analyze 로 선택한 테이블에 빈공간 분석을 수행할 수 있습니다. 빈공간(vacuum) 은 공간을 확보하고 재사용할 수 있도록 해주며, 분석(analyze) 은 쿼리를 가장 효율적으로 실행하는 방식을 결정하기 위해 사용되는 통계를 업데이트합니다. Change Logging… 으로는 테이블에 변경 사항 로그 작업 지원을 추가할 수 있습니다. 마지막으로, Import Layer/File… 메뉴로 레이어/파일을 가져올 수 있고 Export to File… 메뉴로 파일로 내보낼 수 있습니다.
참고
DB 관리자를 이용해서 PostgreSQL 데이터베이스의 테이블 및 열에 주석을 추가할 수 있습니다.
Providers 창은 QGIS가 지원하는 모든 기존 데이터베이스의 목록을 담고 있습니다. 어느 항목을 더블클릭하면 해당 데이터베이스에 연결할 수 있습니다. 어느 항목을 오른쪽 클릭하면 기존 스키마 및 테이블을 재명명하거나 삭제할 수 있습니다. 컨텍스트 메뉴를 통해 QGIS 캔버스에 테이블도 추가할 수 있습니다.
데이터베이스에 연결돼 있는 경우, DB 관리자의 메인 창에서 탭 4개를 사용할 수 있습니다. Info 탭은 테이블 및 그 도형은 물론 기존 필드, 제약 조건 및 인덱스에 대한 정보를 제공합니다. 이 탭에서 선택한 테이블에 공간 인덱스를 생성할 수 있습니다. Table 탭은 테이블을 표시하고, Preview 탭은 도형을 미리보기로 렌더링합니다. SQL Window 를 열면, SQL 창을 새 탭에 배치할 것입니다.
25.2.1.1. SQL 창에서 작업하기
DB 관리자를 통해 사용자의 공간 데이터베이스에 SQL 쿼리를 실행할 수 있습니다. 쿼리를 저장하고 불러올 수 있으며, 사용자 쿼리를 공식으로 표현하게 도와주는 SQL Query Builder 도 있습니다. Load as new layer 옵션을 활성화하고 Column(s) with unique values (IDs), Geometry column 및 Layer name (prefix) 옵션을 지정해주면 공간 산출물도 살펴볼 수 있습니다. SQL의 일부분을 강조시킨 다음 Ctrl+R 조합 키 또는 Execute 버튼을 클릭하면 해당 부분만 실행하도록 할 수 있습니다.
QGIS also adds support for the REGEXP function in some providers.
This allows users to use regular expressions in SQL filters or expressions, for example:
SELECT * FROM places WHERE name REGEXP '^A';
This returns all features where the name field starts with the letter A.
After executing your query, you can select specific cells in the result set. Use the Ctrl+C shortcut to copy the selected cells to the clipboard. The copied data is available as a formatted table. This allows you to paste the data into other applications, such as spreadsheet where it will show up as a table.
Query History 버튼을 클릭하면 각 데이터베이스 및 제공자의 최신 쿼리 20개를 저장합니다.
항목을 더블 클릭하면 SQL 창에 문자열을 추가할 것입니다.
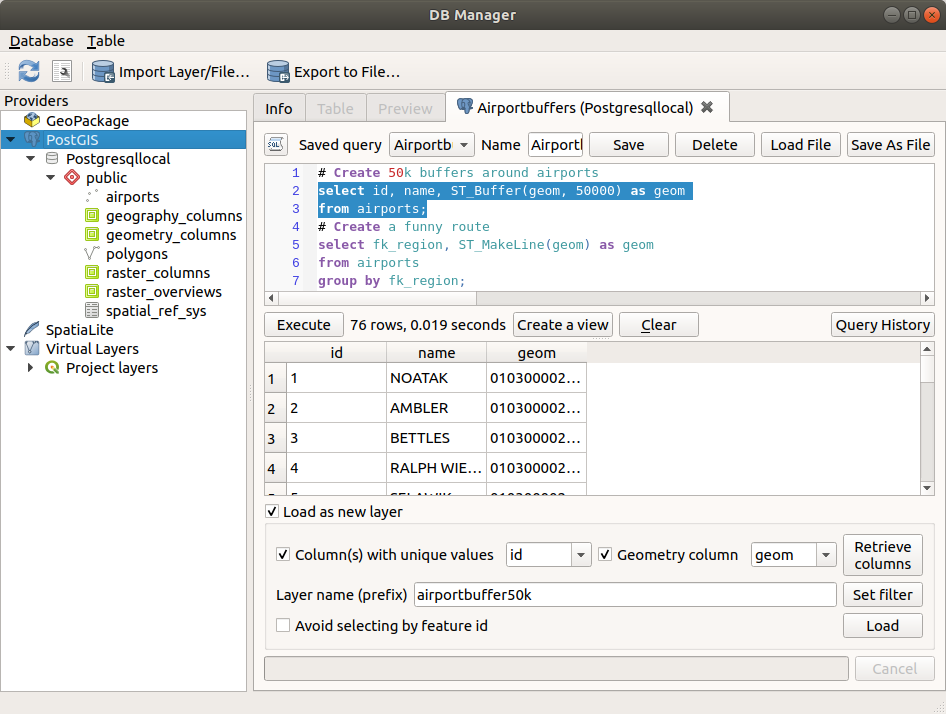
그림 25.5 데이터베이스 관리자 SQL 창에서 SQL 쿼리 실행하기
참고
가상 레이어를 생성하기 위해 SQL 창을 사용할 수도 있습니다. 이런 경우 SQL 창을 열기 전에 데이터베이스를 선택하는 대신, Virtual Layers 아래 있는 QGIS Layers 를 선택하십시오. 사용할 SQL 문법은 가상 레이어 생성 의 지침을 참조하십시오.
25.2.1.2. Import Vector Layer
You can import layer or file into your database. Here are the parameters you can set for the import process:
Input: Select the layer or file to import. Using the dropdown menu, select from the list of loaded layers in QGIS or click on the … button to select a file from disk. Check the
 Import only selected features to import only the selected
features of the layer.
Import only selected features to import only the selected
features of the layer.Output table: Choose the Schema and provide a name for the new table.
Options: Here are some options for the import process:
- Primary key: Provide naming for the primary key field.
By default, it is named
id. - Geometry column: Provide naming for the geometry column.
By default, it is named
geom. - Source SRID: Define the SRID for the geometry column.
By default, it uses the layer’s CRS.
- Target SRID: Define the target SRID to reproject the geometries
during the import process. By default, it uses the layer’s CRS.
- Encoding: Define the encoding of the source data. By default, it uses
Automatic. It is QGIS’s automatic detection mode that attempts to guess the file’s character encoding based on available metadata or system locale. - Replace destination table (if exists): If a table with the same name already exists in the selected schema,
it will be replaced.
- Do not promote to multi-part: Geometries will be imported as single-part geometries.
- Convert field names to lower case: All field names will be converted to lower case.
- Create spatial index: A spatial index will be created on the geometry column after import.
- Comment: Add comments to table. Only available for PostgreSQL databases.

그림 25.6 Importing a vector layer into a spatial database using DB Manager
25.2.1.3. Export to Vector File
To export a table from your database to a vector file, select the desired Format and Save as location. Under Options, you can set the following parameters:
- Source SRID: Define the source SRID of the geometry column.
By default, it uses the layer’s CRS.
- Target SRID: Define the target SRID to reproject the geometries
during the export process. By default, it uses the layer’s CRS.
- Encoding: Define the encoding of the output data.
- Replace destination table (if exists): If a table with the same name already exists at the selected location,
it will be replaced.

그림 25.7 Exporting a table to a vector file using DB Manager