중요
번역은 여러분이 참여할 수 있는 커뮤니티 활동입니다. 이 페이지는 현재 96.00% 번역되었습니다.
12.1. 수업: GRASS 설정하기
QGIS에서 GRASS를 사용하려면 인터페이스를 조금 다른 방식으로 생각해야 합니다. QGIS에서 직접 작업하는 것이 아니라 QGIS를 통해서 GRASS에서 작업하는 것이라는 사실을 기억하십시오. 따라서 QGIS를 GRASS 지원과 함께 설치했는지 확인하십시오.
 윈도우 상에서 GRASS와 함께 사용할 수 있는 QGIS 세션을 열려면
 QGIS Desktop with GRASS 아이콘을 클릭해야 합니다.
이 수업의 목표: QGIS에서 GRASS 프로젝트를 시작하기.
12.1.1. ★☆☆ 따라해보세요: 새 GRASS 세션 시작하기
QGIS 내에서 GRASS를 실행하려면, 다른 모든 플러그인처럼 GRASS를 활성화시켜야 합니다:
먼저 새 QGIS 프로젝트를 여십시오.
Plugin Manager 의 목록에서
 GRASS 8 을 활성화하십시오.
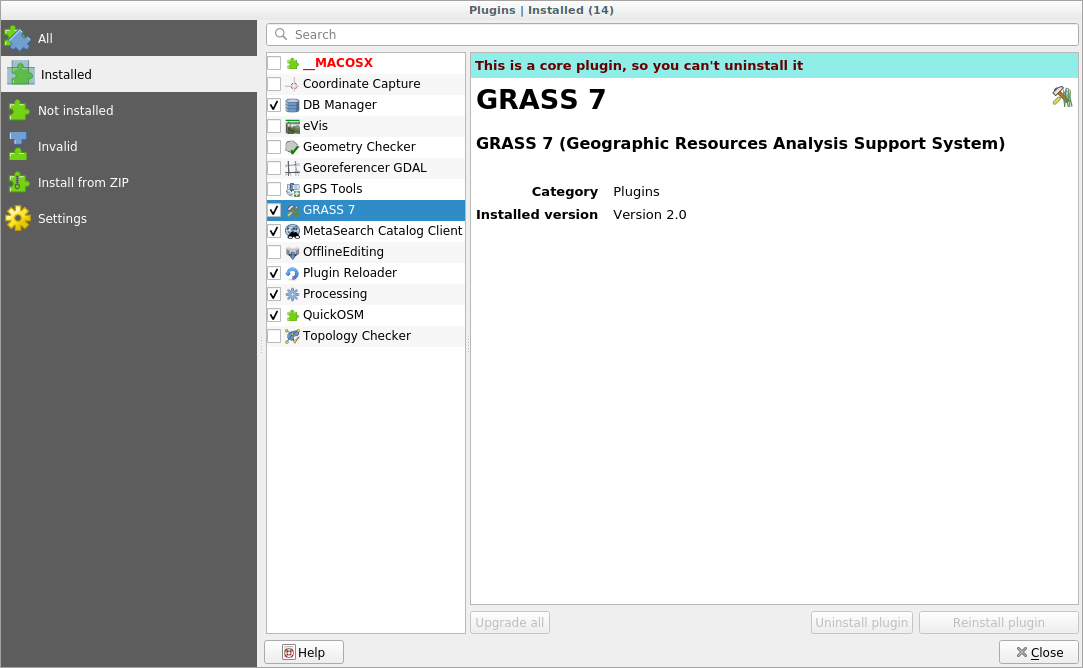
GRASS 툴바와 GRASS 패널이 나타날 것입니다:
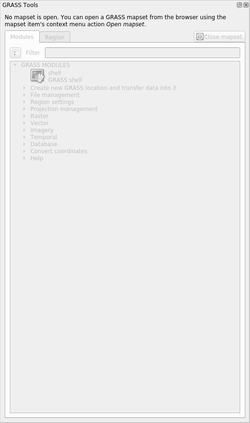
그림 12.125 GRASS 툴바와 패널
GRASS 패널이 활성화되어 있지 않은 이유는, GRASS를 사용할 수 있으려면 먼저 Mapset 을 생성해야 하기 때문입니다. GRASS는 항상 데이터베이스 환경에서 작동합니다. 즉 여러분이 사용하고자 하는 데이터를 모두 GRASS 데이터베이스로 가져와야 한다는 뜻입니다.
GRASS 데이터베이스의 구조는 간단합니다. 비록 첫눈에는 아주 복잡해 보이지만 말이죠. 여러분이 알고 있어야 할 가장 중요한 점은 데이터베이스의 상위 수준(upper level)이 Location 이라는 것입니다. 각 Location 이 서로 다른 Mapset 을 담고 있을 수 있습니다. 모든 Mapset 에서 PERMANENT 맵셋을 찾을 수 있을 겁니다. GRASS가 기본적으로 생성하는 맵셋이기 때문입니다. 각 Mapset 은 (래스터, 벡터 등등의) 데이터를 독특한 구조로 담고 있지만, 걱정하지 마십시오. GRASS가 처리해줄 것입니다.
이것만 기억하십시오 — Location 이 Mapset 을 담고 있고, Mapset 이 데이터를 담고 있습니다. 더 자세한 정보를 알고 싶다면 GRASS 웹사이트 를 방문해보세요.
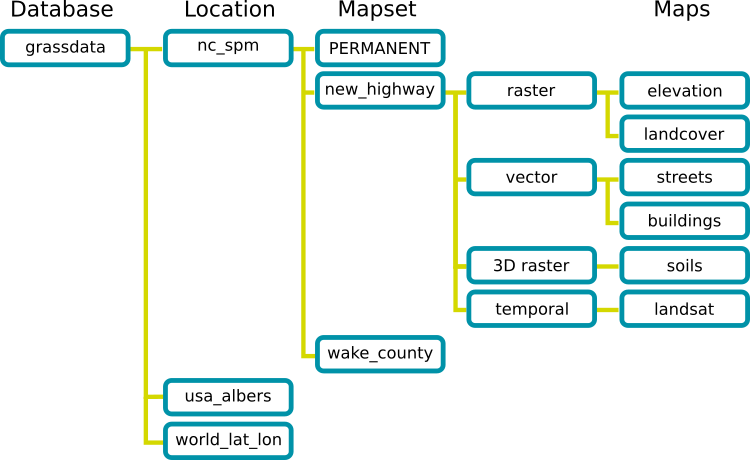
그림 12.126 GRASS 데이터베이스 구조 (GRASS 문서에서 발췌)
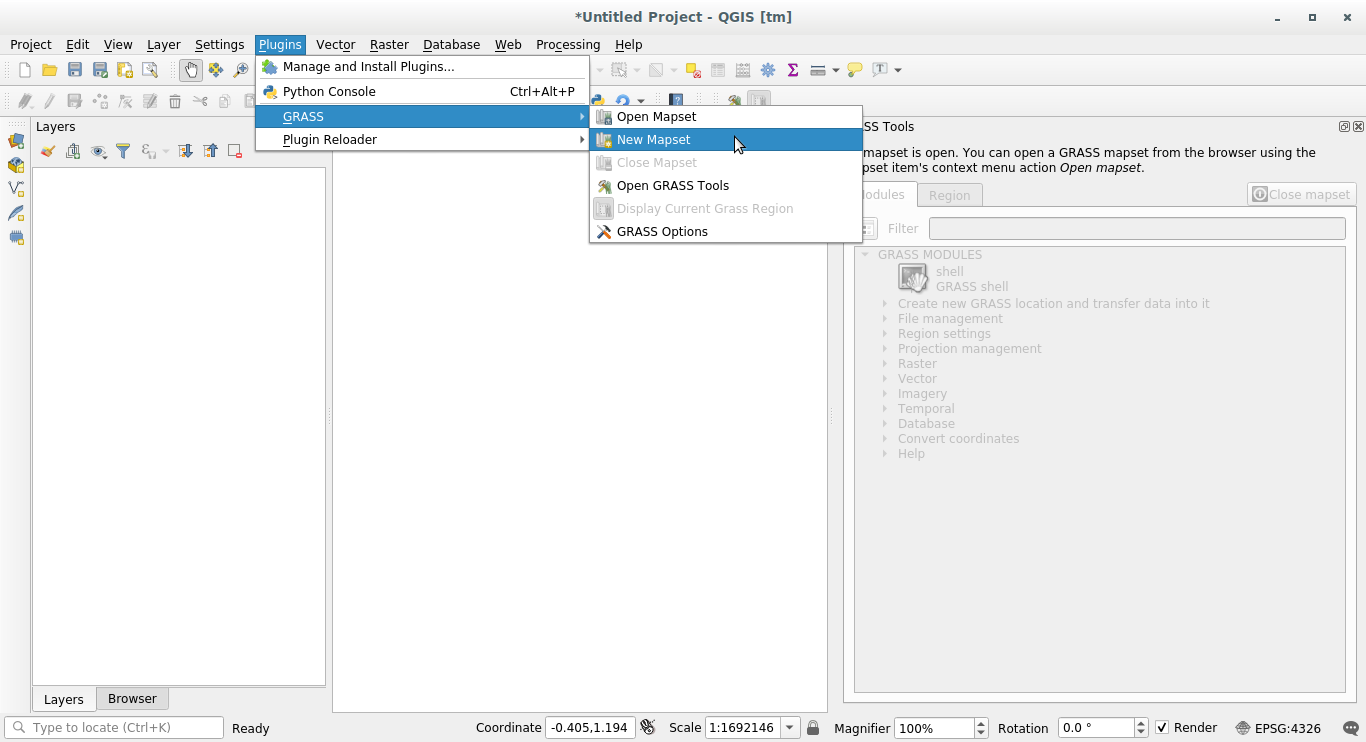
12.1.2. ★☆☆ 따라해보세요: 새 GRASS 프로젝트 시작하기
메뉴를 클릭하십시오:
GRASS 데이터베이스의 경로를 선택하라는 메시지를 보게 될 것입니다.
GRASS의 데이터베이스를 설정하는 데 사용될 디렉터리를 다음과 같이 설정하십시오:
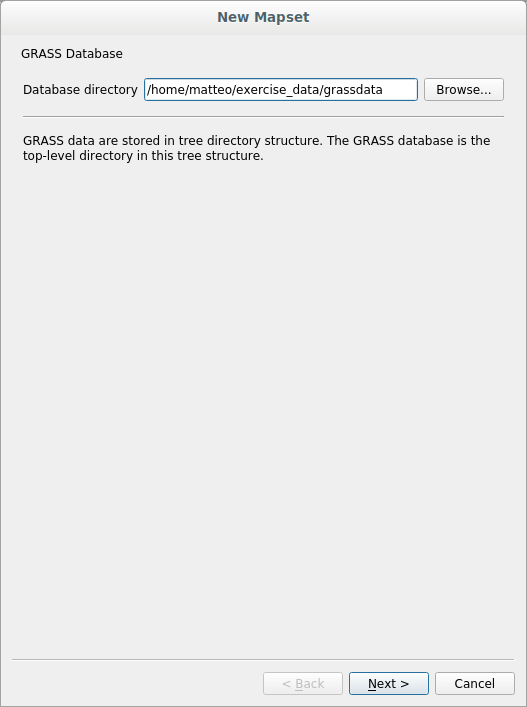
Next 를 클릭합니다.
GRASS는 여러분이 작업하게 될 지리적 영역의 최대 범위를 설명하는 Location 을 생성해야 합니다. 달리 GRASS Region 이라고도 하죠.
참고
이 영역(region)이 GRASS에서 극히 중요한 이유는 GRASS에서 모든 레이어가 계산될 지역을 설명하기 때문입니다. 무엇이든 이 영역 바깥에 있다면 연산에 넣지 않을 것입니다. 걱정하지 않아도 됩니다 — 로케이션을 생성한 다음 언제라도 GRASS 영역의 범위를 변경할 수 있으니까요.
새
SouthAfrica로케이션을 생성하십시오: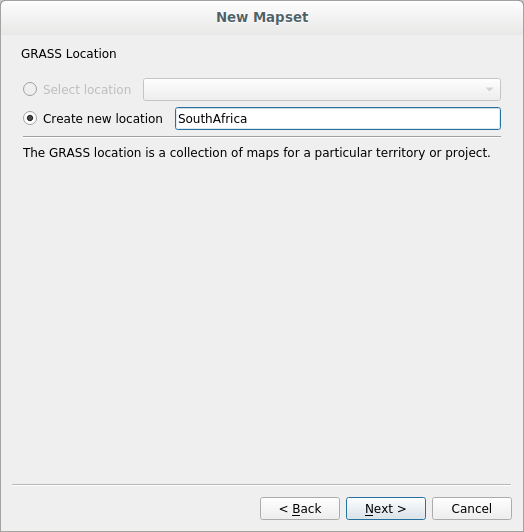
Next 를 클릭합니다.
WGS 84를 사용할 것이므로, 이 좌표계를 찾아서 선택하십시오: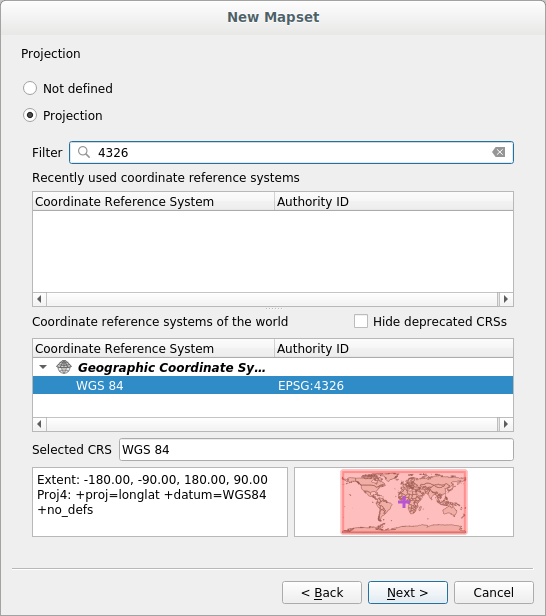
Next 를 클릭합니다.
Now select the region
South Africafrom the dropdown and click Set: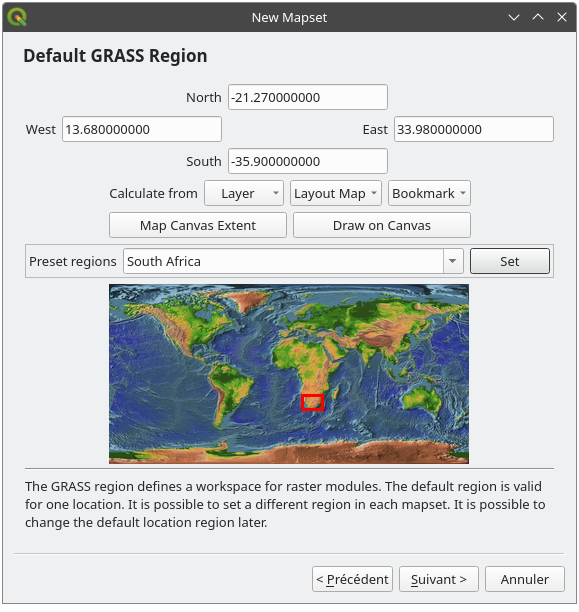
Next 를 클릭합니다.
여러분이 작업하게 될 맵 파일인 맵셋을 생성하십시오.
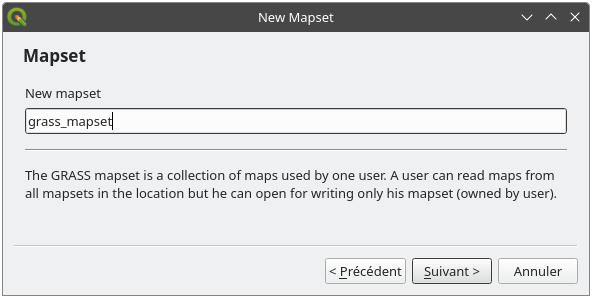
설정을 완료하면, 모든 정보의 요약과 함께 맵셋을 생성할 것인지 묻는 대화창이 열릴 것입니다.
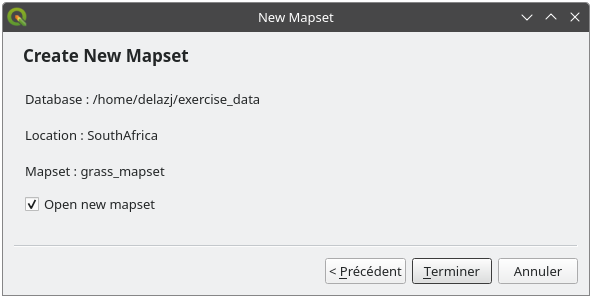
Finish 를 클릭합니다.
이어지는 대화창에 있는 OK 를 클릭합니다.
GRASS 패널이 활성화되어 모든 GRASS 도구들을 사용할 수 있게 될 것입니다.
12.1.3. ★☆☆ 따라해보세요: GRASS에 벡터 데이터 불러오기
이제 비어 있는 맵이 준비됐습니다. 여러분이 모든 GRASS 도구들을 사용할 수 있게 되기 전에 GRASS 데이터베이스로, 특히 Mapset 으로 데이터를 불러와야 합니다. GRASS Mapset 으로 불러오지 않은 레이어에 GRASS 도구를 사용할 수는 없습니다.
데이터를 GRASS 데이터베이스로 불러오는 방법은 많이 있습니다. 첫 번째 방법으로 시작해봅시다.
★☆☆ 따라해보세요: QGIS 탐색기를 사용해서 데이터 불러오기
★☆☆ 탐색기 패널 절에서 QGIS에 데이터를 불러오는 가장 쉽고 빠른 방법은 탐색기 패널이라는 사실을 배웠습니다.
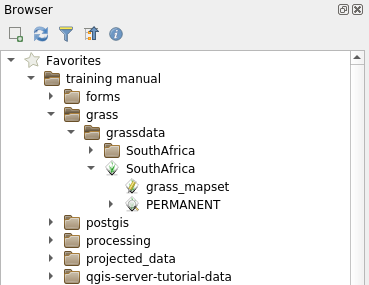
QGIS 탐색기는 GRASS 데이터를 실제로 GRASS 데이터로 인식합니다. GRASS 맵셋 옆에 있는 GRASS 아이콘을 보면 알 수 있습니다. 또한  아이콘이 열려 있는 맵셋 옆에 나타난 것도 볼 수 있을 것입니다.
참고
GRASS 로케이션이 일반적인 폴더로 복제된 것을 보게 될 것입니다. GRASS Mapset 데이터는  폴더 안에 있는 데이터입니다.
레이어들을 폴더에서 GRASS 맵셋으로 쉽게 드래그&드롭 할 수 있습니다.
roads 레이어를 SouthAfrica 로케이션의 grass_mapset 맵셋으로 가져와봅시다.
탐색기로 가서, 그냥 training_data.gpkg GeoPackage 파일에서 roads 레이어를 grass_mapset 맵셋으로 드래그하십시오.
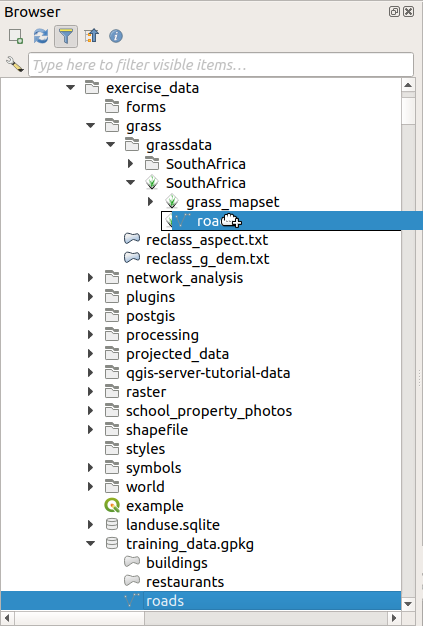
이게 다입니다! 맵셋을 펼치면 가져온 roads 레이어를 보게 될 겁니다. 이제 가져온 레이어를 다른 모든 레이어들처럼 QGIS에서 불러올 수 있습니다.
팁
레이어 범례 패널에서도 레이어들을 탐색기 패널에 있는 맵셋으로 불러올 수 있습니다. 이렇게 하면 워크플로 속도가 엄청나게 빨라집니다!
★☆☆ 따라해보세요: GRASS 패널을 사용해서 데이터 불러오기
이제 시간이 걸리는 방법을 사용해서 rivers.shp 레이어를 같은 맵셋으로 불러올 것입니다.
평소대로 데이터를 QGIS로 불러오십시오. (
exercise_data/shapefile/폴더에 있는)rivers.shp데이터셋을 사용하십시오.해당 레이어를 불러오면,
GRASS Panel의 Filter 란을 클릭한 다음v.in.ogr.qgis를 입력해서 벡터 가져오기 도구를 찾으십시오. ( 메뉴 항목을 사용해도 됩니다.)경고
v.in.ogr.qgis도구는v.in.ogr.qgis.loc도구와 비슷합니다. 이 예제에서는 첫 번째 도구를 찾습니다.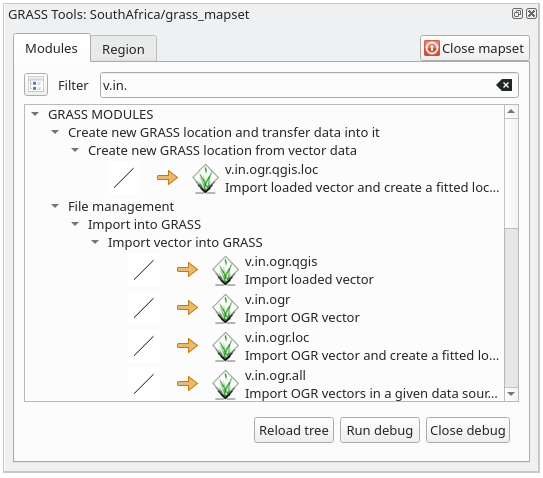
v는 벡터(vector) 를,in은 데이터를 GRASS 데이터베이스로 가져오기(import)하는 함수를,ogr은 벡터 데이터를 읽는 데 쓰이는 소프트웨어 라이브러리를, 그리고qgis는 이 도구가 QGIS에 이미 불러온 벡터들 사이에서 벡터를 검색할 것을 뜻합니다.Once you’ve found this tool, click on it to bring up the tool itself. Choose the
riverslayer in the Loaded Layer box and type and name itg_riversto prevent confusion: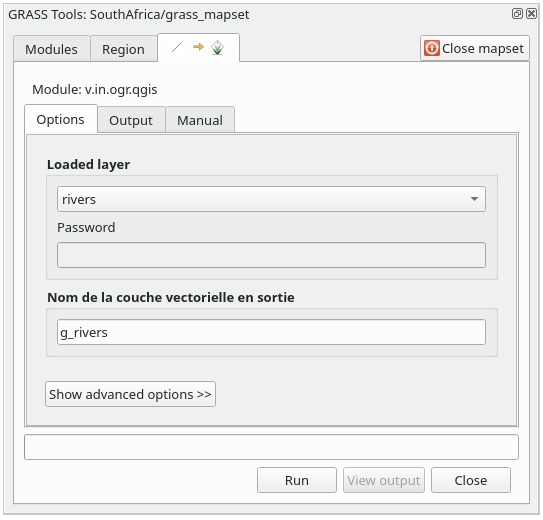
참고
★★★ Advanced Options 아래 있는 추가적인 가져오기 옵션들을 살펴보십시오. 이 옵션들 중에는 데이터를 가져오는 데 쓰이는 SQL 쿼리에 WHERE 구문을 추가할 수 있는 기능도 있습니다.
Run 을 클릭해서 가져오기를 시작합니다.
가져오기가 끝나면 View output 버튼을 클릭해서 맵에 새로 가져온 GRASS 레이어를 살펴보십시오.
첫 번째 가져오기 도구를 (View output 바로 옆에 있는 Close 버튼을 클릭해서) 닫은 다음, GRASS Tools 창을 닫으십시오.
Remove the original
riverslayer.
이제 여러분의 QGIS 맵에 가져온 GRASS 레이어만 보이게 됩니다.
12.1.4. ★☆☆ 따라해보세요: GRASS에 래스터 데이터 불러오기
벡터 레이어 가져오기와 동일한 방법으로 래스터 레이어를 가져올 수 있습니다.
GRASS 맵셋에 srtm_41_19_4326.tif 레이어를 가져올 것입니다.
참고
이 래스터 레이어는 이미 올바른 WGS 84 좌표계를 사용하고 있습니다. 다른 좌표계를 사용하는 레이어인 경우 반드시 GRASS 맵셋과 동일한 좌표계로 재투영해야만 합니다.
srtm_41_19_4326.tif레이어를 QGIS로 불러오십시오.GRASS Tools 대화창을 다시 여십시오.
Modules 탭을 클릭하십시오.
r.in.gdal.qgis를 검색한 다음 ( 메뉴 항목을 사용해도 됩니다) 해당 도구를 더블클릭해서 도구 대화창을 여십시오.입력 레이어를
srtm_41_19_4326.tif로, 산출물을g_dem으로 설정하십시오.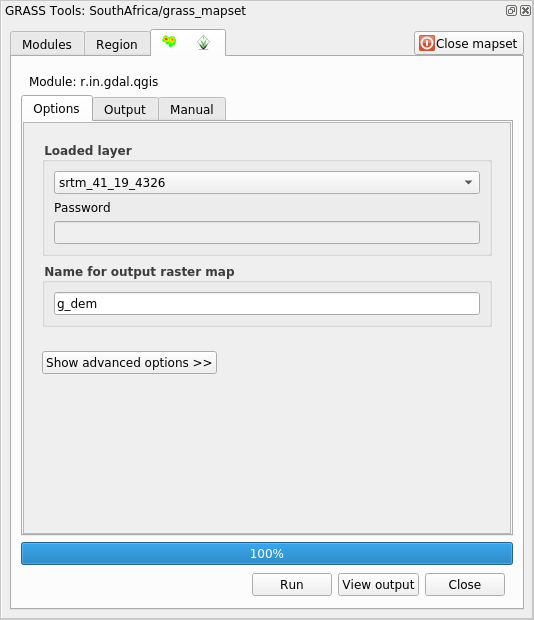
Run 을 클릭합니다.
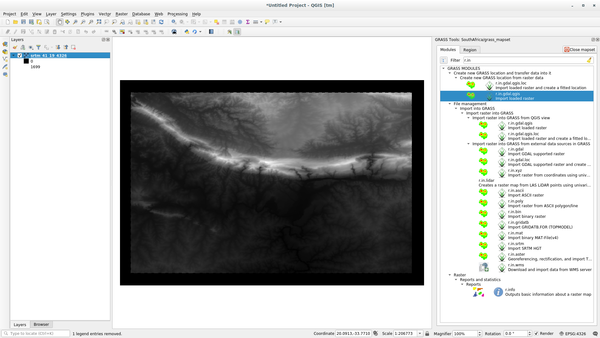
처리가 끝나면 View output 을 클릭하십시오.
현재 탭의 Close 를 클릭한 다음, 전체 대화창의 Close 를 클릭하십시오.
이제 원본
srtm_41_19_4326.tif레이어를 제거해도 됩니다.
12.1.5. ★☆☆ 혼자서 해보세요: 맵셋에 레이어 추가하기
exercise_data/shapefile/ 폴더에서 water.shp 와 places.shp 벡터 레이어들을 GRASS 맵셋으로 가져와보십시오. rivers 와 마찬가지로, 혼동을 피하기 위해 가져온 레이어의 이름을 g_water 및 g_places 로 바꾸십시오.
해답
탐색기에서 (벡터 및 래스터 둘 다) 레이어들을 드래그&드롭하면 GRASS 맵셋에 추가할 수 있습니다. (★☆☆ 따라해보세요: QGIS 탐색기를 사용해서 데이터 불러오기 를 참조하세요.) 또는 벡터의 경우 v.in.gdal.qgis, 래스터의 경우 r.in.gdal.qgis 도구를 사용해도 됩니다.
12.1.6. ★☆☆ 기존 GRASS 맵셋 열기
기존 GRASS 맵셋을 가지고 있다면, QGIS의 또다른 세션에서 쉽게 다시 열 수 있습니다.
GRASS 맵셋을 열 수 있는 방법이 몇 가지 있습니다. 그중에서 몇 가지를 알아봅시다.
GRASS Tools 창의 Close Mapset 버튼을 클릭해서 맵셋을 닫으십시오.
★☆☆ 따라해보세요: GRASS 플러그인 사용하기
메뉴를 클릭하십시오.
GRASS 데이터베이스 폴더를 찾으십시오 — 조심하세요! GRASS 맵셋 폴더가 아니라 반드시 그 상위 폴더를 선택해야만 합니다. GRASS는 실제로 데이터베이스의 모든
Location들과 각Location의Mapset들을 읽을 것입니다.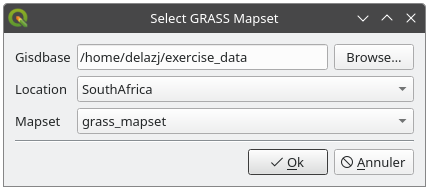
Choose the
LocationSouthAfricaand theMapsetgrass_mapsetthat we have created before.
끝났습니다! GRASS 패널이 활성화될 것입니다. 다시 말해 맵셋을 올바로 열었다는 뜻입니다.
★☆☆ 따라해보세요: QGIS 탐색기 사용하기
더 빠르고 쉬운 방법은 QGIS 탐색기를 사용해서 Mapset 을 여는 것입니다:
(열려 있는 경우) GRASS Tools 창의 Close Mapset 버튼을 클릭해서 맵셋을 닫으십시오.
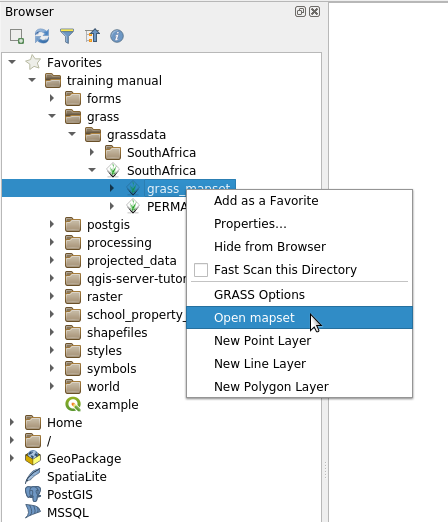
QGIS 탐색기에서 GRASS 데이터베이스의 폴더로 가십시오.
맵셋을 오른쪽 클릭하십시오. (맵셋 옆에
GRASS 아이콘이 있다는 사실을 잊지 마세요.) 컨텍스트 메뉴가 나타날 것입니다.Open mapset 을 클릭하십시오:
이제 맵셋이 열려서 사용할 수 있습니다!
팁
GRASS 맵셋을 오른쪽 클릭하면 서로 다른 많은 설정들을 사용할 수 있습니다. 이 설정들을 탐색해서 유용한 옵션들을 모두 살펴보도록 하십시오.
12.1.7. 결론
GRASS는 데이터를 공간 데이터베이스 구조로 불러온다는 점에서 GRASS의 데이터 획득 워크플로는 QGIS의 방법과 약간 다릅니다. 하지만 QGIS를 프론트엔드로 사용하면, QGIS의 기존 레이어를 GRASS를 위한 데이터 소스로 이용할 수 있기 때문에 GRASS 맵셋을 더 쉽게 설정할 수 있게 됩니다.
12.1.8. 다음은 무엇을 배우게 될까요?
이제 GRASS에 데이터를 가져왔으니, GRASS가 제공하는 고급 분석 작업을 해볼 차례입니다.