Wichtig
Übersetzen ist eine Gemeinschaftsleistung Sie können mitmachen. Diese Seite ist aktuell zu 96.37% übersetzt.
23.5. Ein Modell erstellen
Mit dem Modellentwurf können Sie komplexe Modelle über eine einfache und leicht zu bedienende Schnittstelle erstellen. Bei der Arbeit mit einem GIS sind die meisten Analysevorgänge nicht isoliert, sondern Teil einer Kette von Vorgängen. Mit dem Modellentwurf kann diese Kette von Operationen in einen einzigen Prozess verpackt werden, sodass sie zu einem späteren Zeitpunkt mit einem anderen Satz von Eingaben bequem ausgeführt werden kann. Unabhängig von der Anzahl der Schritte und der verschiedenen Algorithmen wird ein Modell als ein einziger Algorithmus ausgeführt, was Zeit und Mühe spart.
Der Modellentwurf kann aus der Menüleiste über () geöffnet werden.
23.5.1. Die Benutzeroberfläche des Modellentwurfs
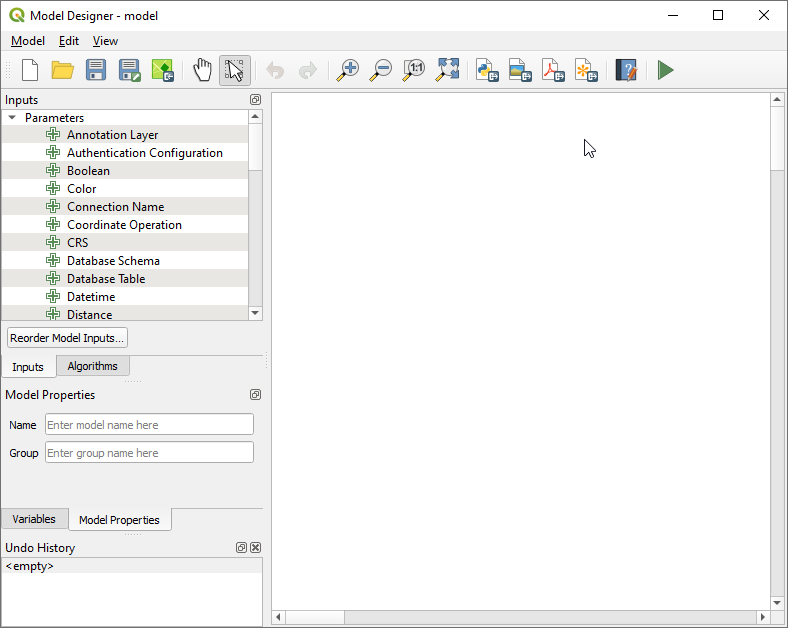
Abb. 23.18 Modellentwurf
Auf der rechten Seite der Benutzeroberfläche befindet sich ein Bereich, auf dem die Struktur des Modells und der Arbeitsablauf, den es darstellt, aufgebaut werden können.
Im oberen Bereich der Benutzeroberfläche bieten verschiedene Menüs und die Navigation-Werkzeugleiste Zugang zu einer Vielzahl von Werkzeugen.
23.5.1.1. Menü Modell
Bezeichnung |
Tastenkürzel |
Navigation Toolbar |
Beschreibung |
|---|---|---|---|
|
Prüft, ob die im Modell verwendeten Algorithmen und Eingaben existieren. Praktisch vor der Freigabe eines Modells. |
||
|
F5 |
|
Führt das Modell aus |
|
Umschalt+F5 |
Führt nur die ausgewählten Schritte in einem Modell aus, sodass ein Teil des Modells ausgeführt werden kann. |
|
Modelleingaben neu anordnen… |
Legt die Reihenfolge fest, in der die Eingaben dem Benutzer im Algorithmus-Dialog präsentiert werden. |
||
Ausgabelayer neu anordnen… |
Legt eine bestimmte Reihenfolge fest, die die Ausgaben des Modells beim Laden der Ergebnisse in ein Projekt verwenden müssen. |
||
|
Strg+O |
|
Öffnet eine |
|
Strg+S |
|
Speichert das Modell auf der Festplatte als |
|
Strg+Shift+S |
|
Speichert das Modell auf der Festplatte als neue |
|
|
Bettet die Modelldatei in die Projektdatei ein und macht sie bei der Weitergabe der Projektdatei verfügbar. |
|
|
|
Eine Schnittstelle zur Dokumentation des Modells, der Algorithmen, der Parameter und Ausgaben sowie des Autors und der Versionierung |
|
|
|
Speichert den grafischen Entwurf des Modells in einem Bilddateiformat (zu Illustrationszwecken) |
|
|
Speichert den grafischen Entwurf des Modells in einem |
||
|
Speichert den grafischen Entwurf des Modells in einem |
||
|
|
Erzeugt eine Python-Skriptdatei mit den Anweisungen für das Modell |


23.5.1.2. Bearbeiten-Menü
Bezeichnung |
Tastenkürzel |
Navigation Toolbar |
Beschreibung |
|---|---|---|---|
|
Strg+A |
Wählt alle Modellkomponenten im Designer aus |
|
Gewählte Komponenten auf Gitter einrasten |
rastet die Elemente ein und richtet sie in einem Raster aus |
||
|
Strg+Y |
|
Rückgängig machen der zuletzt abgebrochenen Aktion. Siehe auch das Undo/Redo Bedienfeld. |
|
Strg+Z |
|
Macht die vorherige Änderung rückgängig. Siehe auch das Undo/Redo Bedienfeld. |
|
Strg+X |
Schneidet eine Auswahl von Komponenten aus dem Modell aus. |
|
|
Strg+C |
Kopiert eine Auswahl von Komponenten aus dem Modell. |
|
|
Strg+V |
Fügt eine ausgeschnittene oder kopierte Auswahl von Komponenten aus einem Modell in ein anderes oder innerhalb desselben Modells ein. Die ausgewählten Komponenten behalten ihre ursprünglichen Eigenschaften und Kommentare bei. |
|
|
Entf |
Entfernt eine Komponente aus dem Modell. |
|
Gruppenrahmen hinzufügen |
Fügt einen Rahmen im Hintergrund zusammengehöriger Komponenten hinzu, um diese visuell zu gruppieren. Besonders nützlich bei großen Modellen, um den Arbeitsablauf übersichtlich zu halten. |


23.5.1.3. Menü Ansicht
Bezeichnung |
Tastenkürzel |
Navigation Toolbar |
Beschreibung |
|---|---|---|---|
Zoomt auf den Umfang des ausgewählten Gruppenrahmens |
|||
|
Strg++ |
|
|
|
Strg+- |
|
|
|
Strg+1 |
|
|
|
Strg+0 |
|
Zeigt alle Komponenten im Darstellungsbereich des Designers an |
|
Zeigt Kommentare zu jedem Algorithmus oder jeder Eingabe im Modelldesigner an |
||
|
|||
|
Strg+Tab |
Schaltet die Bedienfelder im Designer ein oder aus |


23.5.1.4. Bedienfelder
Der linke Teil des Fensters ist ein Bereich mit fünf Bedienfeldern, mit denen Sie dem Modell neue Elemente hinzufügen können:
Eingaben: alle Eingabeparameter, die Ihr Modell beeinflussen könnten
Toolbox: here you can find available Processing algorithms. It also includes input parameters. Use Search… box to find algorithms or inputs.
Modell-Eigenschaften: geben Sie den Namen (erforderlich) des Modells und die Gruppe an, in der es in der Verarbeitungs-Werkzeugkiste angezeigt wird
Variablen: Modelle können spezielle Variablen enthalten, die eindeutig und nur für sie verfügbar sind. Auf diese Variablen kann mit jedem im Modell verwendeten Ausdruck zugegriffen werden. Sie sind nützlich, um Algorithmen innerhalb eines Modells zu steuern und mehrere Aspekte des Modells durch Änderung einer einzigen Variable zu kontrollieren. Die Variablen können im Bedienfeld Variablen eingesehen und geändert werden.
Rücknahmeprotokoll: Dieses Bedienfeld registriert alles, was im Modellierer passiert, und macht es einfach, Dinge rückgängig zu machen, die man falsch gemacht hat.
23.5.1.5. Zu den verfügbaren Algorithmen
Some algorithms that can be executed from the do not appear in the list of available algorithms when you are designing a model. To be included in a model, an algorithm must have the correct semantic. If an algorithm does not have such a well-defined semantic (for instance, if the number of output layers cannot be known in advance), then it is not possible to use it within a model, and it will not appear in the list of algorithms that you can find in the modeler dialog. On the other hand some algorithms are specific to the modeler. Those algorithms are located within the group ‚Modeler Tools‘.
23.5.2. Ein Modell erstellen
Das Erstellen eines Modells beinhaltet zwei grundlegende Schritte:
Definition von erforderlichen Eingaben. Diese Eingaben werden dem Paramterfenster hinzugefügt, sodass der Anwender Ihre Werte einstellen kann, wenn er das Modell ausführt. Das Modell selber ist ein Algorithmus, also wird das Parameterfenster automatisch erstellt, so wie es mit allen Algorithmen, die in der Verarbeitungsumgebung zur Verfügung stehen, passiert.
Definition des Arbeitsablaufs. Der Arbeitsablauf wird definiert, indem Algorithmen hinzugefügt werden. In diesen wird festgelegt, wie sie die definierten Eingaben oder die von anderen Algorithmen im Modell erzeugten Ausgaben verwenden.
23.5.2.1. Definition von Eingaben
The first step is to define the inputs for the model. They are found in the Inputs panel on the left side of the modeler window. Hovering with the mouse over the inputs will show a tooltip with additional information. For a full list of available parameters in modeler and their correspondence for scripting, please read Eingabe- und Ausgabetypen für Verarbeitungsalgorithmen.
Wenn Sie auf ein Element doppelklicken, wird ein Dialog angezeigt, in dem Sie seine Eigenschaften definieren können. Je nach Parameter enthält der Dialog mindestens ein Grundelement (die Beschreibung, die der Benutzer bei der Ausführung des Modells sieht). Die Angabe einer Beschreibung ist Pflicht. Wenn Sie einen numerischen Wert hinzufügen, wie in der nächsten Abbildung zu sehen ist, müssen Sie, zusätzlich zur Beschreibung des Parameters, einen Standardwert und den Bereich der gültigen Werte festlegen.
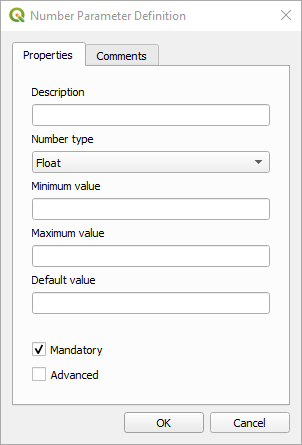
Abb. 23.19 Definition der Modellparameter
Sie können Ihre Eingabe als zwingend für Ihr Modell definieren, indem Sie das Kontrollkästchen  Zwingend erforderlich ankreuzen. Durch Ankreuzen des Kontrollkästchens
  Erweitert können Sie die Eingabe so einstellen, dass sie sich im Abschnitt Erweitert befindet. Dies ist besonders nützlich, wenn das Modell viele Parameter hat und einige davon nicht trivial sind, Sie diese aber dennoch wählen möchten.
Für jede hinzugefügte Eingabe wird der Modellierungsebene ein neues Element hinzugefügt.

Abb. 23.20 Darstellungen von Modellparameter
Sie können Eingaben auch hinzufügen, indem Sie den Eingabetyp aus der Liste an die gewünschten Stelle im Modellierungsfenster ziehen. Wenn Sie einen Parameter einer bestehenden Eingabe ändern möchten, doppelklicken Sie einfach darauf, und es erscheint der gleiche Dialog wie bei der Erstellung.
Wenn Sie ein Modell innerhalb eines anderen Modells verwenden, werden die erforderlichen Ein- und Ausgaben in der Modellansicht angezeigt.
23.5.2.2. Definition des Arbeitsablaufs
Im folgenden Beispiel werden wir zwei Eingaben und zwei Algorithmen hinzufügen. Ziel des Modells ist es, die Höhenwerte eines DEM-Raster-Layers mit Hilfe des Algorithmus Drape in einen Layer mit Linien zu kopieren und dann die Gesamtsteigung des Layers mit Hilfe des Algorithmus Climb Along Line zu berechnen.
Auf der Registerkarte Eingaben wählen Sie die beiden Eingaben als Vektorlayer für die Linie und Rasterlayer für das DEM. Wir sind nun bereit, die Algorithmen zum Workflow hinzuzufügen.
Algorithms can be found in the Toolbox panel, grouped much in the same way as they are in the Processing toolbox.
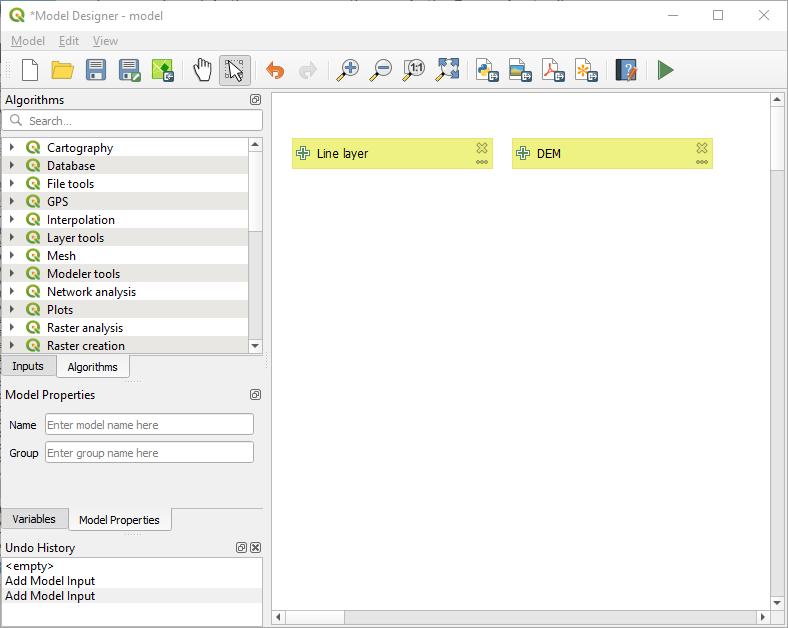
Abb. 23.21 Modell-Eingaben
Um einen Algorithmus zu einem Modell hinzuzufügen, doppelklicken Sie auf seinen Namen oder ziehen Sie ihn per Drag & Drop, genau wie bei den Eingaben. Wie bei den Eingaben können Sie die Beschreibung des Algorithmus ändern und einen Kommentar hinzufügen. Beim Hinzufügen eines Algorithmus erscheint ein Ausführungsdialog, dessen Inhalt dem des Bedienfelds ähnelt, das beim Ausführen des Algorithmus aus der Toolbox angezeigt wird. Die folgende Abbildung zeigt die beiden Algorithmus-Dialoge Drapieren (Z-Wert von Raster übernehmen) und Entlang Linie klettern.
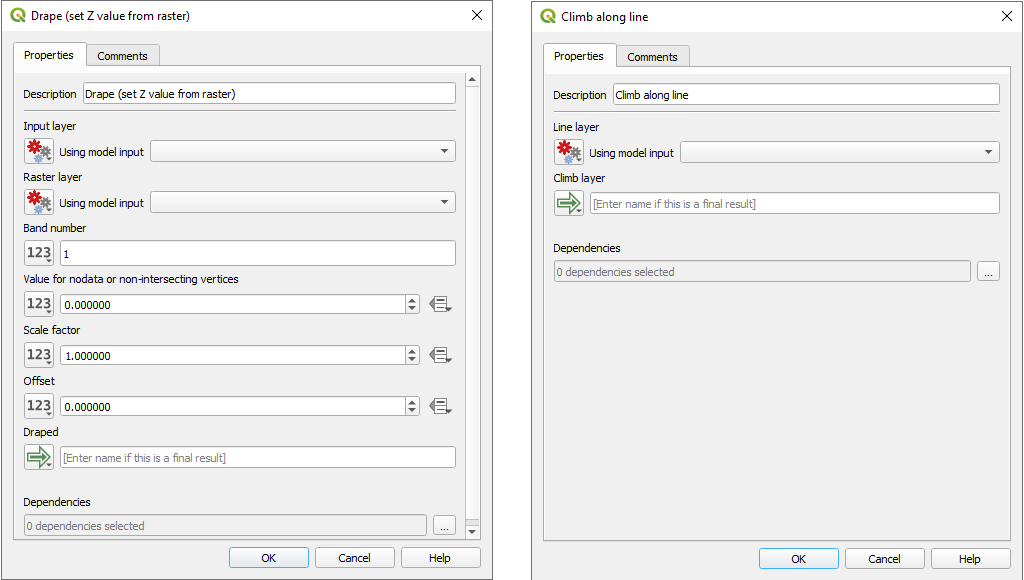
Abb. 23.22 Modell-Algorithmus-Parameter
Wie Sie sehen können, gibt es jedoch einige Unterschiede. Neben jedem Parameter befindet sich ein Dropdown-Menü, mit dem Sie festlegen können, wie der Parameter während des Arbeitsablaufs verwendet werden soll:
 Wert: erlaubt es Ihnen, dem Parameter einen statischen Wert zuzuweisen. Abhängig vom Parametertyp können Sie mit dem Widget eine Zahl (
5,0), eine Zeichenkette (meinText) eingeben, im QGIS-Projekt oder aus einem Ordner geladene Layer auswählen, Elemente aus einer Liste auswählen, … Vorberechneter Wert: öffnet das Dialogfeld Ausdruckseditor und ermöglicht es Ihnen, einen Ausdruck zu definieren, um den Parameter zu füllen. Modelleingaben sowie einige andere Layer-Statistiken stehen als Variablen zur Verfügung und werden oben im Dialogfeld „Suche“ des Ausdruckseditors aufgelistet. Der Ausdruck wird einmal ausgewertet, bevor der untergeordnete Algorithmus ausgeführt wird, und während der Ausführung dieses Algorithmus verwendet.
 Modell Eingabe: ermöglicht die Verwendung einer Eingabe, die dem Modell als Parameter hinzugefügt wurde. Wenn Sie auf diese Option klicken, werden alle geeigneten Eingaben für den Parameter aufgelistet.
 Algorithmus Ausgabe: erlaubt es, die Ausgabe eines anderen Algorithmus als Eingabe des aktuellen Algorithmus zu verwenden. Wie bei den Modelleingaben listet diese Option alle geeigneten Eingaben für den Parameter auf.
Der Ausgabeparameter verfügt ebenfalls über die oben genannten Optionen in seinem Dropdown-Menü:
Hinzufügen statischer Ausgaben für untergeordnete Algorithmen, z. B. Speichern der Ausgabe eines untergeordneten Algorithmus in einem vordefinierten Geopaket oder Postgres Layer
Verwendung ausdrucksbasierter Ausgabewerte für untergeordnete Algorithmen, z. B. automatische Generierung eines Dateinamens auf der Grundlage des heutigen Datums und Speichern der Ausgaben in dieser Datei
eine Modelleingabe verwenden, z. B. die Modelleingabe Datei/Ordner, um eine Ausgabedatei oder einen Ordner anzugeben
eine andere Algorithmusausgabe verwenden, z. B. die Ausgabe des Algorithmus Verzeichnis erstellen (aus Modellierwerkzeuge)
an additional
 Model Output option makes the output of the algorithm available in the model.
If a layer generated by the algorithm is only to be used as input to another algorithm,
don’t edit that text box.
Model Output option makes the output of the algorithm available in the model.
If a layer generated by the algorithm is only to be used as input to another algorithm,
don’t edit that text box.
In der folgenden Abbildung sehen Sie die beiden als
Modelleingabedefinierten Eingabeparameter und den temporären Output Layer: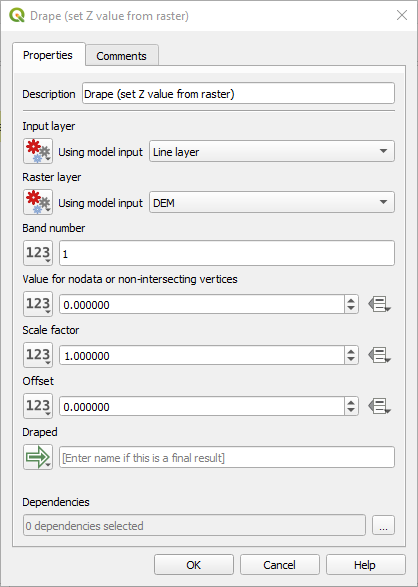
Abb. 23.23 Algorithmus Eingabe- und Ausgabeparameter
Sie finden auch einen zusätzlichen Parameter namens Abhängigkeiten, der beim Aufruf des Algorithmus aus der Toolbox nicht verfügbar ist. Mit diesem Parameter können Sie die Reihenfolge festlegen, in der die Algorithmen ausgeführt werden, indem Sie einen Algorithmus ausdrücklich als Elternteil des aktuellen Algorithmus definieren. Dadurch wird der übergeordnete Algorithmus vor dem aktuellen Algorithmus ausgeführt.
When you use the output of a previous algorithm as the input of your algorithm, that implicitly sets the previous algorithm as parent of the current one (and places the corresponding arrow in the modeler canvas). However, in some cases an algorithm might depend on another one even if it does not use any output object from it (for instance, an algorithm that executes a SQL sentence on a PostgreSQL database and another one that imports a layer into that same database). In that case, just select the previous algorithm in the Dependencies parameter and they will be executed in the correct order.
Sobald allen Parametern gültige Werte zugewiesen wurden, klicken Sie auf OK und der Algorithmus wird der Oberfläche hinzugefügt. Er wird mit den Elementen auf der Oberfläche (Algorithmen oder Eingaben) verknüpft, die Objekte liefern, die als Eingaben für den Algorithmus verwendet werden.
Elements can be dragged to a different position on the canvas using the
 Select/Move/Link Item tool.
This is useful to make the structure of the model clearer and more intuitive.
You can also resize the elements, grasping their border.
This is particularly useful if the description of the input or algorithm is long.
With option checked, items resizing
or displacement can be bound to a virtual grid, for a more visually structured
algorithm design.
Select/Move/Link Item tool.
This is useful to make the structure of the model clearer and more intuitive.
You can also resize the elements, grasping their border.
This is particularly useful if the description of the input or algorithm is long.
With option checked, items resizing
or displacement can be bound to a virtual grid, for a more visually structured
algorithm design.
Die Verknüpfungen zwischen den Elementen werden automatisch aktualisiert, und am oberen und unteren Rand jedes Algorithmus befindet sich eine Schaltfläche +. Wenn Sie auf die Schaltfläche klicken, werden alle Eingänge und Ausgänge des Algorithmus aufgelistet, so dass Sie sich einen schnellen Überblick verschaffen können.
You can create or remove connections between model components using an interactive drag-and-drop interface. Each parameter and algorithm item on the model canvas includes small circular sockets, output sockets on the right and input sockets on the left. To connect components, click and drag from an output socket (either from a model input or an algorithm) to an input socket on another algorithm. A visual edge follows the cursor and completes the connection when released. To remove a connection, drag the edge away from the input socket. The algorithm dialogs update automatically to reflect changes made using the drag-and-drop interface.
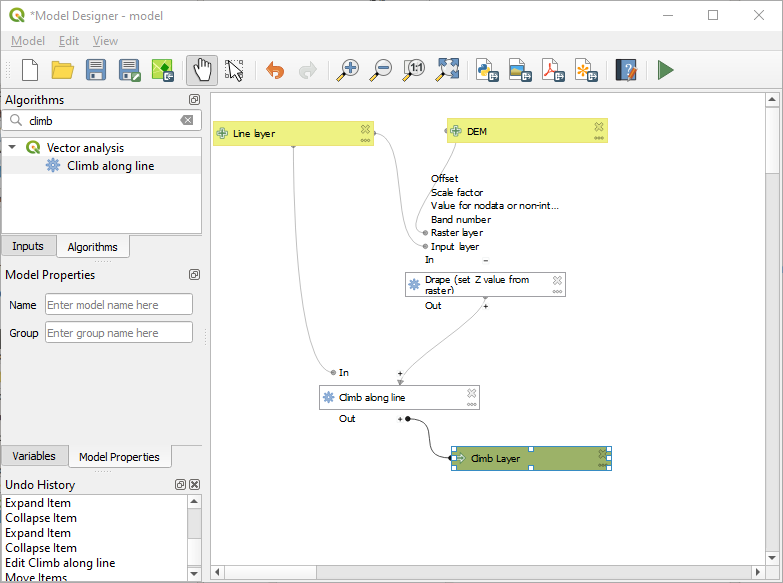
Abb. 23.24 Ein komplettes Modell
With the tool, you can add a draggable box to the canvas. This feature is very useful in big models to group related elements in the modeler canvas and to keep the workflow clean. For example we might group together all the algorithms of the example:
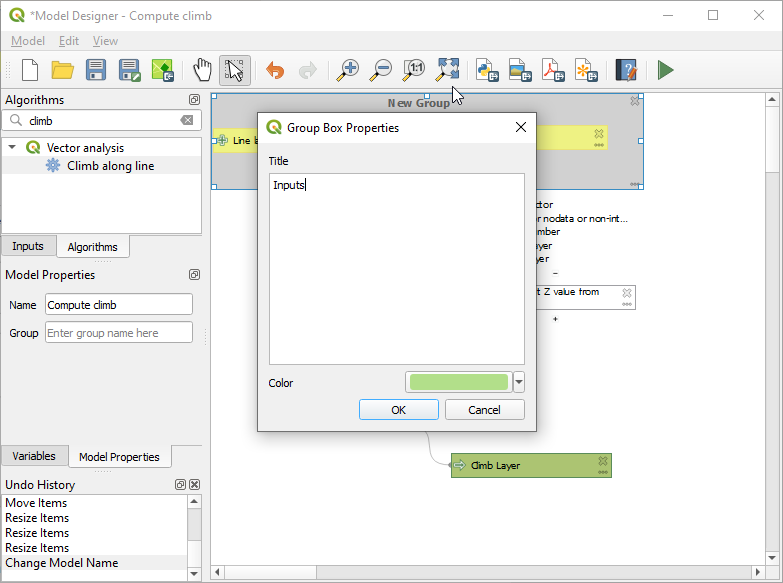
Abb. 23.25 Modell Gruppenrahmen
Sie können den Namen und die Farbe der Boxen ändern. Gruppenrahmen sind sehr nützlich, wenn sie zusammen mit dem Werkzeug verwendet werden, mit dem Sie auf einen bestimmten Teil des Modells zoomen können. Sie können auch mit dem Mausrad hinein- und herauszoomen.
Sie können die Reihenfolge der Eingaben und deren Auflistung im Hauptdialog des Modells ändern. Am unteren Ende des Bedienfeldes Eingaben finden Sie die Schaltfläche Modell-Eingaben neu ordnen. Wenn Sie darauf klicken, öffnet sich ein neuer Dialog, in dem Sie die Reihenfolge der Eingaben ändern können:
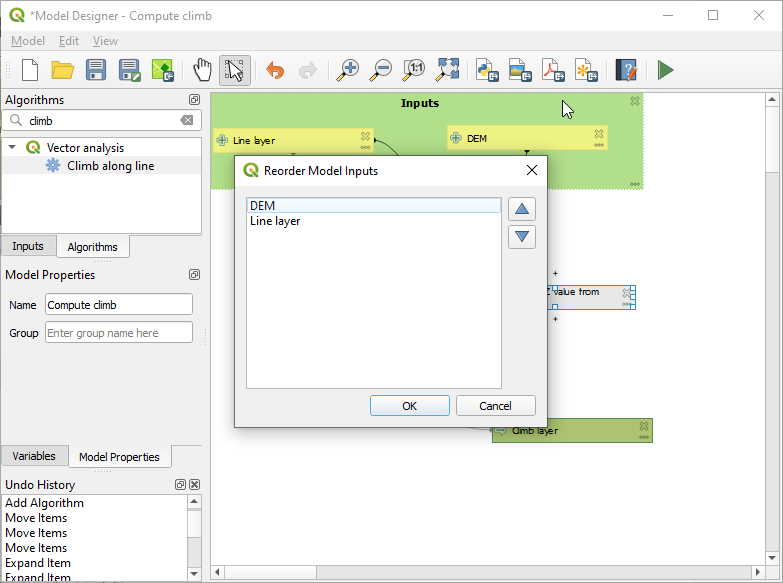
Abb. 23.26 Modell-Eingaben neu ordnen
Es besteht auch die Möglichkeit, eine bestimmte Reihenfolge festzulegen, die die Ausgaben des Modells beim Laden der Ergebnisse in ein Projekt verwenden müssen. Dadurch kann der Modellersteller sicherstellen, dass die Layer in der Kartenansicht logisch angeordnet sind, wenn er ein Modell ausführt, z. B. indem er einen Vektorlayer über einen Rasterlayer oder einen Punktelayer über einen Polygonlayer legt. Der Modellersteller kann auch einen optionalen „Gruppennamen“ für die Ausgaben festlegen, um die Ausgaben innerhalb des Layer-Baums automatisch zu gruppieren, indem er einen neuen Gruppennamen verwendet oder sie einer bestehenden Gruppe hinzufügt. Im Modell-Menü finden Sie den Eintrag Outputlayern neu ordnen .... Wenn Sie darauf klicken, öffnet sich ein neues Dialogfenster, in dem Sie die Reihenfolge der Output Layer ändern können:
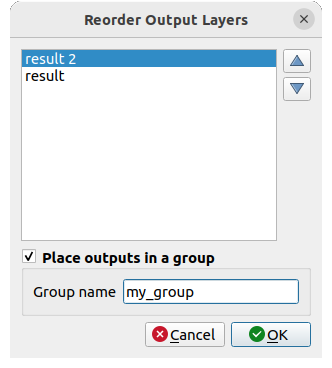
Abb. 23.27 Ausgabelayer neu ordnen
Kommentare können auch zu Eingaben oder Algorithmen im Modellierer hinzugefügt werden. Dies kann über die Registerkarte Kommentare des Elements oder durch einen Rechtsklick erfolgen. In der gleichen Registerkarte kann eine Farbe für einzelne Modellkommentare manuell eingestellt werden. Kommentare sind nur in der Kartenansicht des Modellierers sichtbar und nicht im Dialog des endgültigen Algorithmus; sie können durch Deaktivieren von ausgeblendet werden.
Ihr Modell kann auf verschiedene Arten ausgeführt werden:
Sie können das gesamte Modell ausführen, indem Sie in der Symbolleiste auf
 Modell ausführen… klicken, mit der rechten Maustaste auf das Modell im Browser-Bedienfeld oder klicken: Wenn Sie das Modell mit dem Editor ausführen, werden alle nicht standardmäßigen Werte in den Eingaben gespeichert. Das bedeutet, dass bei einer späteren Ausführung des Modells über den Editor diese Werte bei jedem weiteren Lauf bereits im Dialogfeld vorausgefüllt sind.
Sie können Elemente des Modells auswählen und nur diesen Teil des Modells ausführen: Klicken Sie auf die Option
 Ausgewählte Schritte ausführen… im Menü oder im Kontextmenü eines ausgewählten Algorithmus. Der Anfangszustand wird aus früheren Ausführungen des Modells über den Editor übernommen, sodass die Ergebnisse aus früheren Schritten des Modells für die ausgewählten Schritte verfügbar sind. Auf diese Weise können Teile eines großen Modells korrigiert werden, ohne dass das gesamte Modell ständig zum Testen ausgeführt werden muss. Dies ist besonders nützlich, wenn frühere Schritte im Modell zeitaufwändig sind.
Sie können einen Teil des Modells ausführen, beginnend mit einem bestimmten Algorithmus: Klicken Sie mit der rechten Maustaste auf den Algorithmus und wählen Sie
Von hier aus ausführen…. Ebenso werden Werte aus früheren Ausführungen übernommen.Um den Algorithmus aus der Processing Toolbox verwenden zu können, muss er gespeichert und der Modeller-Dialog geschlossen werden, damit die Toolbox ihren Inhalt aktualisieren kann.
23.5.2.3. Ihr Modell dokumentieren
Sie müssen Ihr Modell dokumentieren, und das können Sie direkt im Modellierer tun. Klicken Sie auf die Schaltfläche  Modellhilfe bearbeiten, und ein Dialogfeld wie das folgende wird angezeigt.
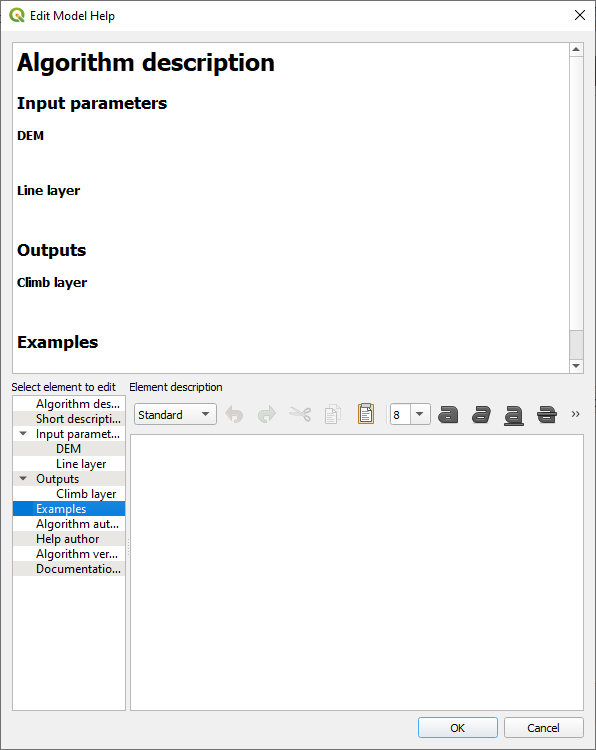
Abb. 23.28 Hilfe bearbeiten
Auf der rechten Seite sehen Sie eine einfache HTML-Seite, die anhand der Beschreibung der Eingabeparameter und der Ergebnisse des Algorithmus erstellt wurde, zusammen mit einigen zusätzlichen Elementen wie einer allgemeinen Beschreibung des Modells oder seines Autors. Außerdem gibt es einen Abschnitt mit Beispielen, in den Sie Ihre eigenen Beispiele eingeben können, um die Verwendung des Modells zu erläutern. Wenn Sie den Hilfe-Editor zum ersten Mal öffnen, sind alle diese Beschreibungen leer, aber Sie können sie mithilfe der Elemente auf der linken Seite des Dialogs bearbeiten. Wählen Sie ein Element im oberen Teil aus und schreiben Sie die Beschreibung in das Textfeld darunter.
Modell-Hilfe wird als Teil eines Modells selbst gespeichert.
23.5.3. Speichern und laden von Modellen
23.5.3.1. Speicherung von Modellen
Verwenden Sie die Schaltfläche  Modell speichern, um das aktuelle Modell zu speichern und die Schaltfläche
  Modell öffnen, um ein zuvor gespeichertes Modell zu öffnen. Modelle werden mit der Erweiterung
 .model3 gespeichert. Wenn das Modell bereits über das Modellierfenster gespeichert wurde, werden Sie nicht zur Eingabe eines Dateinamens aufgefordert. Da bereits eine Datei mit dem Modell verknüpft ist, wird diese Datei für nachfolgende Speicherungen verwendet.
Bevor Sie ein Modell speichern, müssen Sie in den Textfeldern im oberen Teil des Fensters einen Namen und eine Gruppe für das Modell eingeben.
Modelle, die im Ordner models gespeichert sind (Standardordner, wenn Sie zur Eingabe eines Dateinamens zum Speichern des Modells aufgefordert werden), erscheinen in der Toolbox in der entsprechenden Rubrik. Wenn die Werkzeugkiste aufgerufen wird, durchsucht sie den Ordner models nach Dateien mit der Erweiterung .model3 und lädt die darin enthaltenen Modelle. Da ein Modell selbst ein Algorithmus ist, kann es wie jeder andere Algorithmus zur Werkzeugkiste hinzugefügt werden.
Modelle können auch innerhalb des Projekts mit der Schaltfläche  Modell im Projekt speichern gespeichert werden. Modelle, die mit dieser Methode gespeichert werden, werden nicht als :file:``.model3` Dateien auf die Platte geschrieben, sondern in die Projektdatei eingebettet.
Projektmodelle sind im Menü  Projektmodelle der Toolbox und im Menüpunkt verfügbar.
Die Verarbeitungsmodellierung kann im Verarbeitungskonfigurationsdialog in der Modelle Gruppe eingestellt werden.
Modelle, die aus dem Ordner models geladen wurden, erscheinen nicht nur in der Werkzeugkiste, sondern auch in der Algorithmenliste im Reiter Algorithms des Modellierfensters. Das bedeutet, dass Sie ein Modell als Teil eines größeren Modells einbinden können, genau wie andere Algorithmen.
Die Modelle werden im Browser Bedienfeld angezeigt und können von dort aus gestartet werden.
23.5.3.2. Exportieren eines Modells als Python Skript
Wie wir in einem späteren Kapitel sehen werden, können Processing-Algorithmen von der QGIS-Python-Konsole aus aufgerufen werden, und neue Processing-Algorithmen können mit Python erstellt werden. Eine schnelle Möglichkeit, ein solches Python-Skript zu erstellen, besteht darin, ein Modell zu erstellen und es dann als Python-Datei zu exportieren.
Klicken Sie dazu auf die Schaltfläche  Als PythonSkript exportieren… in der Kartenansicht des Modells oder klicken Sie mit der rechten Maustaste auf den Namen des Modells in der Werkzeugkiste und wählen Sie Modell als Python-Algorithmus exportieren….
23.5.3.3. Exportieren eines Modells als Bild, PDF oder SVG-Datei
Ein Modell kann auch als Bild, SVG oder PDF (für Illustrationszwecke) exportiert werden, indem Sie auf  Als Bild exportieren,
  Als PDF exportieren oder
  Als SVG exportieren klicken.
23.5.4. Ein Modell bearbeiten
Sie können das Modell, das Sie gerade erstellen, bearbeiten und dabei den Workflow und die Beziehungen zwischen den Algorithmen und Eingaben, die das Modell definieren, anpassen.
Sie können auch ein vorhandenes Modell bearbeiten, indem Sie im Browser-Panel die Option Modell bearbeiten… auswählen.
Wenn Sie mit der rechten Maustaste auf einen Algorithmus im Darstellungsbereich klicken, sehen Sie ein Kontextmenü wie das folgende:
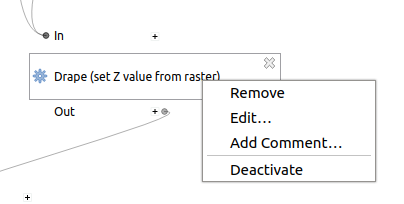
Abb. 23.29 Rechtsklick auf ein Modell-Element
Optionen für Ausführen eines Teils des Modells wurden bereits zuvor vorgestellt.
Durch Auswahl der Option Entfernen wird der ausgewählte Algorithmus entfernt. Ein Algorithmus kann nur entfernt werden, wenn keine anderen Algorithmen von ihm abhängig sind. Das heißt, wenn keine Ausgabe des Algorithmus als Eingabe in einem anderen Algorithmus verwendet wird.
Wenn Sie die Option Bearbeiten… auswählen, wird das Parameterdialogfeld angezeigt, in dem Sie die Eingaben und Parameterwerte ändern können. Nicht alle im Modell verfügbaren Eingabeelemente werden als verfügbare Eingaben angezeigt. Layer oder Werte, die in einem fortgeschritteneren Schritt des vom Modell definierten Workflows generiert werden, sind nicht verfügbar, wenn sie zirkuläre Abhängigkeiten verursachen.
Wählen Sie die neuen Werte aus und klicken Sie wie gewohnt auf die Schaltfläche OK. Die Verbindungen zwischen den Modellelementen ändern sich im Darstellungsbereich entsprechend.
Mit Kommentar hinzufügen… können Sie dem Algorithmus einen Kommentar hinzufügen, um das Verhalten besser zu beschreiben.
Bemerkung
Durch einen Rechtsklick auf einen Eingabeparameter können Sie außerdem Entfernen, Bearbeiten… und Kommentar hinzufügen… auswählen.
Ein Modell kann teilweise ausgeführt werden, indem einige seiner Algorithmen deaktiviert werden. Wählen Sie dazu die Option Abschalten im Kontextmenü, das erscheint, wenn Sie mit der rechten Maustaste auf ein Algorithmenelement klicken. Der ausgewählte Algorithmus und alle Algorithmen im Modell, die von ihm abhängen, werden grau dargestellt und nicht als Teil des Modells ausgeführt.

Abb. 23.30 Modell mit deaktiviertem Algorithmus
Wenn Sie mit der rechten Maustaste auf einen nicht aktiven Algorithmus klicken, wird die Menüoption Aktivieren angezeigt, mit der Sie ihn wieder aktivieren können.
Wenn Sie ein Modell über den Designer bearbeiten (und nachdem Sie dieses Modell ausgeführt haben), können Sie mit einem Rechtsklick auf einen beliebigen untergeordneten Schritt im Modell die Option
 Ausgabe-Layer anzeigen auswählen. Dadurch werden die Ausgabe-Layer dieses Schritts als neue Layer zum aktuellen QGIS-Projekt hinzugefügt.
Diese Aktion ist für alle untergeordneten Algorithmen im Modell verfügbar, auch wenn das Modell nicht so konfiguriert ist, dass die Ausgaben dieser untergeordneten Elemente als Modellausgaben verwendet werden. Dies ist als hilfreiche Debugging-Aktion konzipiert. Wenn ein Modell fehlschlägt (oder unerwartete Ergebnisse liefert), können Sie das Modell durchlaufen und die Ausgaben für vermutlich problematische Schritte anzeigen. Dadurch müssen Sie keine temporären Ausgaben zu einem Modell hinzufügen und es zum Testen erneut ausführen.
Darüber hinaus ist diese Aktion nach dem Ausführen des Modells immer verfügbar, auch wenn das Modell selbst fehlgeschlagen ist (z. B. aufgrund eines falsch konfigurierten Schritts später im Modell).
Mit der Aktion Protokoll anzeigen können Sie das Protokoll für jeden untergeordneten Algorithmus anzeigen, nachdem Sie den Algorithmus-Dialog geschlossen haben.