중요
번역은 여러분이 참여할 수 있는 커뮤니티 활동입니다. 이 페이지는 현재 98.73% 번역되었습니다.
18.2. 수업: QGIS에서 DB 관리자를 통해 공간 데이터베이스 작업하기
벌써 QGIS는 물론 다른 도구들을 통해 여러 가지 데이터베이스 작업을 수행하는 방법을 살펴보았습니다. 그러나 이제 그와 동일한 기능은 물론 관리 지향 도구들을 더 많이 제공하는 DB 관리자(DB Manager) 도구에 대해 배워볼 때입니다.
이 수업의 목표: QGIS DB 관리자를 사용해서 공간 데이터베이스와 쌍방향 작업하는 방법을 배우기.
18.2.1. ★☆☆ Follow Along: Managing PostgreSQL Databases with DB Manager
가장 먼저 메뉴에서 항목을 선택하거나 툴바에서  DB Manager 아이콘을 클릭해서 DB 관리자 인터페이스를 실행해야 합니다.
이전에 환경설정했던 연결들을 볼 수 있을 겁니다. myPG 부분에서 public 스키마를 펼치면 이전 수업들에서 작업했던 테이블들도 볼 수 있을 것입니다.
사용자 데이터베이스가 담고 있는 스키마에 대한 몇몇 메타데이터를 볼 수 있다는 사실을 알 수 있습니다.
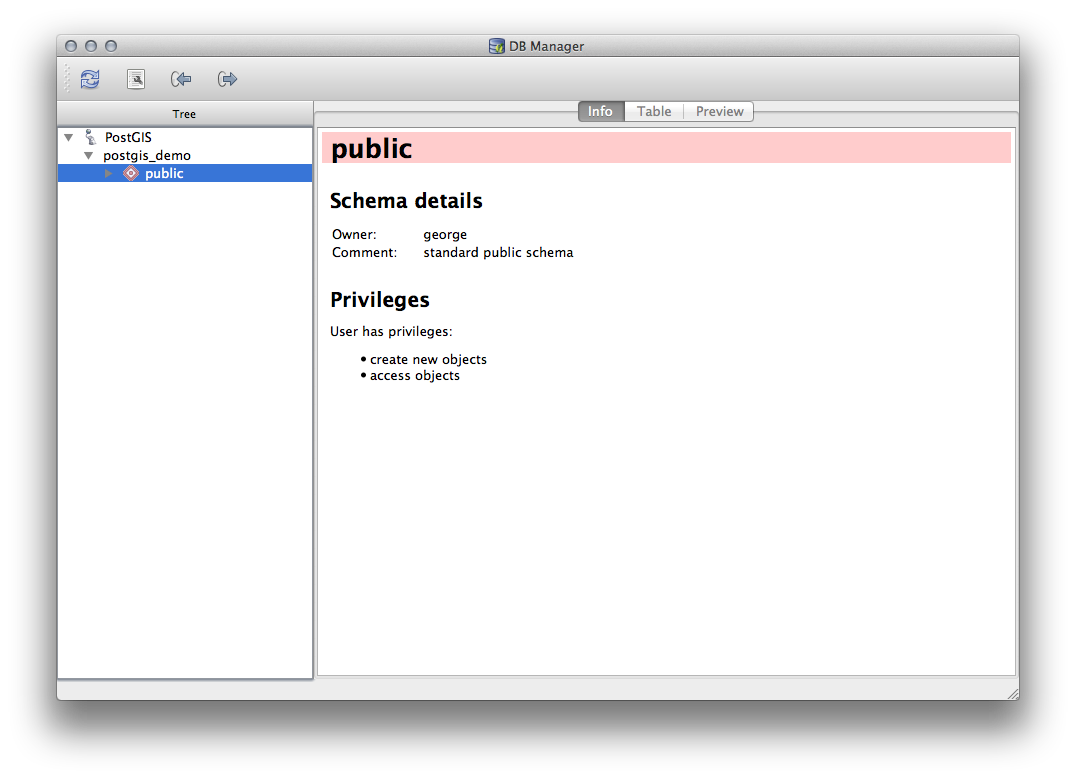
스키마란 PostgreSQL 데이터베이스에서 데이터 테이블 및 기타 객체들을 그룹화하는 방식이자 사용 권한 및 기타 제약 조건들을 담은 컨테이너입니다. PostgreSQL 스키마를 관리하는 것은 이 교재의 범위를 벗어나지만, 스키마에 대한 PostgreSQL 문서 에서 더 자세한 정보를 찾아볼 수 있습니다. DB 관리자를 사용해서 새 스키마를 생성할 수 있지만, 스키마를 효과적으로 관리하려면 pgAdmin III 같은 도구나 명령줄 인터페이스를 사용해야 할 것입니다.
사용자 데이터베이스 내부의 테이블을 관리하는 데에도 DB 관리자를 사용할 수 있습니다. 이미 명령줄에서 테이블을 생성하고 관리하는 다양한 방법을 배웠지만, 이제 DB 관리자에서 이런 작업을 하는 방법을 배워보겠습니다.
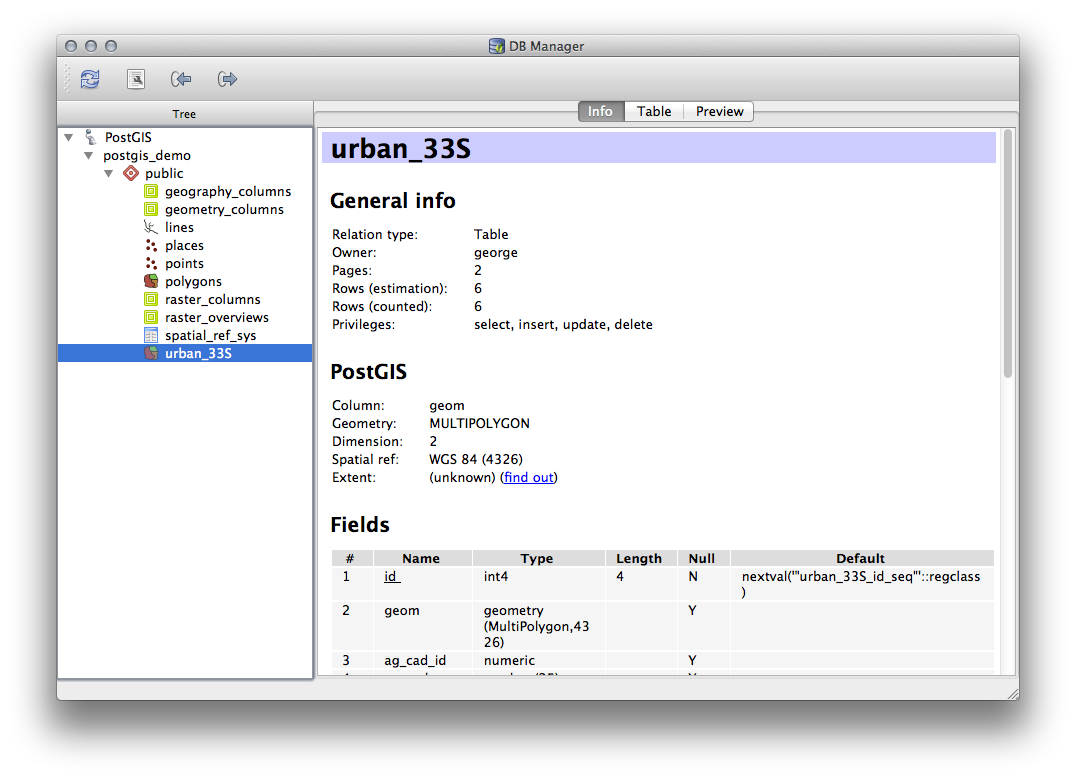
먼저 트리에서 테이블 이름을 클릭한 다음, Info 탭에서 테이블의 메타데이터를 살펴만 봐도 도움이 됩니다.
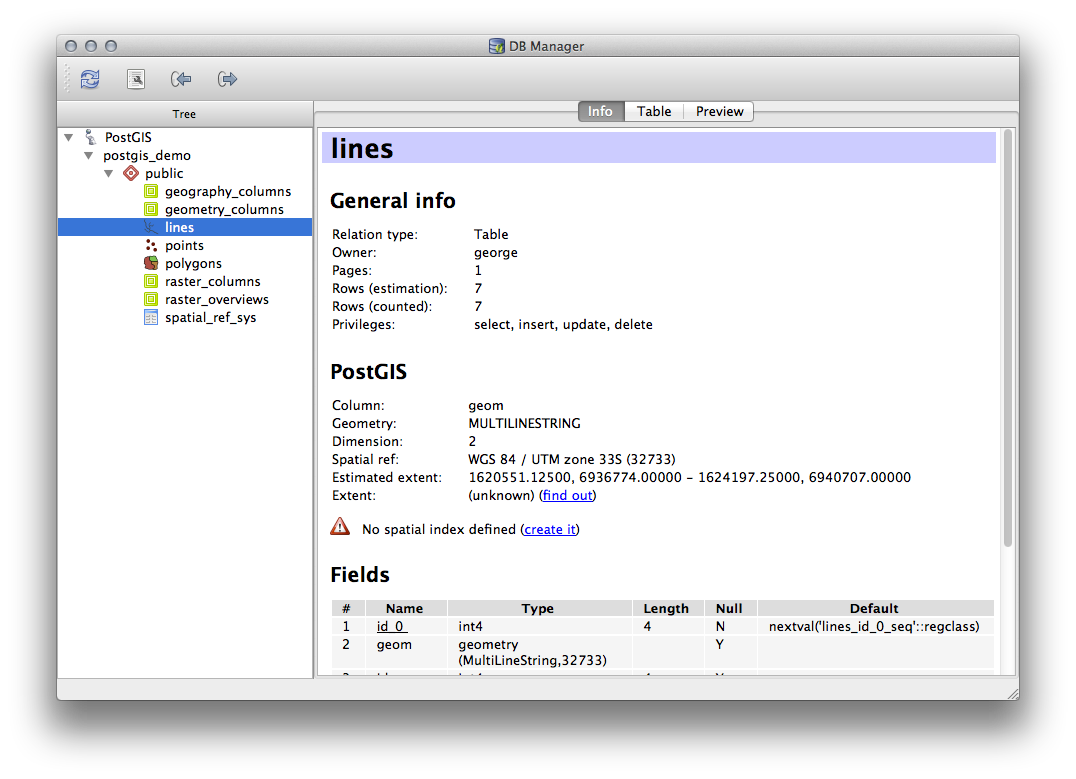
이 패널에서 테이블에 대한 General Info 는 물론 PostGIS 확장 프로그램이 도형 및 공간 참조 시스템에 대해 유지관리하고 있는 정보도 볼 수 있습니다.
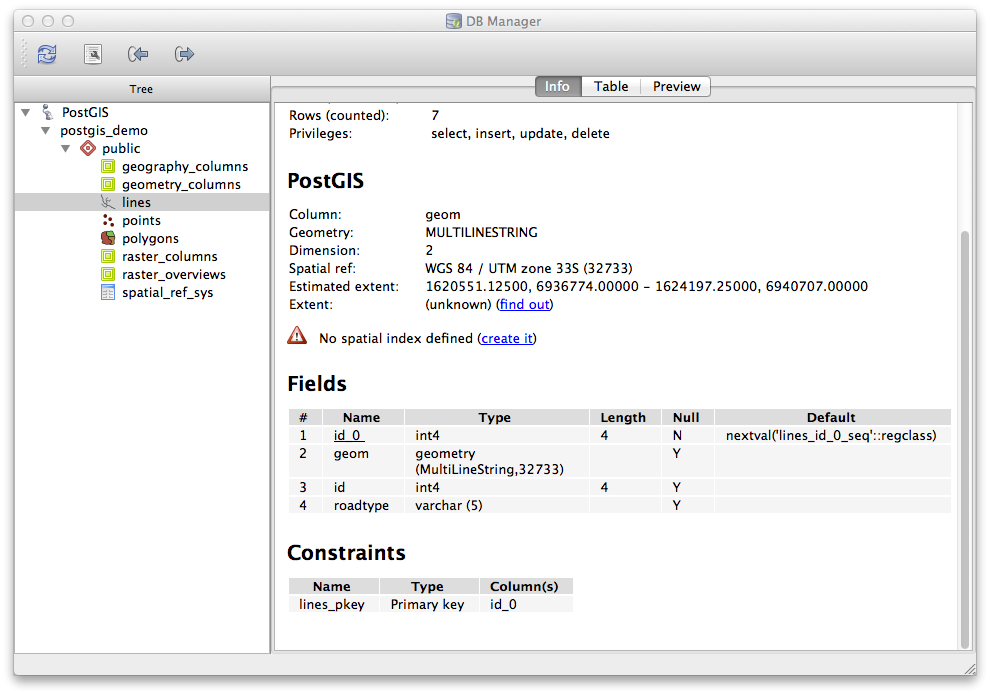
Info 탭을 아래로 스크롤해보면, 현재 보고 있는 테이블의 Fields, Constraints, Indexes 에 대한 자세한 정보를 볼 수 있습니다.
DB 관리자를 사용하면 레이어 트리에 있는 레이어의 속성 테이블을 보는 것과 동일한 방식으로 간단히 데이터베이스 내부의 레코드를 볼 수 있다는 것도 도움이 됩니다. Table 탭을 선택하면 데이터를 둘러볼 수 있습니다.
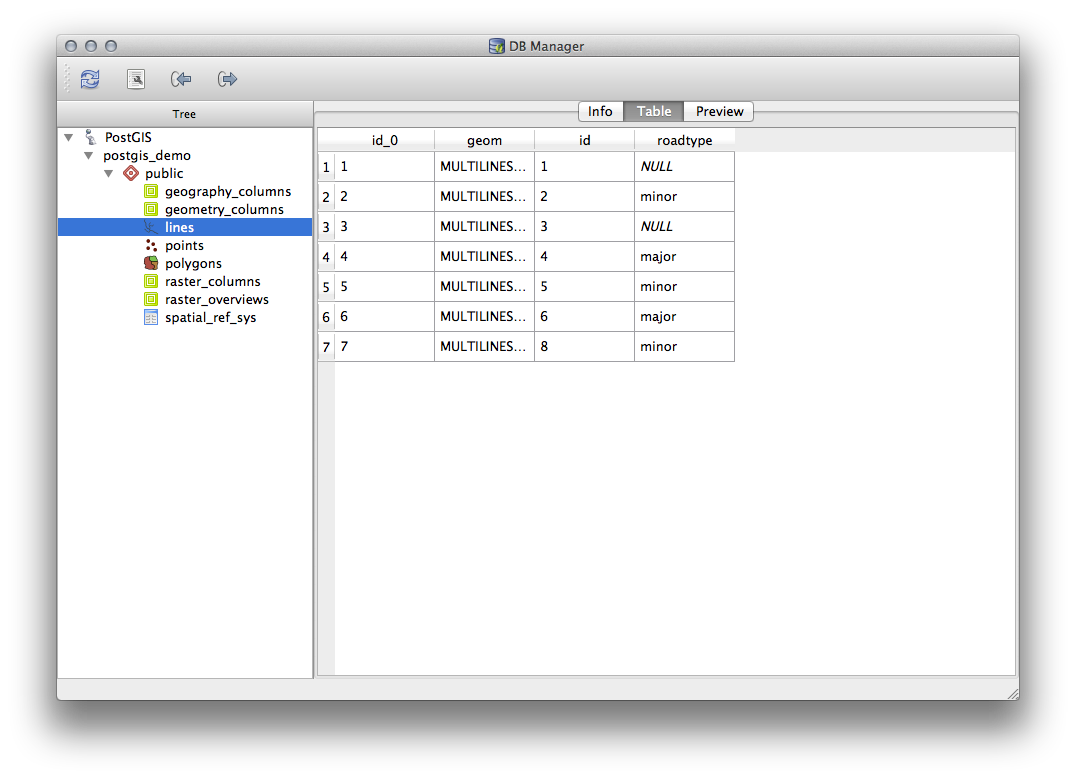
레이어의 데이터를 맵 프리뷰로 보여주는 Preview 탭도 있습니다.
트리에 있는 레이어를 오른쪽 클릭한 다음 Add to Canvas 를 선택하면 해당 레이어를 사용자 맵에 추가할 것입니다.
지금까지 데이터베이스의 스키마와 테이블의 메타데이터를 살펴보기만 했지만, 테이블을 수정하거나 새 열을 추가하려면 어떻게 해야 할까요? DB 관리자에서 직접 이런 작업을 할 수 있습니다.
트리에서 편집하고자 하는 테이블을 선택하십시오.
메뉴에서 항목을 선택해서 Table Properties 대화창을 여십시오.
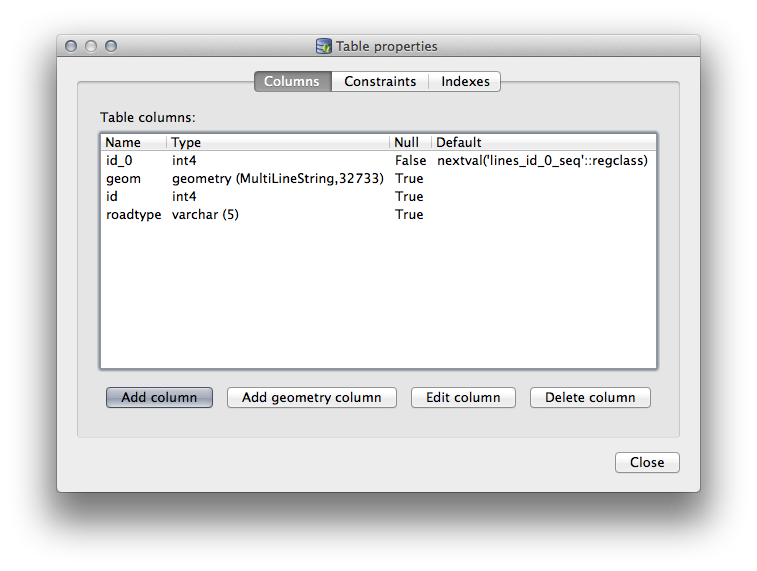
이 대화창에서 열을 추가하고, 도형 열을 추가하고, 기존 열을 편집하거나 완전히 삭제할 수 있습니다.
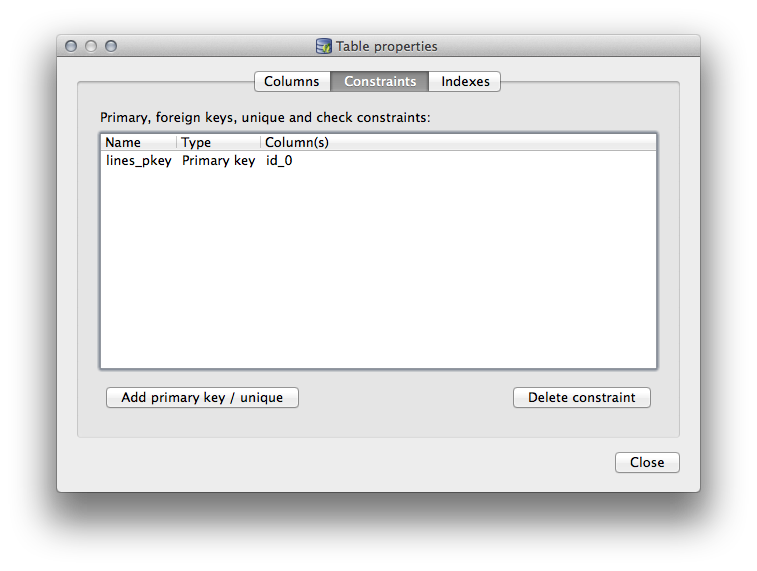
Constraints 탭에서 어떤 필드를 기본 키로 사용할지 또는 기존 제약 조건을 삭제할지 관리할 수 있습니다.
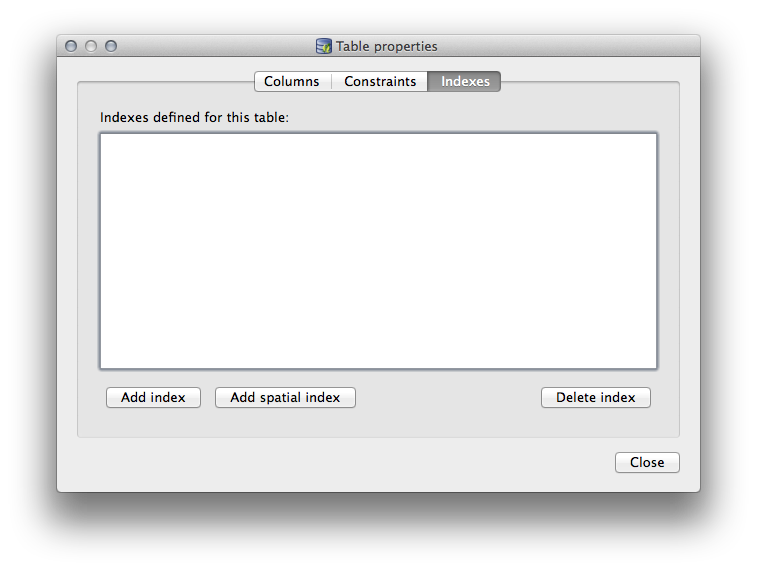
Indexes 탭에서 공간 인덱스 및 일반 인덱스 둘 다 추가하거나 삭제할 수 있습니다.
18.2.2. ★☆☆ 따라해보세요: 새 테이블 생성하기
이제 데이터베이스에 있는 기존 테이블을 작업하는 과정을 배웠으니, DB 관리자를 이용해서 새 테이블을 생성해봅시다.
이미 열려 있지 않다면 DB 관리자 창을 열고, 여러분의 데이터베이스의 기존 테이블 목록이 보일 때까지 트리를 펼치십시오.
메뉴의 항목을 선택해서 Create Table 대화창을 여십시오.
기본
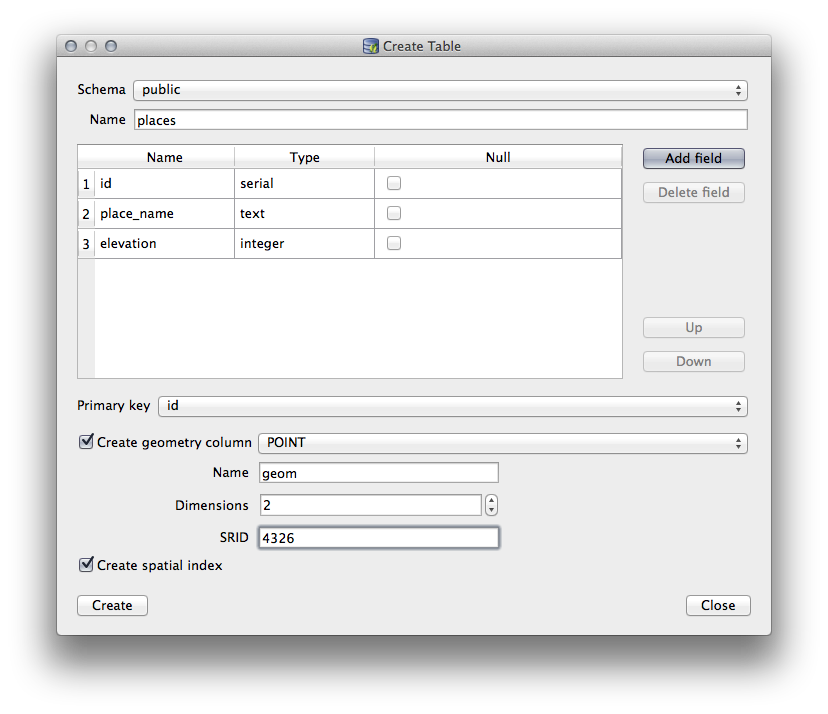
Public스키마를 사용하고 테이블 이름을places라고 지정하십시오.아래 그림처럼
id,place_name, 그리고elevation필드들을 추가하십시오.id필드가 기본 키로 설정되었는지 확인하십시오.Create geometry column 체크박스를 체크한 다음
POINT유형으로 설정되었는지 확인하고, 기본 이름인geom은 그대로 유지하고, SRID 를4326으로 지정하십시오.Create spatial index 체크박스를 체크한 다음, Create 를 클릭해서 테이블을 생성합니다.
테이블이 생성되었다고 알려주는 메시지를 닫고, Close 를 클릭해서 Create Table 대화창을 닫으십시오.
이제 DB 관리자에서 새 테이블을 검사해보면 물론 어떤 데이터도 없다는 사실을 알게 될 겁니다. 이때 레이어 메뉴의 Toggle Editing 을 통해 해당 테이블에 places 데이터를 추가할 수 있습니다.
18.2.3. ★☆☆ 따라해보세요: 기본 데이터베이스 관리자
DB 관리자를 통해 몇몇 기본 데이터베이스 관리자(basic database administration) 작업도 할 수 있습니다. DB 관리자를 완전한 데이터베이스 관리자 도구라고 할 수는 없지만, 여러분의 데이터베이스를 유지관리하는 데 사용할 수 있는 몇몇 기능을 제공하긴 합니다.
종종 데이터베이스 테이블이 아주 커질 수도 있고 자주 수정되는 테이블의 경우 PostgreSQL이 더 이상 필요로 하지 않는 레코드 찌꺼기가 남게 될 수도 있습니다. VACUUM 명령어는 일종의 쓰레기 정리 작업을 수행하며, 또 좀 더 나은 퍼포먼스를 위해 사용자 테이블을 분석하는 옵션도 갖추고 있습니다.
DB 관리자에서 VACUUM ANALYZE 명령어를 실행할 수 있는 방법을 알아봅시다.
DB 관리자 트리에서 테이블들 가운데 하나를 선택하십시오.
메뉴에서 항목을 선택하십시오.
PostgreSQL이 작업을 수행할 것입니다. 선택한 테이블의 용량에 따라 작업 완료까지 시간이 걸릴 수도 있습니다.
VACUUM ANALYZE에 대한 PostgreSQL 문서 에서 VACUUM ANALYZE 처리 과정에 대한 자세한 정보를 찾아볼 수 있습니다.
18.2.4. ★☆☆ 따라해보세요: DB 관리자를 통해 SQL 쿼리 실행하기
DB 관리자는 사용자 데이터베이스에 대해 쿼리를 작성하고 그 결과를 살펴볼 수 있는 방법도 제공합니다. 이미 Browser 패널에서 이런 유형의 기능을 배웠지만, DB 관리자에서도 다시 살펴보도록 하겠습니다.
트리에서
lines테이블을 선택하십시오.DB 관리자 툴바에서 다음 SQL window 버튼을 클릭하십시오.

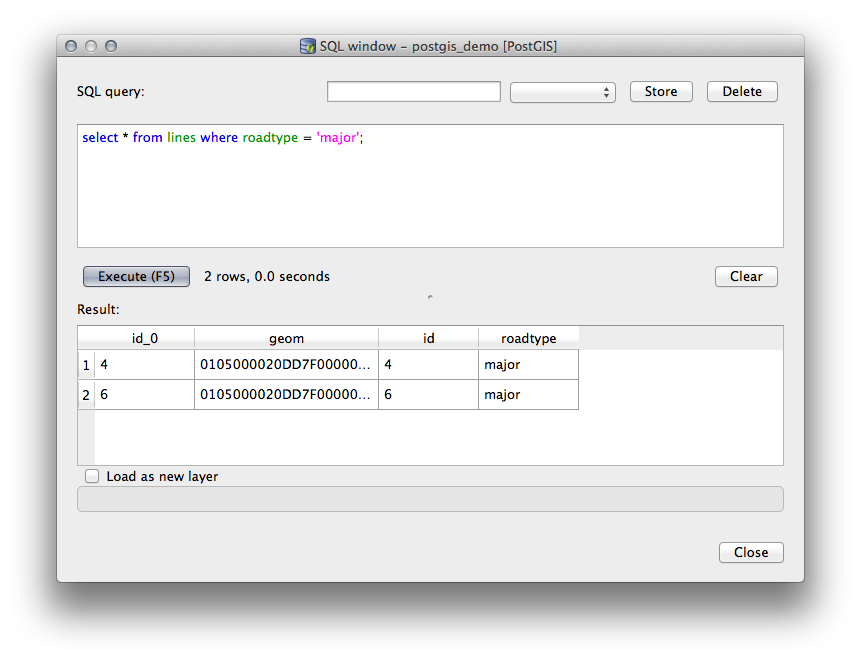
쿼리 입력란에 다음 SQL query 를 작성하십시오.
select * from lines where roadtype = 'major';
Execute (F5) 버튼을 클릭해서 쿼리를 실행하십시오.
이제 Result 패널에서 쿼리와 일치하는 레코드를 볼 수 있을 겁니다.
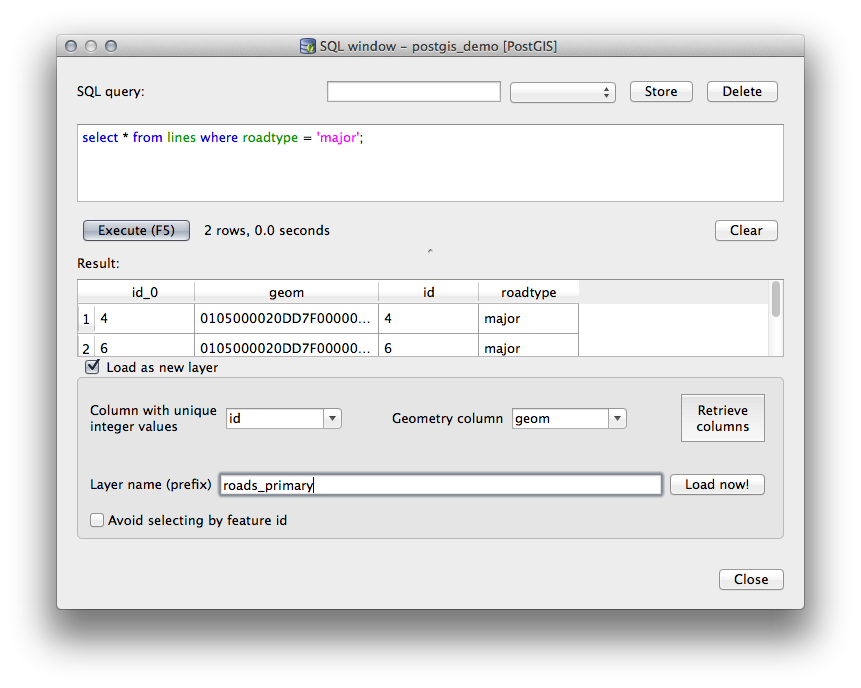
이 결과를 사용자 맵에 추가하려면 Load as new layer 체크박스를 체크하십시오.
Column with unique integer values 에
id열을 그리고 Geometry column 에geom열을 선택하십시오.Layer name (prefix) 에
roads_primary라고 입력하십시오.Load now! 를 클릭하십시오. 이 결과가 여러분의 맵에 새 레이어로 뜰 것입니다.
이제 사용자 쿼리와 일치하는 레이어가 사용자 맵에 나타났습니다. 물론 이 쿼리 도구를 사용해서 이전 수업들에서 살펴보았던 많은 명령어를 포함하는, 어떤 임의의 SQL 명령어라도 실행할 수 있습니다.
18.2.5. DB 관리자를 통해 데이터베이스에 데이터 가져오기
이미 명령줄 도구들을 사용해서 공간 데이터베이스에 데이터를 가져오는 방법을 살펴보았습니다. 이제 DB 관리자를 사용해서 가져오기를 수행하는 방법을 배워볼 차례입니다.
DB 관리자 툴바에서 다음 Import layer/file 버튼을 클릭하십시오.

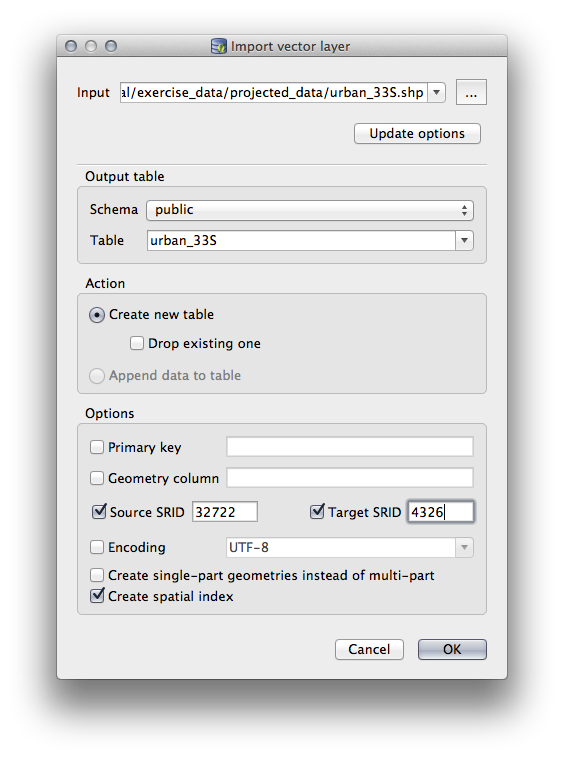
입력 데이터셋으로
exercise_data/projected_data에 있는urban_33S.shp파일을 선택하십시오.Update Options 버튼을 클릭해서 일부 양식 값들을 미리 채우십시오.
Create new table 옵션을 반드시 선택하십시오.
Source SRID`에 ``32722` 을, 그리고 Target SRID 에
4326을 지정하십시오.Create Spatial Index 체크박스를 체크하십시오.
OK 를 클릭해서 가져오기를 실행하십시오.
가져오기가 성공했다고 알려주는 메시지를 닫으십시오.
DB 관리자 툴바에서 Refresh 버튼을 클릭하십시오.
이제 트리에서 해당 테이블을 클릭하면 데이터베이스의 테이블을 검사할 수 있습니다. 목록에서 Spatial ref: 가 WGS 84 (4326) 인지 확인해서 데이터가 재투영되었는지 검증하십시오.
트리에 있는 해당 테이블을 오른쪽 클릭한 다음 Add to Canvas 를 선택하면 사용자 맵에 해당 레이어를 추가할 것입니다.
18.2.6. DB 관리자를 통해 데이터베이스에서 데이터 내보내기
DB 관리자는 당연히 여러분의 공간 데이터베이스에서 데이터를 내보낼 수도 있으므로, 그 방법을 배워보겠습니다.
트리에서
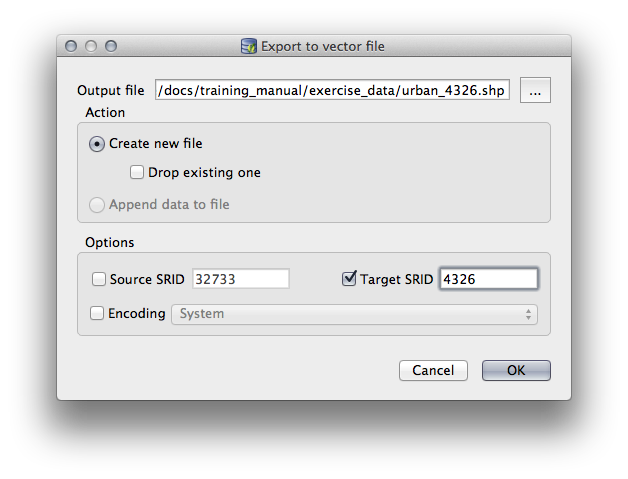
lines레이어를 선택한 다음 툴바에 있는 Export to File 버튼을 클릭하면 Export to vector file 대화창이 열립니다.Output file 의 … 버튼을 클릭하고 데이터를
exercise_data디렉터리에urban_4326라는 이름으로 저장하십시오.Target SRID 를
4326으로 설정하십시오.OK 를 클릭해서 내보내기를 시작하십시오.
가져오기가 성공했다고 알려주는 메시지를 닫고, DB 관리자 창도 닫으십시오.
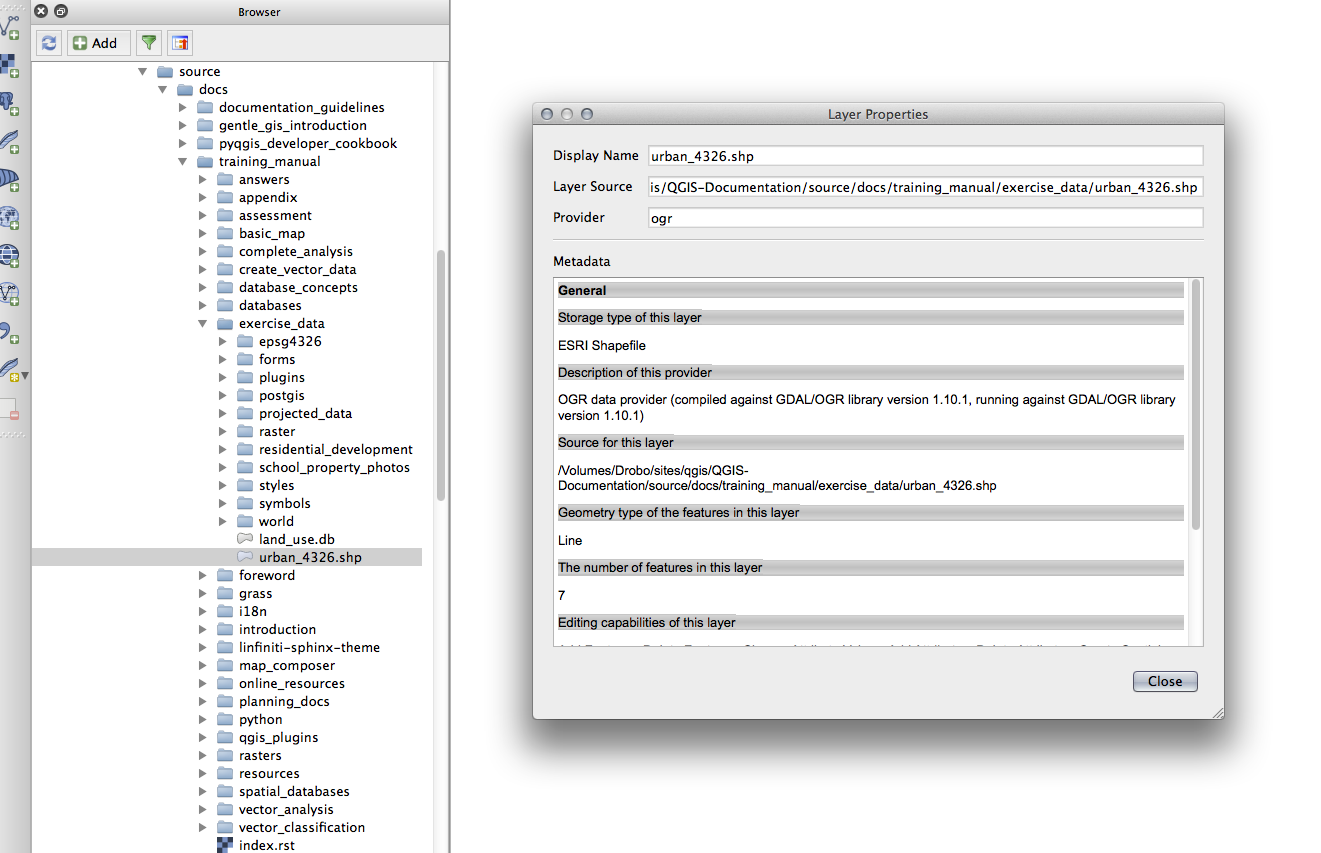
이제 탐색기 패널에서 방금 생성한 셰이프파일을 검사할 수 있습니다.
18.2.7. 결론
이제 QGIS에서 DB 관리자를 사용해서 공간 데이터베이스를 관리하고, 여러분의 데이터에 대해 SQL 쿼리를 실행하고, 데이터를 가져오고 내보내는 방법을 배웠습니다.
18.2.8. 다음은 무엇을 배우게 될까요?
다음 수업에서, 이런 방법들을 SpatiaLite 데이터베이스에 사용하는 방법을 살펴볼 것입니다.