Introduction
This document is intended to work both as a tutorial and a reference guide. While it does not list all possible use cases, it should give a good overview of the principal functionality.
Starting from 0.9 release, QGIS has optional scripting support using Python language. We’ve decided for Python as it’s one of the most favourite languages for scripting. PyQGIS bindings depend on SIP and PyQt4. The reason for using SIP instead of more widely used SWIG is that the whole QGIS code depends on Qt libraries. Python bindings for Qt (PyQt) are done also using SIP and this allows seamless integration of PyQGIS with PyQt.
There are several ways how to use Python bindings in QGIS desktop, they are covered in detail in the following sections:
- automatically run Python code when QGIS starts
- issue commands in Python console within QGIS
- create and use plugins in Python
- create custom applications based on QGIS API
Python bindings are also available for QGIS Server:
- starting from 2.8 release, Python plugins are also available on QGIS Server (see Server Python Plugins)
- starting from 2.11 version (Master at 2015-08-11), QGIS Server library has Python bindings that can be used to embed QGIS Server into a Python application.
There is a complete QGIS API reference that documents the classes from the QGIS libraries. Pythonic QGIS API is nearly identical to the API in C++.
A good resource when dealing with plugins is to download some plugins from plugin repository and examine their code. Also, the python/plugins/ folder in your QGIS installation contains some plugin that you can use to learn how to develop such plugin and how to perform some of the most common tasks.
Run Python code when QGIS starts
There are two distinct methods to run Python code every time QGIS starts.
PYQGIS_STARTUP environment variable
You can run Python code just before QGIS initialization completes by setting the PYQGIS_STARTUP environment variable to the path of an existing Python file.
This method is something you will probably rarely need, but worth mentioning here because it is one of the several ways to run Python code within QGIS and because this code will run before QGIS initialization is complete. This method is very useful for cleaning sys.path, which may have undesireable paths, or for isolating/loading the initial environ without requiring a virt env, e.g. homebrew or MacPorts installs on Mac.
The startup.py file
Every time QGIS starts, the user’s Python home directory (usually: .qgis2/python) is searched for a file named startup.py, if that file exists, it is executed by the embedded Python interpreter.
Python Console
For scripting, it is possible to take advantage of integrated Python console. It can be opened from menu: Plugins ‣ Python Console. The console opens as a non-modal utility window:
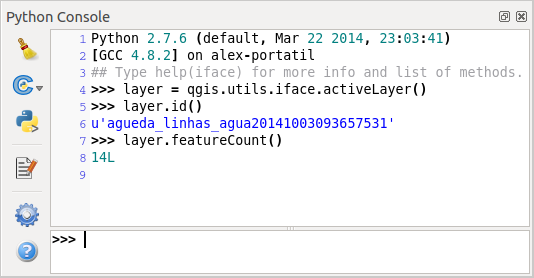
QGIS Python console
The screenshot above illustrates how to get the layer currently selected in the layer list, show its ID and optionally, if it is a vector layer, show the feature count. For interaction with QGIS environment, there is a iface variable, which is an instance of QgsInterface. This interface allows access to the map canvas, menus, toolbars and other parts of the QGIS application.
For convenience of the user, the following statements are executed when the console is started (in future it will be possible to set further initial commands)
from qgis.core import *
import qgis.utils
For those which use the console often, it may be useful to set a shortcut for triggering the console (within menu Settings ‣ Configure shortcuts...)
Python Plugins
QGIS allows enhancement of its functionality using plugins. This was originally possible only with C++ language. With the addition of Python support to QGIS, it is also possible to use plugins written in Python. The main advantage over C++ plugins is its simplicity of distribution (no compiling for each platform needed) and easier development.
Many plugins covering various functionality have been written since the introduction of Python support. The plugin installer allows users to easily fetch, upgrade and remove Python plugins. See the Python Plugin Repositories page for various sources of plugins.
Creating plugins in Python is simple, see Developing Python Plugins for detailed instructions.
Note
Python plugins are also available in QGIS server (QGIS as OGC Data Server), see QGIS Server Python Plugins for further details.
Python Applications
Often when processing some GIS data, it is handy to create some scripts for automating the process instead of doing the same task again and again. With PyQGIS, this is perfectly possible — import the qgis.core module, initialize it and you are ready for the processing.
Or you may want to create an interactive application that uses some GIS functionality — measure some data, export a map in PDF or any other functionality. The qgis.gui module additionally brings various GUI components, most notably the map canvas widget that can be very easily incorporated into the application with support for zooming, panning and/or any further custom map tools.
PyQGIS custom applications or standalone scripts must be configured to locate the QGIS resources such as projection information, providers for reading vector and raster layers, etc. QGIS Resources are initialized by adding a few lines to the beginning of your application or script. The code to initialize QGIS for custom applications and standalone scripts is similar, but examples of each are provided below.
Note: do not use qgis.py as a name for your test script — Python will not be able to import the bindings as the script’s name will shadow them.
Using PyQGIS in standalone scripts
To start a standalone script, initialize the QGIS resources at the beginning of the script similar to the following code:
from qgis.core import *

# supply path to qgis install location
QgsApplication.setPrefixPath("/path/to/qgis/installation", True)

# create a reference to the QgsApplication, setting the
# second argument to False disables the GUI
qgs = QgsApplication([], False)

# load providers
qgs.initQgis()

# Write your code here to load some layers, use processing algorithms, etc.

# When your script is complete, call exitQgis() to remove the provider and
# layer registries from memory
qgs.exitQgis()
We begin by importing the qgis.core module and then configuring the prefix path. The prefix path is the location where QGIS is installed on your system. It is configured in the script by calling the setPrefixPath method. The second argument of setPrefixPath is set to True, which controls whether the default paths are used.
The QGIS install path varies by platform; the easiest way to find it for your your system is to use the Python Console from within QGIS and look at the output from running QgsApplication.prefixPath().
After the prefix path is configured, we save a reference to QgsApplication in the variable qgs. The second argument is set to False, which indicates that we do not plan to use the GUI since we are writing a standalone script. With the QgsApplication configured, we load the QGIS data providers and layer registry by calling the qgs.initQgis() method. With QGIS initialized, we are ready to write the rest of the script. Finally, we wrap up by calling qgs.exitQgis() to remove the data providers and layer registry from memory.
Using PyQGIS in custom applications
The only difference between Using PyQGIS in standalone scripts and a custom PyQGIS application is the second argument when instantiating the QgsApplication. Pass True instead of False to indicate that we plan to use a GUI.
from qgis.core import *

# supply path to qgis install location
QgsApplication.setPrefixPath("/path/to/qgis/installation", True)

# create a reference to the QgsApplication
# setting the second argument to True enables the GUI, which we need to do
# since this is a custom application
qgs = QgsApplication([], True)

# load providers
qgs.initQgis()

# Write your code here to load some layers, use processing algorithms, etc.

# When your script is complete, call exitQgis() to remove the provider and
# layer registries from memory
qgs.exitQgis()
Now you can work with QGIS API — load layers and do some processing or fire up a GUI with a map canvas. The possibilities are endless :-)
Running Custom Applications
You will need to tell your system where to search for QGIS libraries and appropriate Python modules if they are not in a well-known location — otherwise Python will complain:
>>> import qgis.core
ImportError: No module named qgis.core
This can be fixed by setting the PYTHONPATH environment variable. In the following commands, qgispath should be replaced with your actual QGIS installation path:
- on Linux: export PYTHONPATH=/qgispath/share/qgis/python
- on Windows: set PYTHONPATH=c:\qgispath\python
The path to the PyQGIS modules is now known, however they depend on qgis_core and qgis_gui libraries (the Python modules serve only as wrappers). Path to these libraries is typically unknown for the operating system, so you get an import error again (the message might vary depending on the system):
>>> import qgis.core
ImportError: libqgis_core.so.1.5.0: cannot open shared object file: No such file or directory
Fix this by adding the directories where the QGIS libraries reside to search path of the dynamic linker:
- on Linux: export LD_LIBRARY_PATH=/qgispath/lib
- on Windows: set PATH=C:\qgispath;%PATH%
These commands can be put into a bootstrap script that will take care of the startup. When deploying custom applications using PyQGIS, there are usually two possibilities:
- require user to install QGIS on his platform prior to installing your application. The application installer should look for default locations of QGIS libraries and allow user to set the path if not found. This approach has the advantage of being simpler, however it requires user to do more steps.
- package QGIS together with your application. Releasing the application may be more challenging and the package will be larger, but the user will be saved from the burden of downloading and installing additional pieces of software.
The two deployment models can be mixed - deploy standalone application on Windows and macOS, for Linux leave the installation of QGIS up to user and his package manager.