` `
Модуль eVis
(This section is derived from Horning, N., K. Koy, P. Ersts. 2009. eVis (v1.1.0) User’s Guide. American Museum of Natural History, Center for Biodiversity and Conservation. Available from http://biodiversityinformatics.amnh.org/, and released under the GNU FDL.)
The Biodiversity Informatics Facility at the American Museum of Natural History’s (AMNH) Center for Biodiversity and Conservation (CBC) has developed the Event Visualization Tool (eVis), another software tool to add to the suite of conservation monitoring and decision support tools for guiding protected area and landscape planning. This plugin enables users to easily link geocoded (i.e., referenced with latitude and longitude or X and Y coordinates) photographs, and other supporting documents, to vector data in QGIS.
eVis is now automatically installed and enabled in new versions of QGIS, and as with all plugins, it can be disabled and enabled using the Plugin Manager (see The Plugins Dialog).
В состав eVis входит три модуля: инструмент подключения к базе данных, инструмент определения событий и обозреватель событий. Все эти модули работают совместно, позволяя просматривать геокодированные фотографии и прочие документы, связанные с объектами, хранящимися в векторных файлах, базах данных и таблицах.
Обозреватель событий
The Event Browser module provides the functionality to display geocoded photographs that are linked to vector features displayed in the QGIS map window. Point data, for example, can be from a vector file that can be input using QGIS or it can be from the result of a database query. The vector feature must have attribute information associated with it to describe the location and name of the file containing the photograph and, optionally, the compass direction the camera was pointed when the image was acquired. Your vector layer must be loaded into QGIS before running the Event Browser.
Запуск модуля «Обозреватель событи黶
To launch the Event Browser module, click on Database ‣ eVis ‣ eVis Event Browser. This will open the Generic Event Browser window.
Окно Обозреватель событий состоит из трёх вкладок, расположенных сверху. Вкладка Вывод используется для просмотра фотографий и связанной с ними атрибутивной информации. Вкладка Параметры содержит набор настроек, позволяющих управлять поведением расширения eVis. И, наконец, вкладка Внешние приложения используется для сопоставления расширений файлов, отличных от изображений, и приложений, используемых в eVis для их отображения.
Назначение окна «Выво件
To see the Display window, click on the Display tab in the Event Browser window. The Display window is used to view geocoded photographs and their associated attribute data.
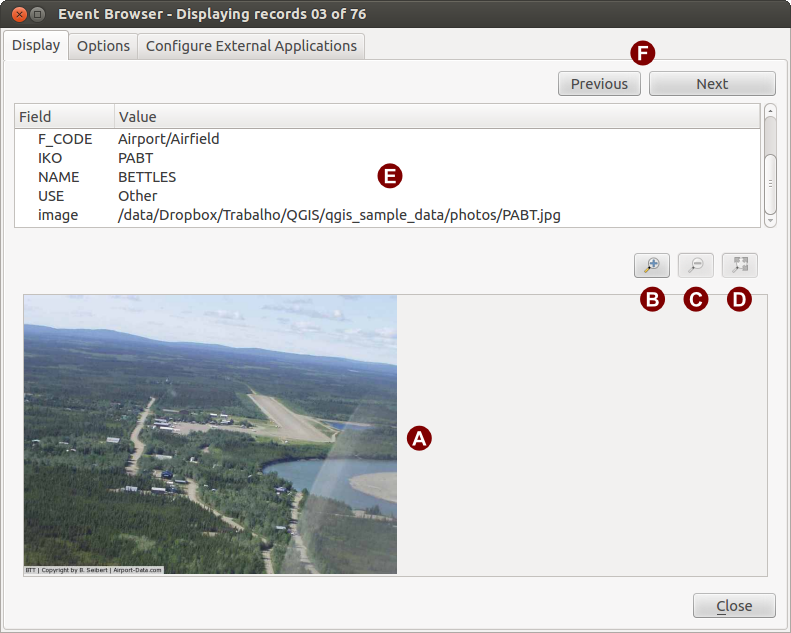
Окно «Вывод» расширения eVis
Область вывода изображения: Область отображения фотографий.
Кнопка «Увеличить»: Увеличьте фотографию для просмотра мелких деталей. Если изображение полностью не помещается в окно просмотра, воспользуйтесь полосами прокрутки, расположенными с левой и с нижней стороны окна и позволяющими перемещаться по изображению.
Кнопка «Уменьшить»: Уменьшите фотографию для просмотра больших территорий.
Увеличить до полного охвата: Отобразить полный охват фотографии.
- Attribute information window: All of the attribute information for the point associated with the photograph being viewed is displayed here. If the file type being referenced in the displayed record is not an image but is of a file type defined in the Configure External Applications tab, then when you double-click on the value of the field containing the path to the file, the application to open the file will be launched to view or hear the contents of the file. If the file extension is recognized, the attribute data will be displayed in green.
Навигационные кнопки: Если выделено более одного объекта, то используйте кнопки [Предыдущее] и [Следующее] для перехода между ними.
Назначение окна «Параметры»
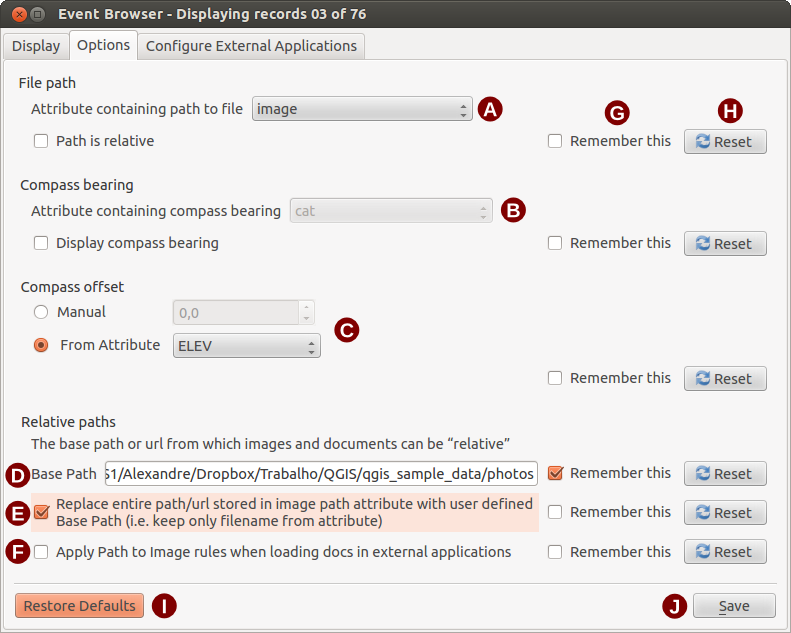
Окно «Параметры» расширения eVis
- File path: A drop-down list to specify the attribute field that contains the directory path or URL for the photographs or other documents being displayed. If the location is a relative path, then the checkbox must be clicked. The base path for a relative path can be entered in the Base Path text box below. Information about the different options for specifying the file location are noted in the section Определение местоположения и названия фотографий below.
- Compass bearing: A drop-down list to specify the attribute field that contains the compass bearing associated with the photograph being displayed. If compass bearing information is available, it is necessary to click the checkbox below the drop-down menu title.
- Compass offset: Compass offsets can be used to compensate for
declination (to adjust bearings collected using magnetic bearings to true north
bearings). Click the
 Manual radio button to enter
the offset in the text box or click the
From Attribute radio button to select the attribute field
containing the offsets. For both of these options, east declinations should
be entered using positive values, and west declinations should use negative
values.
Manual radio button to enter
the offset in the text box or click the
From Attribute radio button to select the attribute field
containing the offsets. For both of these options, east declinations should
be entered using positive values, and west declinations should use negative
values. - Directory base path: The base path onto which the relative path defined in Figure_eVis_options (A) will be appended.
- Replace path: If this checkbox is checked, only the file name from A will be appended to the base path.
- Apply rule to all documents: If checked, the same path rules that are defined for photographs will be used for non-image documents such as movies, text documents, and sound files. If not checked, the path rules will only apply to photographs, and other documents will ignore the base path parameter.
- Remember settings: If the checkbox is checked, the values for the associated parameters will be saved for the next session when the window is closed or when the [Save] button below is pressed.
Восстановить: Сбросить и установить параметр в значение по умолчанию.
- Restore defaults: This will reset all of the fields to their default settings. It has the same effect as clicking all of the [Reset] buttons.
Сохранить: Сохранить настройки, не закрывая вкладку Параметры.
Назначение окна «Внешние приложения»
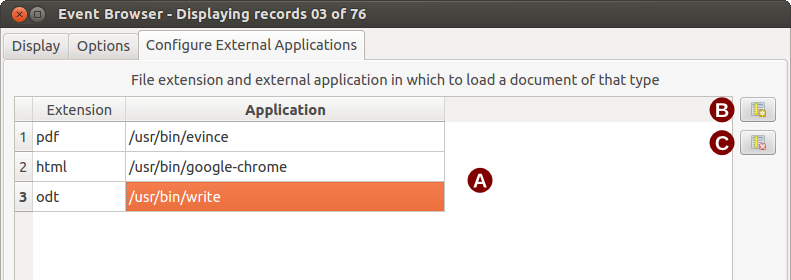
Окно «Внешние приложения» расширения eVis
Таблица сопоставления: Таблица содержит типы файлов, которые можно открыть, используя eVis. Для каждого типа представляется расширение и путь к приложению, позволяющему открыть файл данного типа. Таким образом, появляется возможность открыть практически любой файл, например, видео, звуковую запись или текстовый документ, а не только изображение.
Добавить новый тип файлов: Добавить новый тип файлов с уникальным расширением и путь до приложения, которое его откроет.
Удалить текущую строку: Удалить из таблицы выбранный тип файлов.
Определение местоположения и названия фотографий
The location and name of the photograph can be stored using an absolute or relative path, or a URL if the photograph is available on a web server. Examples of the different approaches are listed in Table evis_examples.
X        Y        FILE                                                BEARING
780596   1784017  C:\Workshop\eVis_Data\groundphotos\DSC_0168.JPG     275
780596   1784017  /groundphotos/DSC_0169.JPG                          80
780819   1784015  http://biodiversityinformatics.amnh.org/\
                  evis_testdata/DSC_0170.JPG                          10
780596   1784017  pdf:http://www.testsite.com/attachments.php?\
                  attachment_id-12                                    76
Определение местоположения и названия прочих документов поддерживаемых форматов
Supporting documents such as text documents, videos, and sound clips can also be displayed or played by eVis. To do this, it is necessary to add an entry in the file reference table that can be accessed from the Configure External Applications window in the Generic Event Browser that matches the file extension to an application that can be used to open the file. It is also necessary to have the path or URL to the file in the attribute table for the vector layer. One additional rule that can be used for URLs that don’t contain a file extension for the document you want to open is to specify the file extension before the URL. The format is — file extension:URL. The URL is preceded by the file extension and a colon; this is particularly useful for accessing documents from wikis and other web sites that use a database to manage the web pages (see Table evis_examples).
Обозреватель событий
When the Event Browser window opens, a photograph will appear in the display window if the document referenced in the vector file attribute table is an image and if the file location information in the Options window is properly set. If a photograph is expected and it does not appear, it will be necessary to adjust the parameters in the Options window.
If a supporting document (or an image that does not have a file extension recognized by eVis) is referenced in the attribute table, the field containing the file path will be highlighted in green in the attribute information window if that file extension is defined in the file reference table located in the Configure External Applications window. To open the document, double-click on the green-highlighted line in the attribute information window. If a supporting document is referenced in the attribute information window and the file path is not highlighted in green, then it will be necessary to add an entry for the file’s filename extension in the Configure External Applications window. If the file path is highlighted in green but does not open when double-clicked, it will be necessary to adjust the parameters in the Options window so the file can be located by eVis.
If no compass bearing is provided in the Options window, a red asterisk will be displayed on top of the vector feature that is associated with the photograph being displayed. If a compass bearing is provided, then an arrow will appear pointing in the direction indicated by the value in the compass bearing display field in the Event Browser window. The arrow will be centered over the point that is associated with the photograph or other document.
To close the Event Browser window, click on the [Close] button from the Display window.
Определить события eVis
The ‘Event ID’ module allows you to display a photograph by clicking on a feature displayed in the QGIS map window. The vector feature must have attribute information associated with it to describe the location and name of the file containing the photograph and, optionally, the compass direction the camera was pointed when the image was acquired. This layer must be loaded into QGIS before running the ‘Event ID’ tool.
Запуск модуля «Определить события»
To launch the ‘Event ID’ module, either click on the  Event ID
icon or click on Database ‣ eVis ‣ Event ID Tool. This will
cause the cursor to change to an arrow with an ‘i’ on top of it signifying that
the ID tool is active.
Event ID
icon or click on Database ‣ eVis ‣ Event ID Tool. This will
cause the cursor to change to an arrow with an ‘i’ on top of it signifying that
the ID tool is active.
To view the photographs linked to vector features in the active vector layer displayed in the QGIS map window, move the Event ID cursor over the feature and then click the mouse. After clicking on the feature, the Event Browser window is opened and the photographs on or near the clicked locality are available for display in the browser. If more than one photograph is available, you can cycle through the different features using the [Previous] and [Next] buttons. The other controls are described in the Обозреватель событий section of this guide.
Соединение с БД
Модуль «Соединение с БД» представляет собой инструмент для соединения и запросов к базам данных или иным ресурсам ODBC, таким, как электронные таблицы.
eVis can directly connect to the following types of databases: PostgreSQL, MySQL, and SQLite; it can also read from ODBC connections (e.g., MS Access). When reading from an ODBC database (such as an Excel spreadsheet), it is necessary to configure your ODBC driver for the operating system you are using.
Загрузка модуля «Соединение с БД»
To launch the ‘Database Connection’ module, either click on the appropriate icon
 eVis Database Connection or click on Database ‣
eVis ‣ Database Connection. This will launch the Database Connection
window. The window has three tabs: Predefined Queries,
Database Connection, and SQL Query. The Output
Console window at the bottom of the window displays the status of actions
initiated by the different sections of this module.
eVis Database Connection or click on Database ‣
eVis ‣ Database Connection. This will launch the Database Connection
window. The window has three tabs: Predefined Queries,
Database Connection, and SQL Query. The Output
Console window at the bottom of the window displays the status of actions
initiated by the different sections of this module.
Соединение с БД
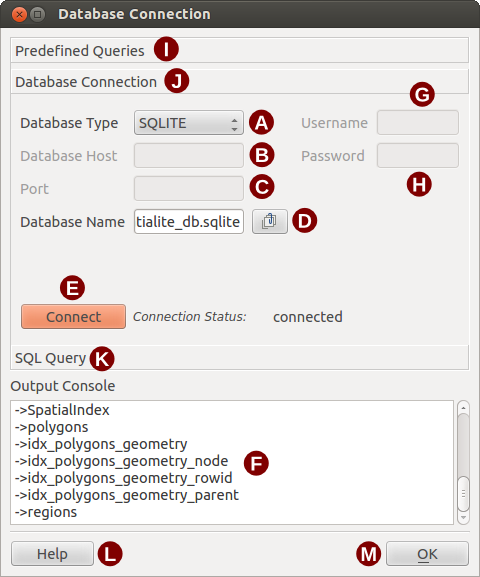
Click on the Database Connection tab to open the database
connection interface. Next, use the Database Type  combo box to select the type of database that you want to connect to. If a
password or username is required, that information can be entered in the
Username and Password textboxes.
combo box to select the type of database that you want to connect to. If a
password or username is required, that information can be entered in the
Username and Password textboxes.
Enter the database host in the Database Host textbox. This option is not available if you selected ‘MS Access’ as the database type. If the database resides on your desktop, you should enter “localhost”.
В поле База данных укажите имя базы данных. Если выбран тип «ODBC», то укажите здесь имя источника данных.
When all of the parameters are filled in, click on the [Connect] button. If the connection is successful, a message will be written in the Output Console window stating that the connection was established. If a connection was not established, you will need to check that the correct parameters were entered above.
Окно «Соединение с БД» расширения eVis
- Database Type: A drop-down list to specify the type of database that will be used.
Сервер БД: Адрес сервера баз данных.
- Port: The port number if a MySQL or PostgreSQL database type is selected.
- Database Name: The name of the database.
- Connect: A button to connect to the database using the parameters defined above.
- Output Console: The console window where messages related to processing are displayed.
Пользователь: Имя пользователя, указываемое в случае защиты доступа к базе данных паролем.
Пароль: Пароль, соответствующий имени пользователя.
Предопределённые запросы: Вкладка Предопределённые запросы.
Соединение с БД: Вкладка Соединение с БД.
SQL-запрос: Вкладка SQL-запрос.
- Help: Displays the online help.
OK: Закрыть главное окно Соединение с БД.
Выполнение SQL-запросов
SQL queries are used to extract information from a database or ODBC resource. In eVis, the output from these queries is a vector layer added to the QGIS map window. Click on the SQL Query tab to display the SQL query interface. SQL commands can be entered in this text window. A helpful tutorial on SQL commands is available at http://www.w3schools.com/sql. For example, to extract all of the data from a worksheet in an Excel file, select * from [sheet1$] where sheet1 is the name of the worksheet.
Click on the [Run Query] button to execute the command. If the query is successful, a Database File Selection window will be displayed. If the query is not successful, an error message will appear in the Output Console window.
В окне Выбор файла БД в поле Имя нового слоя введите имя слоя, который будет создан на основе результатов выборки.
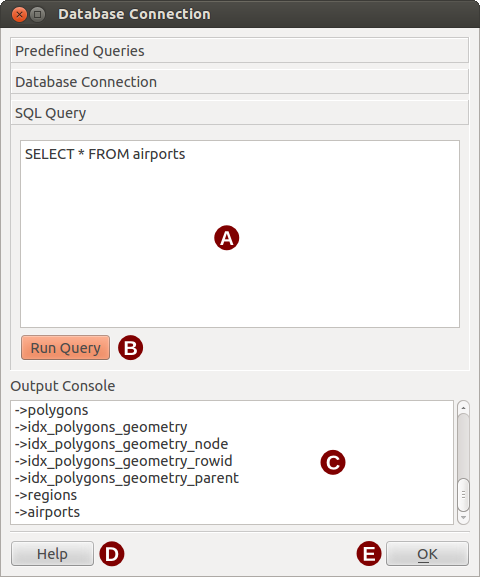
Вкладка «SQL-запрос» расширения eVis
Текстовое поле «SQL-запрос»: Место ввода SQL-запросов.
Выполнить: Кнопка выполнения SQL-запросов.
Консоль вывода: Консольное окно, в котором отображаются сообщения, связанные с работой модуля.
- Help: Displays the online help.
OK: Закрыть главное окно Соединение с БД.
Use the X Coordinate and Y Coordinate
combo boxes to select the fields from the database that stores the
X (or longitude) and Y (or latitude) coordinates. Clicking on the [OK]
button causes the vector layer created from the SQL query to be displayed in the
QGIS map window.
To save this vector file for future use, you can use the QGIS ‘Save as...’ command that is accessed by right-clicking on the layer name in the QGIS map legend and then selecting ‘Save as...’
Совет
Создание векторного слоя на основе данных листа Microsoft Excel
When creating a vector layer from a Microsoft Excel Worksheet, you might see that unwanted zeros (“0”) have been inserted in the attribute table rows beneath valid data. This can be caused by deleting the values for these cells in Excel using the Backspace key. To correct this problem, you need to open the Excel file (you’ll need to close QGIS if you are connected to the file, to allow you to edit the file) and then use Edit ‣ Delete to remove the blank rows from the file. To avoid this problem, you can simply delete several rows in the Excel Worksheet using Edit ‣ Delete before saving the file.
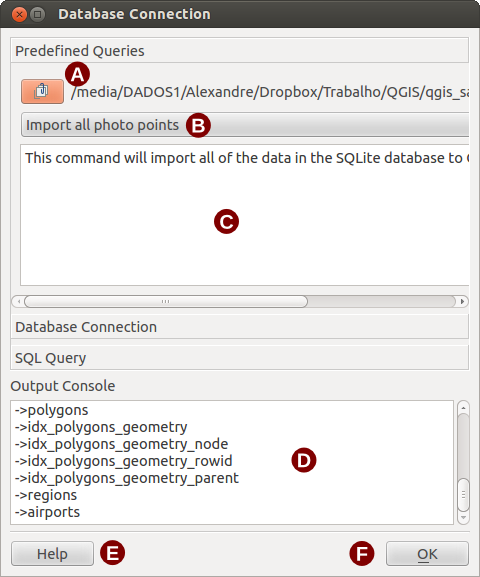
Запуск предопределённых запросов
With predefined queries, you can select previously written queries stored in XML format in a file. This is particularly helpful if you are not familiar with SQL commands. Click on the Predefined Queries tab to display the predefined query interface.
To load a set of predefined queries, click on the  Open File
icon. This opens the Open File window, which is used to locate the file
containing the SQL queries. When the queries are loaded, their titles as
defined in the XML file will appear in the drop-down menu located just below
the Open File icon. The full description of the query is
displayed in the text window under the drop-down menu.
Open File
icon. This opens the Open File window, which is used to locate the file
containing the SQL queries. When the queries are loaded, their titles as
defined in the XML file will appear in the drop-down menu located just below
the Open File icon. The full description of the query is
displayed in the text window under the drop-down menu.
Select the query you want to run from the drop-down menu and then click on the SQL Query tab to see that the query has been loaded into the query window. If it is the first time you are running a predefined query or are switching databases, you need to be sure to connect to the database.
Click on the [Run Query] button in the SQL Query tab to execute the command. If the query is successful, a Database File Selection window will be displayed. If the query is not successful, an error message will appear in the Output Console window.
The eVis Predefined Queries tab
Открыть файл: Вызов окна Открыть файл для поиска XML-файла, содержащего предопределённые запросы.
- Predefined Queries: A drop-down list with all of the queries defined by the predefined queries XML file.
Описание запроса: Короткое описание запроса, берётся из XML-файла.
Консоль вывода: Консольное окно, в котором отображаются сообщения, связанные с работой модуля.
- Help: Displays the online help.
OK: Закрыть главное окно Соединение с БД.
XML-формат предопределённых запросов eVis
XML-теги eVis
Тег |
Описание |
|---|---|
| query | Определяет начало и конец запроса. |
| shortdescription | A short description of the query that appears in the eVis drop-down menu. |
| description | Более детальное описание запроса, отображается в текстовом поле вкладки Предопределённые запросы. |
| databasetype | The database type, defined in the Database Type drop-down menu in the Database Connection tab. |
| databaseport | The port as defined in the Port text box in the Database Connection tab. |
| databasename | The database name as defined in the Database Name text box in the Database Connection tab. |
| databaseusername | The database username as defined in the Username text box in the Database Connection tab. |
| databasepassword | The database password as defined in the Password text box in the Database Connection tab. |
| sqlstatement | SQL-запрос. |
| autoconnect | A flag (“true”” or “false”) to specify if the above tags should be used to automatically connect to the database without running the database connection routine in the Database Connection tab. |
Пример XML-файла, содержащего три запроса:
<?xml version="1.0"?>
<doc>
 <query>
   <shortdescription>Import all photograph points</shortdescription>
   <description>This command will import all of the data in the SQLite database to QGIS
      </description>
   <databasetype>SQLITE</databasetype>
   <databasehost />
   <databaseport />
   <databasename>C:\textbackslash Workshop/textbackslash
eVis\_Data\textbackslash PhotoPoints.db</databasename>
   <databaseusername />
   <databasepassword />
   <sqlstatement>SELECT Attributes.*, Points.x, Points.y FROM Attributes LEFT JOIN
      Points ON Points.rec_id=Attributes.point_ID</sqlstatement>
   <autoconnect>false</autoconnect>
 </query>
  <query>
   <shortdescription>Import photograph points "looking across Valley"</shortdescription>
   <description>This command will import only points that have photographs "looking across
      a valley" to QGIS</description>
   <databasetype>SQLITE</databasetype>
   <databasehost />
   <databaseport />
   <databasename>C:\Workshop\eVis_Data\PhotoPoints.db</databasename>
   <databaseusername />
   <databasepassword />
   <sqlstatement>SELECT Attributes.*, Points.x, Points.y FROM Attributes LEFT JOIN
      Points ON Points.rec_id=Attributes.point_ID where COMMENTS='Looking across
      valley'</sqlstatement>
   <autoconnect>false</autoconnect>
 </query>
 <query>
   <shortdescription>Import photograph points that mention "limestone"</shortdescription>
   <description>This command will import only points that have photographs that mention
      "limestone" to QGIS</description>
   <databasetype>SQLITE</databasetype>
   <databasehost />
   <databaseport />
   <databasename>C:\Workshop\eVis_Data\PhotoPoints.db</databasename>
   <databaseusername />
   <databasepassword />
   <sqlstatement>SELECT Attributes.*, Points.x, Points.y FROM Attributes LEFT JOIN
      Points ON Points.rec_id=Attributes.point_ID where COMMENTS like '%limestone%'
      </sqlstatement>
   <autoconnect>false</autoconnect>
 </query>
</doc>