15.2. Lesson: Georeferențierea unei Hărți
O activitate silvică obișnuită constă în actualizarea informațiilor pentru zonele forestiere. Este posibil ca informațiile anterioare pentru acea zonă să aibă o vechime de mai mulți ani, să fi fost colectate în mod analogic (adică, pe hârtie) sau poate că au fost digitizate, dar tot ce aveți reprezintă versiunea pe hârtie a datelor inventarului respectiv.
Cel mai probabil, v-ați dori să utilizați aceste informații în GIS, de exemplu, pentru a le compara mai târziu cu inventarele ulterioare. Acest lucru presupune că va trebui să digitizați manual informațiile, cu ajutorul softului GIS. Dar, înainte de a începe digitizarea, trebuie făcuți pași importanți, cum ar fi scanarea și georeferențierea hărții de hârtie.
Scopul acestei lecții: De a afla cum să utilizați instrumentul de Georeferențiere din QGIS.
15.2.1.  Scanarea hărții
Prima activitate constă în scanarea hărții. Dacă harta dvs. este prea mare, atunci o puteți scana pe porțiuni, dar rețineți că pentru fiecare parte va trebui să reluați acțiunile de preprocesare și georeferențiere. Din acest motiv, este recomandabil să împărțiți harta în cel mai mic număr de porțiuni posibile.
If you are going to use a different map that the one provided with this manual, use your own scanner to scan the map as an image file, a resolution of 300 DPI will do. If your map has colors, scan the image in color so that you can later use those colors to separate information from your map into different layers (for ex., forest stands, contour lines, roads...).
Pentru acest exercițiu, veți utiliza o hartă scanată anterior, pe care o puteți găsi ca rautjarvi_map.tif în folderul de date exercise_data/forestry
15.2.2. Follow Along: Georeferențierea hărții scanate
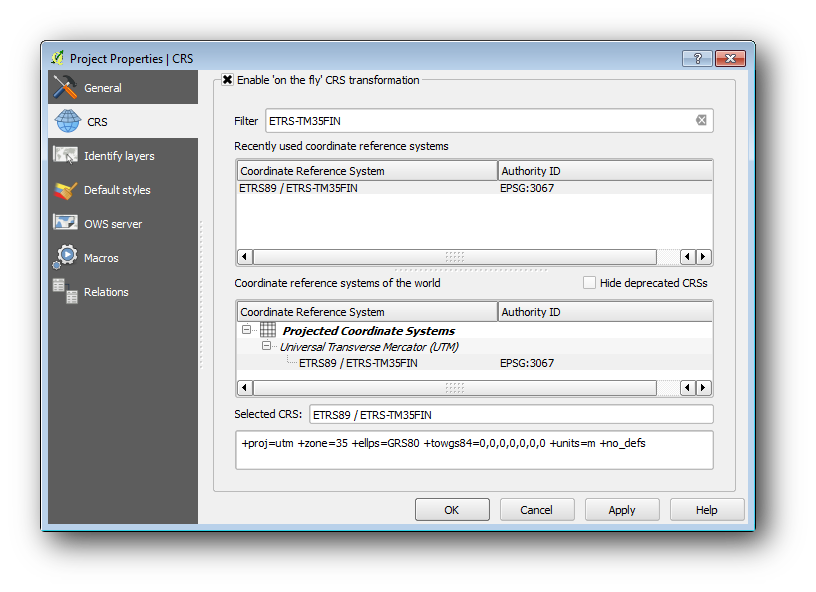
Open QGIS and set the project’s CRS to ETRS89 / ETRS-TM35FIN in Project ‣ Project Properties ‣ CRS, which is the currently used CRS in Finland. Make sure that Enable ‘on the fly’ CRS transformation is checked, since we will be working with old data that is another CRS.
Salvați proiectul QGIS sub numele map_digitizing.qgs.
You will use the georeferencing plugin from QGIS, the plugin is already installed in QGIS. Activate the plugin using the plugin manager as you have done in previous modules. The plugin is named Georeferencer GDAL.
Pentru a georeferenția harta:
Deschideți instrumentul de georeferențiere, Raster ‣ Georeferencer ‣ Georeferencer.
- Add the map image file, rautjarvi_map.tif, as the image to georeferenciate, File ‣ Open raster.
- When prompted find and select the KKJ / Finland zone 2 CRS, it is the CRS that was used in Finland back in 1994 when this map was created.
Clic pe OK
Ulterior ar trebui să definiți setările de transformare pentru georeferențierea hărții:
Deschideți Settings ‣ Transformation settings.
Faceți clic pe pictograma de lângă caseta Output raster, mergeți și creați folderul exercise_data\forestry\digitizing, apoi denumiți fișierul rautjarvi_georef.tif.
Setați restul parametrilor așa cum se arată mai jos.
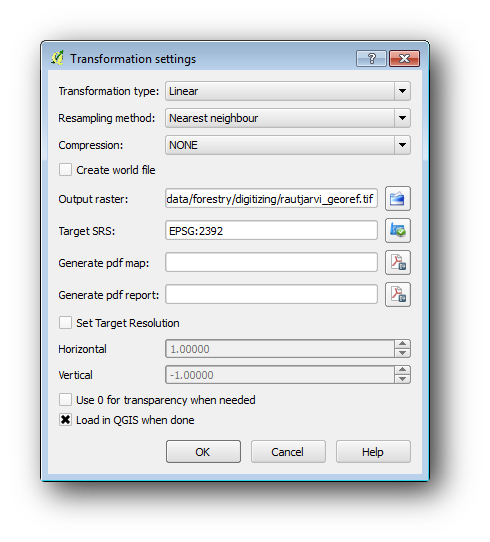
Clic pe OK
The map contains several cross-hairs marking the coordinates in the map, we will use those to georeferenciate this image. You can use the zooming and panning tools as you usually do in QGIS to inspect the image in the Georeferencer’s window.
- Zoom in to the left lower corner of the map and note that there is a cross-hair with a coordinate pair, x and y, that as mentioned before are in KKJ / Finland zone 2 CRS. You will use this point as the first ground control point for the georeferencing your map.
Selectați instrumentul Adăugare punct, apoi faceți clic pe intersecția firelor reticulare (deplasați și măriți după nevoie).
În dialogul Enter map coordinates notați coordonatele care apar pe hartă (X: 2557000 si Y: 6786000).
Clic pe OK
Prima coordonată de georeferențiat deja este gata.
Look for other cross-hairs in the black lines image, they are separated 1000 meters from each other both in North and East direction. You should be able to calculate the coordinates of those points in relation to the first one.
Zoom out in the image and move to the right until you find other cross-hair, and estimate how many kilometres you have moved. Try to get ground control points as far from each other as possible. Digitize at least three more ground control points in the same way you did the first one. You should end up with something similar to this:
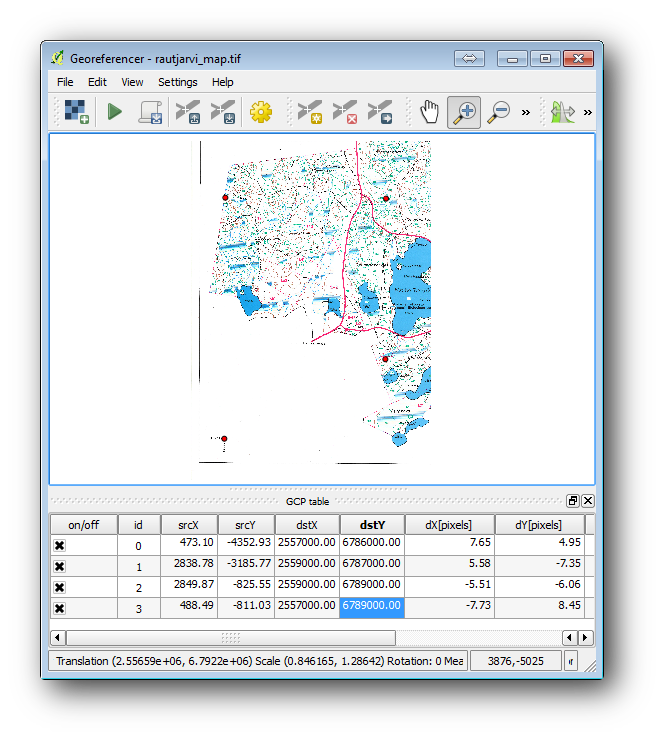
With already three digitized ground control points you will be able to see the georeferencing error as a red line coming out of the points. The error in pixels can be seen also in the GCP table in the dX[pixels] and dY[pixels] columns. The error in pixels should not be higher than 10 pixels, if it is you should review the points you have digitized and the coordinates you have entered to find what the problem is. You can use the image above as a guide.
O dată ce vă mulțumesc punctele dvs. de control, salva punctele de control de pe teren, în cazul în care veți avea nevoie de ele mai târziu:
- File ‣ Save GCP points as....
În folderul exercise_data\forestry\digitizing, denumiți fișierul rautjarvi_map.tif.points.
În cele din urmă, georeferențiați harta dvs.:
- File ‣ Start georeferencing.
Rețineți că deja ați denumit fișierul rautjarvi_georef.tif, când ați editat setările Georeferențiatorului.
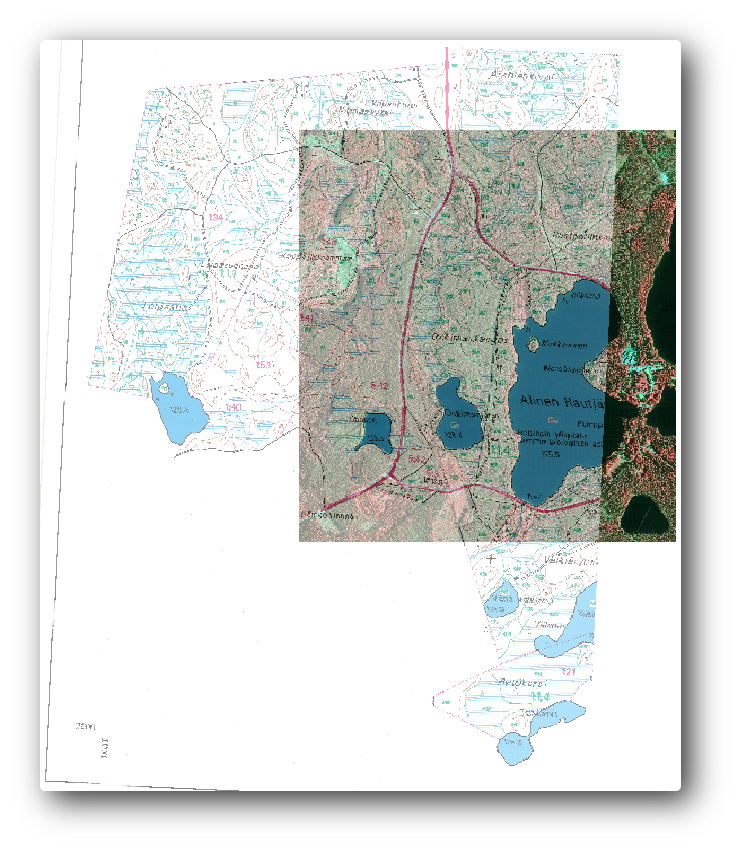
Now you can see the map in QGIS project as a georeferenced raster. Note that the raster seems to be slightly rotated, but that is simply because the data is KKJ / Finland zone 2 and your project is in ETRS89 / ETRS-TM35FIN.
To check that your data is properly georeferenced you can open the aerial image in the exercise_data\forestry folder, named rautjarvi_aerial.tif. Your map and this image should match quite well. Set the map transparency to 50% and compare it to the aerial image.
Salvați modificările proiectului QGIS, apoi veți continua din acest punct cu lecția următoare.
15.2.3. In Conclusion
După cum ați văzut, georeferențierea unei hărți de hârtie este o operațiune relativ simplă.
15.2.4. What’s Next?
In the next lesson, you will digitize the forest stands in your map as polygons and add the inventory data to them