8.1. Lesson: Les données raster
Les données raster sont un peu différentes des données vectorielles. Les données vectorielles possèdent des caractéristiques distinctes construites sur des sommets, et peut-être connectées avec des lignes et/ou des aires. Les données raster, cependant, sont comme des images. Bien qu’ils puissent présenter différentes propriétés d’objets dans le monde réel, ces objets n’existent pas comme des objets distincts ; au contraire, ils sont représentés en utilisant des pixels de différentes valeurs de couleurs différentes.
Lors de ce module, vous allez utiliser des données raster pour compléter votre analyse SIG existante.
Objectif de cette leçon :* Apprendre à travailler avec des données raster dans l’environnement QGIS.
8.1.1.  Follow Along: Chargement de Données Raster
Open your analysis.qgs map (which you should have created and saved during the previous module).
Deactivate all the layers except the solution and important_roads layers.
Click on the Load Raster Layer button:
The Load Raster Layer dialog will open. The data for this project is in exercise_data/raster.
- Either load them all in separately, or hold down ctrl and click on all four of them in turn, then open them at the same time.
The first thing you’ll notice is that nothing seems to be happening in your map. Are the rasters not loading? Well, there they are in the Layers list, so obviously they did load. The problem is that they’re not in the same projection. Luckily, we’ve already seen what to do in this situation.
- Select Project ‣ Project Properties in the menu:
- Select CRS tab in the menu:
- Enable “on the fly” reprojection.
- Set it to the same projection as the rest of your data (WGS 84 / UTM zone 33S).
- Click [OK].
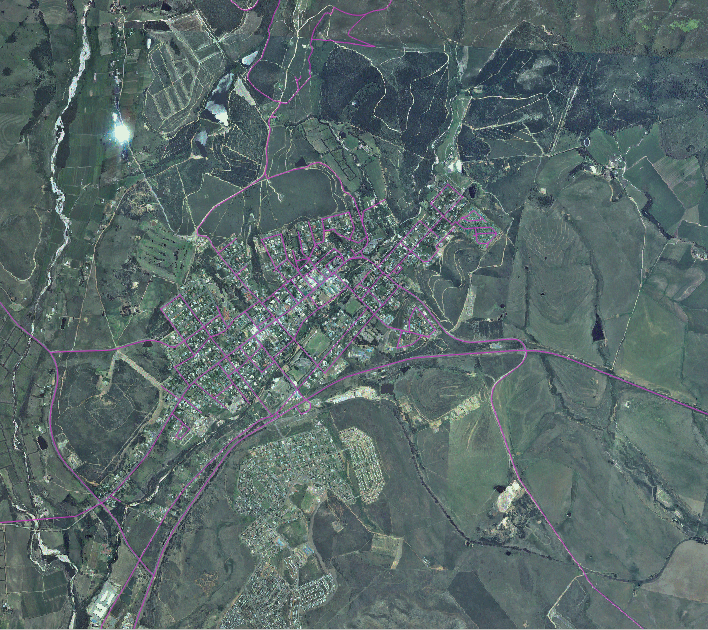
The rasters should fit nicely:

Nous y voilà - quatre photographies aériennes couvrant notre région d’études.
8.1.2.  Follow Along: Créer un Raster Virtuel
Maintenant, comme vous pouvez le voir à partir de cela, votre couche de solution réside dans les quatre photographies. Ce qui signifie que vous allez devoir travailler avec ces quatre rasters tout le temps. Ce n’est pas idéal ; il serait préférable d’avoir un fichier pour une image (composite), non ?
Luckily, QGIS allows you to do exactly this, and without needing to actually create a new raster file, which could take up a lot of space. Instead, you can create a Virtual Raster. This is also often called a Catalog, which explains its function. It’s not really a new raster. Rather, it’s a way to organize your existing rasters into one catalog: one file for easy access.
To make a catalog:
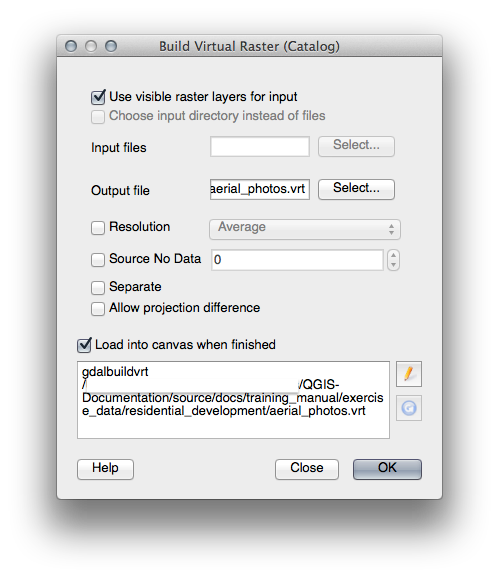
- Click on the menu item Raster ‣ Miscellaneous ‣ Build Virtual Raster (Catalog).
- In the dialog that appears, check the box next to Use visible raster layers for input.
- Enter exercise_data/residential_development as the output location.
- Enter aerial_photos.vrt as the file name.
- Check the Load into canvas when finished button.
Notice the text field below. What this dialog is actually doing is that it’s writing that text for you. It’s a long command that QGIS is going to run.
Note
 Keep in mind that the command text is editable, so you can
customize the command further if preferred. Search online for the initial
command (in this case, gdalbuildvrt) for help on the syntax.
- Click OK to run the command.

It may take a while to complete. When it’s done, it will tell you so with a message box.
- Click OK to chase the message away.
- Click Close on the Build Virtual Raster (Catalog) dialog. (Don’t click OK again, otherwise it’s going to start running that command again.)
- You can now remove the original four rasters from the Layers list.
- If necessary, click and drag the new aerial_photos raster catalog layer to the bottom of the Layers list so that the other activated layers become visible.
8.1.3.  Transformation de données Raster
Les méthodes ci-dessus vous permettent de fusionner les jeux de données en utilisant un catalogue, et de les reprojeter “à la volée”. Cependant, si vous configurez les données que vous allez utiliser pendant un certain temps, il peut être plus efficace de créer de nouveaux rasters qui sont déjà fusionnés et reprojetés. Cela améliore les performances tout en utilisant les rasters dans une carte, mais cela peut prendre un certain temps à d’abord mettre en place.
8.1.3.1. Reprojection de rasters
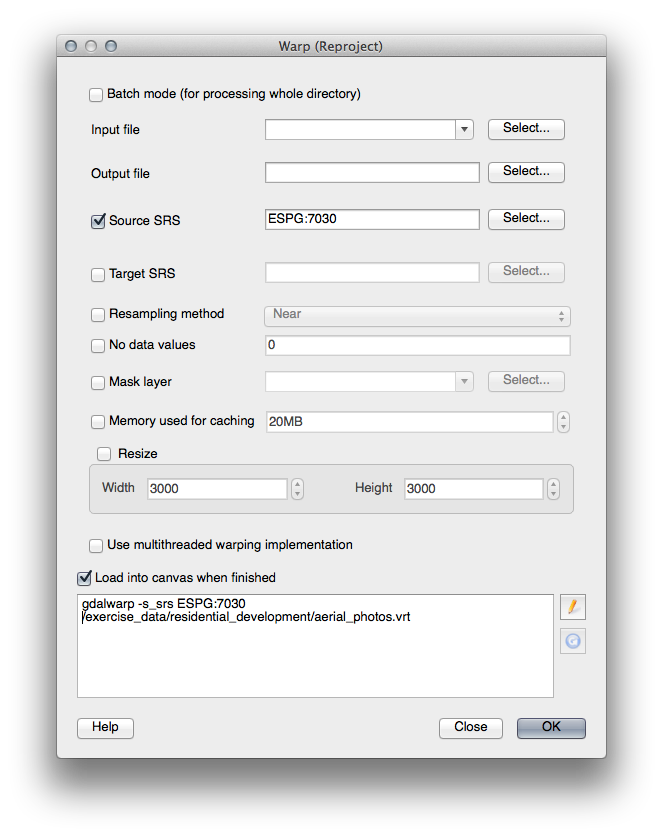
- Click on the menu item Raster ‣ Projections ‣ Warp (Reproject).
Note that this tool features a handy batch option for reprojecting the contents of whole directories. You can also reproject virtual rasters (catalogs), as well as enabling a multithreaded processing mode.

8.1.3.2. Fusion de rasters
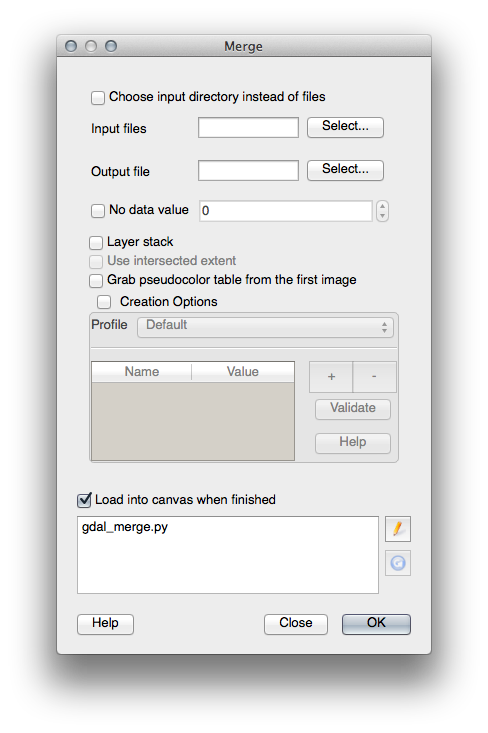
- Click on the menu item Raster ‣ Miscellaneous ‣ Merge.
You can choose to process entire directories instead of single files, giving you a very useful built-in batch processing capability. You can specify a virtual raster as input file, too, and all of the rasters that it consists of will be processed.
You can also add your own command line options using the Creation Options checkbox and list. This only applies if you have knowledge of the GDAL library’s operation.

8.1.4. In Conclusion
Dans QGIS, il est facile d’inclure des données raster dans vos projets existants.
8.1.5. What’s Next?
Ensuite, nous utiliserons les données raster qui ne sont pas de l’imagerie aérienne, et verrons comment la symbolisation est ainsi utile dans le cas des rasters.
