Importante
A tradução é um esforço comunitário você pode contribuir. Esta página está atualmente traduzida em 42.16%.
2. Iniciando
2.1. Installation on Debian-based systems
We will give a short and simple installation how-to for a minimal working configuration on Debian based systems (including Ubuntu and derivatives). However, many other distributions and OSs provide packages for QGIS Server.
Nota
No Ubuntu, você pode usar seu usuário comum, acrescentando sudo aos comandos que requerem permissões de administrador. No Debian você pode trabalhar como administrador (root), sem usar sudo.
Requirements and steps to add official QGIS repositories to install QGIS Server on a Debian based system are provided in QGIS installers page. You may want to install at least the latest Long Term Release.
Uma vez configurado o repositório da versão desejada e instalado o QGIS Server, você pode testar a instalação com:
/usr/lib/cgi-bin/qgis_mapserv.fcgi
Se você obtiver a seguinte saída, o servidor está corretamente instalado.
Nota
Dependendo da versão do QGIS, você poderá ver uma saída ligeiramente diferente informada quando executar qgis_mapserv.fcgi`.
QFSFileEngine::open: No file name specified
Warning 1: Unable to find driver ECW to unload from GDAL_SKIP environment variable.
Warning 1: Unable to find driver ECW to unload from GDAL_SKIP environment variable.
Warning 1: Unable to find driver JP2ECW to unload from GDAL_SKIP environment variable.
Warning 1: Unable to find driver ECW to unload from GDAL_SKIP environment variable.
Warning 1: Unable to find driver JP2ECW to unload from GDAL_SKIP environment variable.
Content-Length: 206
Content-Type: text/xml; charset=utf-8

<ServiceExceptionReport version="1.3.0" xmlns="https://www.opengis.net/ogc">
 <ServiceException code="Service configuration error">Service unknown or unsupported</ServiceException>
</ServiceExceptionReport>
Nota
Como visto abaixo, o QGIS informa um código de Status 400, que identifica corretamente que a solicitação falhou porque não há sessão http ativa. Isto não é um bug e indica que o servidor está funcionando corretamente.
Application path not initialized
Application path not initialized
Warning 1: Unable to find driver ECW to unload from GDAL_SKIP environment variable.
Warning 1: Unable to find driver ECW to unload from GDAL_SKIP environment variable.
Warning 1: Unable to find driver JP2ECW to unload from GDAL_SKIP environment variable.
"Loading native module /usr/lib/qgis/server/libdummy.so"
"Loading native module /usr/lib/qgis/server/liblandingpage.so"
"Loading native module /usr/lib/qgis/server/libwcs.so"
"Loading native module /usr/lib/qgis/server/libwfs.so"
"Loading native module /usr/lib/qgis/server/libwfs3.so"
"Loading native module /usr/lib/qgis/server/libwms.so"
"Loading native module /usr/lib/qgis/server/libwmts.so"
QFSFileEngine::open: No file name specified
Content-Length: 102
Content-Type: application/json
Server:  QGIS FCGI server - QGIS version 3.22.6-Białowieża
Status:  400
[{"code":"Bad request error","description":"Requested URI does not match any registered API handler"}]
Let’s add a sample project. You can use your own, or one from Training demo data:
mkdir /home/qgis/projects/
cd /home/qgis/projects/
wget https://github.com/qgis/QGIS-Training-Data/archive/release_3.22.zip
unzip release_3.22.zip
mv QGIS-Training-Data-release_3.22/exercise_data/qgis-server-tutorial-data/world.qgs .
mv QGIS-Training-Data-release_3.22/exercise_data/qgis-server-tutorial-data/naturalearth.sqlite .
Certamente, você pode usar seu software GIS favorito para abrir este arquivo e dar uma olhada na configuração e nas camadas disponíveis.
Para implantar corretamente o servidor QGIS, você precisa de um servidor HTTP. As escolhas recomendadas são Apache ou NGINX.
2.1.1. Servidor HTTP Apache
Nota
In the following, please replace qgis.demo with the name or IP address of your server.
Instalar Apache e mod_fcgid:
apt install apache2 libapache2-mod-fcgid
Você pode executar o QGIS Server em seu site padrão, mas vamos configurar um virtual host especificamente para isto, como segue.
No diretório :file:`/etc/apache2/sites-available’, crie um arquivo chamado :arquivo:`qgis.demo.conf’, com este conteúdo:
<VirtualHost *:80>
  ServerAdmin webmaster@localhost
  ServerName qgis.demo

  DocumentRoot /var/www/html

  # Apache logs (different than QGIS Server log)
  ErrorLog ${APACHE_LOG_DIR}/qgis.demo.error.log
  CustomLog ${APACHE_LOG_DIR}/qgis.demo.access.log combined

  # Longer timeout for WPS... default = 40
  FcgidIOTimeout 120

  FcgidInitialEnv LC_ALL "en_US.UTF-8"
  FcgidInitialEnv PYTHONIOENCODING UTF-8
  FcgidInitialEnv LANG "en_US.UTF-8"

  # QGIS log
  FcgidInitialEnv QGIS_SERVER_LOG_STDERR 1
  FcgidInitialEnv QGIS_SERVER_LOG_LEVEL 0

  # default QGIS project
  SetEnv QGIS_PROJECT_FILE /home/qgis/projects/world.qgs

  # QGIS_AUTH_DB_DIR_PATH must lead to a directory writeable by the Server's FCGI process user
  FcgidInitialEnv QGIS_AUTH_DB_DIR_PATH "/home/qgis/qgisserverdb/"
  FcgidInitialEnv QGIS_AUTH_PASSWORD_FILE "/home/qgis/qgisserverdb/qgis-auth.db"

  # Set pg access via pg_service file
  SetEnv PGSERVICEFILE /home/qgis/.pg_service.conf
  FcgidInitialEnv PGPASSFILE "/home/qgis/.pgpass"

  # if qgis-server is installed from packages in debian based distros this is usually /usr/lib/cgi-bin/
  # run "locate qgis_mapserv.fcgi" if you don't know where qgis_mapserv.fcgi is
  ScriptAlias /cgi-bin/ /usr/lib/cgi-bin/
  <Directory "/usr/lib/cgi-bin/">
    AllowOverride None
    Options +ExecCGI -MultiViews -SymLinksIfOwnerMatch
    Require all granted
  </Directory>

  <IfModule mod_fcgid.c>
  FcgidMaxRequestLen 26214400
  FcgidConnectTimeout 60
  </IfModule>

</VirtualHost>
Nota
Algumas das opções de configuração acima são explicadas nas seções Servidor variáveis de ambiente e pg_service file
Vamos agora criar os diretórios que irão armazenar os logs e o banco de dados de autenticação do Servidor QGIS:
mkdir -p /var/log/qgis/
chown www-data:www-data /var/log/qgis
mkdir -p /home/qgis/qgisserverdb
chown www-data:www-data /home/qgis/qgisserverdb
Nota
www-datais the Apache user on Debian based systems and we need Apache to have access to those locations or files. Thechown www-data...commands change the owner of the respective directories and files towww-data.
Agora podemos habilitar o host virtual e o
fcgidmod, se isso ainda não tiver sido feito:a2enmod fcgid a2enmod rewrite a2ensite qgis.demo
Now restart Apache for the new configuration to be taken into account:
systemctl restart apache2
Agora que o Apache sabe que deve responder aos pedidos para http://qgis.demo também precisamos configurar o sistema do cliente para que ele saiba quem é
qgis.demo. Fazemos isso adicionando127.0.0.1 qgis.demono arquivo hosts.# Replace 127.0.0.1 with the IP of your server. sh -c "echo '127.0.0.1 qgis.demo' >> /etc/hosts"
Importante
Remember that both the qgis.demo.conf and /etc/hosts files should
be configured for your setup to work.
You can also test the access to your QGIS Server from other clients on the
network (e.g. Windows or macos machines) by going to their /etc/hosts
file and point the qgis.demo name to whatever IP the server machine has on the
network (not 127.0.0.1 as it is the local IP, only accessible from the
local machine). On *nix machines the
hosts file is located in /etc, while on Windows it’s under
the C:\Windows\System32\drivers\etc directory. Under Windows you
need to start your text editor with administrator privileges before opening
the hosts file.
QGIS Server is now available at http://qgis.demo. To check, type in a browser, as in the simple case:
http://qgis.demo/cgi-bin/qgis_mapserv.fcgi?SERVICE=WMS&VERSION=1.3.0&REQUEST=GetCapabilities
2.1.2. Servidor HTTP NGINX
Nota
In the following, please replace qgis.demo with the name or IP address of your server.
You can also use QGIS Server with NGINX. Unlike Apache, NGINX does not automatically spawn FastCGI processes. The FastCGI processes are to be started by something else.
Instalar NGINX:
apt install nginx
As a first option, you can use spawn-fcgi or fcgiwrap to start and manage the QGIS Server processes. Official Debian packages exist for both. When you have no X server running and you need, for example, printing, you can use xvfb.
Another option is to rely on Systemd, the init system for GNU/Linux that most Linux distributions use today. One of the advantages of this method is that it requires no other components or processes. It’s meant to be simple, yet robust and efficient for production deployments.
Configuração NGINX
The include fastcgi_params; used in the previous configuration is important,
as it adds the parameters from /etc/nginx/fastcgi_params:
fastcgi_param  QUERY_STRING       $query_string;
fastcgi_param  REQUEST_METHOD     $request_method;
fastcgi_param  CONTENT_TYPE       $content_type;
fastcgi_param  CONTENT_LENGTH     $content_length;

fastcgi_param  SCRIPT_NAME        $fastcgi_script_name;
fastcgi_param  REQUEST_URI        $request_uri;
fastcgi_param  DOCUMENT_URI       $document_uri;
fastcgi_param  DOCUMENT_ROOT      $document_root;
fastcgi_param  SERVER_PROTOCOL    $server_protocol;
fastcgi_param  REQUEST_SCHEME     $scheme;
fastcgi_param  HTTPS              $https if_not_empty;

fastcgi_param  GATEWAY_INTERFACE  CGI/1.1;
fastcgi_param  SERVER_SOFTWARE    nginx/$nginx_version;

fastcgi_param  REMOTE_ADDR        $remote_addr;
fastcgi_param  REMOTE_PORT        $remote_port;
fastcgi_param  SERVER_ADDR        $server_addr;
fastcgi_param  SERVER_PORT        $server_port;
fastcgi_param  SERVER_NAME        $server_name;

# PHP only, required if PHP was built with --enable-force-cgi-redirect
fastcgi_param  REDIRECT_STATUS    200;
Moreover, you can use some Variáveis ambientais to configure QGIS Server.
In the NGINX configuration file, /etc/nginx/nginx.conf, you have to use
fastcgi_param instruction to define these variables as shown below:
location /qgisserver {
     gzip           off;
     include        fastcgi_params;
     fastcgi_param  QGIS_SERVER_LOG_STDERR  1;
     fastcgi_param  QGIS_SERVER_LOG_LEVEL   0;
     fastcgi_pass   unix:/var/run/qgisserver.socket;
 }
FastCGI wrappers
Aviso
fcgiwrap is easier to set up than spawn-fcgi, because it’s already wrapped in a Systemd service. But it also leads to a solution that is much slower than using spawn-fcgi. With fcgiwrap, a new QGIS Server process is created on each request, meaning that the QGIS Server initialization process, which includes reading and parsing the QGIS project file, is done on each request. With spawn-fcgi, the QGIS Server process remains alive between requests, resulting in much better performance. For that reason, spawn-fcgi is recommended for production use.
spawn-fcgi
Se você quiser utilizar spawn-fcgi:
O primeiro passo é instalar o pacote:
apt install spawn-fcgi
Em seguida, introduzir o seguinte bloco na configuração do seu servidor NGINX:
location /qgisserver {
    gzip           off;
    include        fastcgi_params;
    fastcgi_pass   unix:/var/run/qgisserver.socket;
}
E reiniciar o NGINX para levar em conta a nova configuração:
systemctl restart nginx
Finally, considering that there is no default service file for spawn-fcgi, you have to manually start QGIS Server in your terminal:
spawn-fcgi -s /var/run/qgisserver.socket \
                -U www-data -G www-data -n \
                /usr/lib/cgi-bin/qgis_mapserv.fcgi
O Servidor QGIS está agora disponível em http://qgis.demo/qgisserver.
Nota
When using spawn-fcgi, you may directly define environment variables
before running the server. For example:
export QGIS_SERVER_LOG_STDERR=1
É claro, você pode adicionar um roteiro de inicialização para iniciar o QGIS Server no momento da inicialização ou sempre que quiser. Por exemplo, com systemd:
Edite o arquivo:file:/etc/systemd/system/qgis-server.service com este conteúdo:
[Unit]
Description=QGIS server
After=network.target

[Service]
;; set env var as needed
;Environment="LANG=en_EN.UTF-8"
;Environment="QGIS_SERVER_PARALLEL_RENDERING=1"
;Environment="QGIS_SERVER_MAX_THREADS=12"
;Environment="QGIS_SERVER_LOG_LEVEL=0"
;Environment="QGIS_SERVER_LOG_STDERR=1"
;; or use a file:
;EnvironmentFile=/etc/qgis-server/env

ExecStart=spawn-fcgi -s /var/run/qgisserver.socket -U www-data -G www-data -n /usr/lib/cgi-bin/qgis_mapserv.fcgi

[Install]
WantedBy=multi-user.target
Em seguida, habilitar e iniciar o serviço:
systemctl enable --now qgis-server
Aviso
With the above commands spawn-fcgi spawns only one QGIS Server process.
fcgiwrap
Using fcgiwrap is much easier to setup than spawn-fcgi but it’s much slower.
Primeiro você precisa instalar o pacote correspondente:
apt install fcgiwrap
Em seguida, introduzir o seguinte bloco na configuração do seu servidor NGINX:
1 location /qgisserver {
2     gzip           off;
3     include        fastcgi_params;
4     fastcgi_pass   unix:/var/run/fcgiwrap.socket;
5     fastcgi_param  SCRIPT_FILENAME /usr/lib/cgi-bin/qgis_mapserv.fcgi;
6 }
Finally, restart NGINX and fcgiwrap to take into account the new configuration:
systemctl restart nginx
systemctl restart fcgiwrap
O Servidor QGIS está agora disponível em http://qgis.demo/qgisserver.
Systemd
QGIS Server needs a running X Server to be fully usable, in particular for printing. In the case you already have a running X Server, you can use systemd services.
This method, to deploy QGIS Server, relies on two Systemd units to configure: a Socket unit and a Service unit.
The QGIS Server Socket unit defines and creates a file system socket, used by NGINX to start and communicate with QGIS Server. The Socket unit has to be configured with
Accept=false, meaning that the calls to theaccept()system call are delegated to the process created by the Service unit. It is located in/etc/systemd/system/qgis-server@.socket, which is actually a template:[Unit] Description=QGIS Server Listen Socket (instance %i) [Socket] Accept=false ListenStream=/var/run/qgis-server-%i.sock SocketUser=www-data SocketGroup=www-data SocketMode=0600 [Install] WantedBy=sockets.target
Agora ative e inicie as tomadas:
for i in 1 2 3 4; do systemctl enable --now qgis-server@$i.socket; done
The QGIS Server Service unit defines and starts the QGIS Server process. The important part is that the Service process’ standard input is connected to the socket defined by the Socket unit. This has to be configured using
StandardInput=socketin the Service unit configuration located in/etc/systemd/system/qgis-server@.service:[Unit] Description=QGIS Server Service (instance %i) [Service] User=www-data Group=www-data StandardOutput=null StandardError=journal StandardInput=socket ExecStart=/usr/lib/cgi-bin/qgis_mapserv.fcgi EnvironmentFile=/etc/qgis-server/env [Install] WantedBy=multi-user.target
Nota
The QGIS Server environment variables are defined in a separate file,
/etc/qgis-server/env. It could look like this:QGIS_PROJECT_FILE=/etc/qgis/myproject.qgs QGIS_SERVER_LOG_STDERR=1 QGIS_SERVER_LOG_LEVEL=3
Now start socket service:
for i in 1 2 3 4; do systemctl enable --now qgis-server@$i.service; done
Finalmente, para o servidor HTTP NGINX, vamos apresentar a configuração desta instalação:
upstream qgis-server_backend {
   server unix:/var/run/qgis-server-1.sock;
   server unix:/var/run/qgis-server-2.sock;
   server unix:/var/run/qgis-server-3.sock;
   server unix:/var/run/qgis-server-4.sock;
}

server {
   …

   location /qgis-server {
       gzip off;
       include fastcgi_params;
       fastcgi_pass qgis-server_backend;
   }
}
Now restart NGINX for the new configuration to be taken into account:
systemctl restart nginx
Thanks to Oslandia for sharing their tutorial.
2.1.3. Xvfb
QGIS Server needs a running X Server to be fully usable, in particular for printing.
On servers it is usually recommended not to install it, so you may use xvfb
to have a virtual X environment.
If you’re running the Server in graphic/X11 environment then there is no need to install xvfb. More info at https://www.itopen.it/qgis-server-setup-notes/.
Para instalar o pacote:
apt install xvfb
Create the service file,
/etc/systemd/system/xvfb.service, with this content:[Unit] Description=X Virtual Frame Buffer Service After=network.target [Service] ExecStart=/usr/bin/Xvfb :99 -screen 0 1024x768x24 -ac +extension GLX +render -noreset [Install] WantedBy=multi-user.target
Ative, inicie e verifique o status do
xvfb.service:systemctl enable --now xvfb.service systemctl status xvfb.service
Then, according to your HTTP server, you should configure the DISPLAY parameter or directly use xvfb-run.
Usando Apache:
Adicione à sua configuração Fcgid (ver Servidor HTTP Apache):
FcgidInitialEnv DISPLAY ":99"
Reinicie o Apache para que a nova configuração seja considerada:
systemctl restart apache2
Usando NGINX
With spawn-fcgi using
xvfb-run:xvfb-run /usr/bin/spawn-fcgi -f /usr/lib/cgi-bin/qgis_mapserv.fcgi \ -s /tmp/qgisserver.socket \ -G www-data -U www-data -n
With the DISPLAY environment variable in the HTTP server configuration.
fastcgi_param DISPLAY ":99";
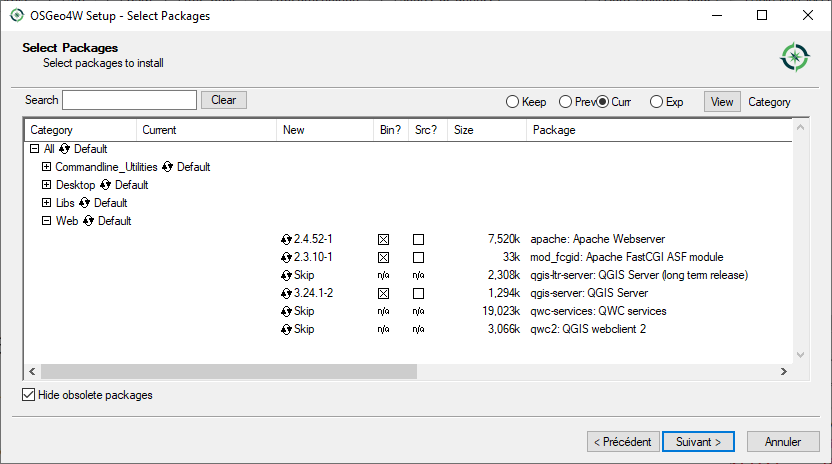
2.2. Instalação no Windows
QGIS Server can also be installed on Windows systems using the OSGeo4W network installer (https://qgis.org/resources/installation-guide/#windows).
Um procedimento simples é o seguinte:
Baixe e execute o instalador OSGeo4W
Siga a “Instalação Avançada” e instale os pacotes QGIS Desktop, QGIS Server apache e mod_fcgid.
O Apache não é instalado diretamente como um serviço no Windows. Você precisa fazê-lo:
Right-click the
OSGeo4W.batfile at the root of theC:\OSGeo4W\folder (if the default installation paths have been used) and select Run as administratorNo console, execute
apache-install.bat, que terá saída> apache-install.bat Installing the 'Apache OSGeo4W Web Server' service The 'Apache OSGeo4W Web Server' service is successfully installed. Testing httpd.conf.... Errors reported here must be corrected before the service can be started. ...
O serviço está iniciado, como você pode notar no relatório. Mas o servidor pode não funcionar devido à falta de configuração personalizada.
Edit the
C:\OSGeo4w\apps\apache\conf\httpd.conffile with the following changes (various other combinations are possible):Tabela 2.1 Apache configuration update Finalidade
Configuração existente
Substituição
(Opcional) Personalize o endereço para ouvir usando um IP e/ou porta, Você pode e adicionar quantas entradas desejar.
Listen ${SRVPORT}
Listen localhost:8080
Indique onde encontrar os arquivos de script
ScriptAlias /cgi-bin/ "${SRVROOT}/cgi-bin/"
ScriptAlias /cgi-bin/ "C:/OSGeo4W/apps/qgis/bin/"
Fornecer permissões na pasta de scripts
<Directory "${SRVROOT}/cgi-bin">
    AllowOverride None
    Options None
    Require all granted
</Directory>
<Directory "C:/OSGeo4W/apps/qgis/bin">
    SetHandler cgi-script
    AllowOverride None
    Options ExecCGI
    Require all granted
</Directory>
Habilitar extensões de arquivo para uso em arquivos de script. Descomentar e completar
#AddHandler cgi-script .cgiAddHandler cgi-script .cgi .exe
Adicionar mais variáveis de configuração personalizadas OSGeo4W
# parse OSGeo4W apache conf files
IncludeOptional "C:/OSGeo4W/httpd.d/httpd_*.conf"
# parse OSGeo4W apache conf files
IncludeOptional "C:/OSGeo4W/httpd.d/httpd_*.conf"
SetEnv GDAL_DATA "C:/OSGeo4W/share/gdal"
SetEnv QGIS_AUTH_DB_DIR_PATH "C:/OSGeo4W/apps/qgis/resources"

# default QGIS project
SetEnv QGIS_PROJECT_FILE "C:/Users/*Your USERNAME*/qgis_projects/qgis-server-tutorial-data/world.qgs"
Reiniciar o servidor web Apache
> apache-restart.bat
Let’s add a sample project. You can use your own, or one from Training demo data. Make sure that you place it in the same folder that your QGIS_PROJECT_FILE environment variable is pointing to:
> "C:/Users/*Your USERNAME*/qgis_projects/qgis-server-tutorial-data/world.qgs"
Abra a janela do navegador para testar uma solicitação de GetCapabilities no Servidor QGIS. Substitua
localhost:8080pelo IP e porta que você definir para ouvir.http://localhost:8080/cgi-bin/qgis_mapserv.fcgi.exe?SERVICE=WMS&VERSION=1.3.0&REQUEST=GetCapabilities
Um :arquivo:`XML` arquivo com as capacidades deve ser devolvido. Seu servidor está pronto para uso.
2.3. Serve a project
Agora que o Servidor QGIS está instalado e funcionando, só temos que usá-lo.
Obviously, we need a QGIS project to work on. Of course, you can fully customize your project by defining contact information, precise some restrictions on CRS or even exclude some layers. Everything you need to know about that is described later in Configurar seu projeto.
But for now, we are going to use a simple project already configured and
previously downloaded in /home/qgis/projects/world.qgs, as described above.
Ao abrir o projeto e dar uma olhada rápida nas camadas, sabemos que 4 camadas estão disponíveis no momento:
airports
places
countries
countries_shapeburst
Você não precisa entender a solicitação completa por enquanto, mas pode recuperar um mapa com algumas das camadas anteriores graças ao Servidor QGIS fazendo algo assim em seu navegador da web para recuperar a camada países:
If you followed the above instructions to install an Apache HTTP Server:
http://qgis.demo/cgi-bin/qgis_mapserv.fcgi?MAP=/home/qgis/projects/world.qgs&LAYERS=countries&SERVICE=WMS&VERSION=1.3.0&REQUEST=GetMap&CRS=EPSG:4326&WIDTH=400&HEIGHT=200&BBOX=-90,-180,90,180
If you followed the above instructions to install an NGINX HTTP Server:
http://qgis.demo/qgisserver?MAP=/home/qgis/projects/world.qgs&LAYERS=countries&SERVICE=WMS&VERSION=1.3.0&REQUEST=GetMap&CRS=EPSG:4326&WIDTH=400&HEIGHT=200&BBOX=-90,-180,90,180
If you followed the instructions for Windows:
http://localhost:8080/cgi-bin/qgis_mapserv.fcgi.exe?SERVICE=WMS&LAYERS=countries&VERSION=1.3.0&REQUEST=GetMap&CRS=EPSG:4326&WIDTH=400&HEIGHT=200&BBOX=-90,-180,90,180
Se você obtiver a próxima imagem, então o Servidor QGIS está rodando corretamente:
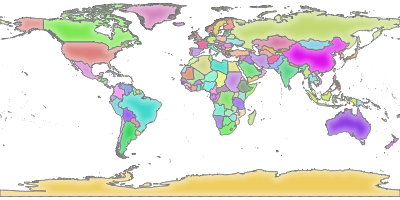
Fig. 2.2 Server response to a basic GetMap request
Note that you may define QGIS_PROJECT_FILE environment variable to use a project by default instead of giving a MAP parameter (see Variáveis ambientais).
Por exemplo com spawn-fcgi:
export QGIS_PROJECT_FILE=/home/qgis/projects/world.qgs
spawn-fcgi -f /usr/lib/bin/cgi-bin/qgis_mapserv.fcgi \
           -s /var/run/qgisserver.socket \
           -U www-data -G www-data -n
2.4. Configurar seu projeto
To provide a new QGIS Server WMS, WFS, OAPIF or WCS, you have to create a QGIS project file with some data or use one of your current projects. Define the colors and styles of the layers in QGIS and the project CRS, if not already defined. Then, go to the QGIS Server menu of the dialog and provide some information about the OWS in the Service Capabilities tab.
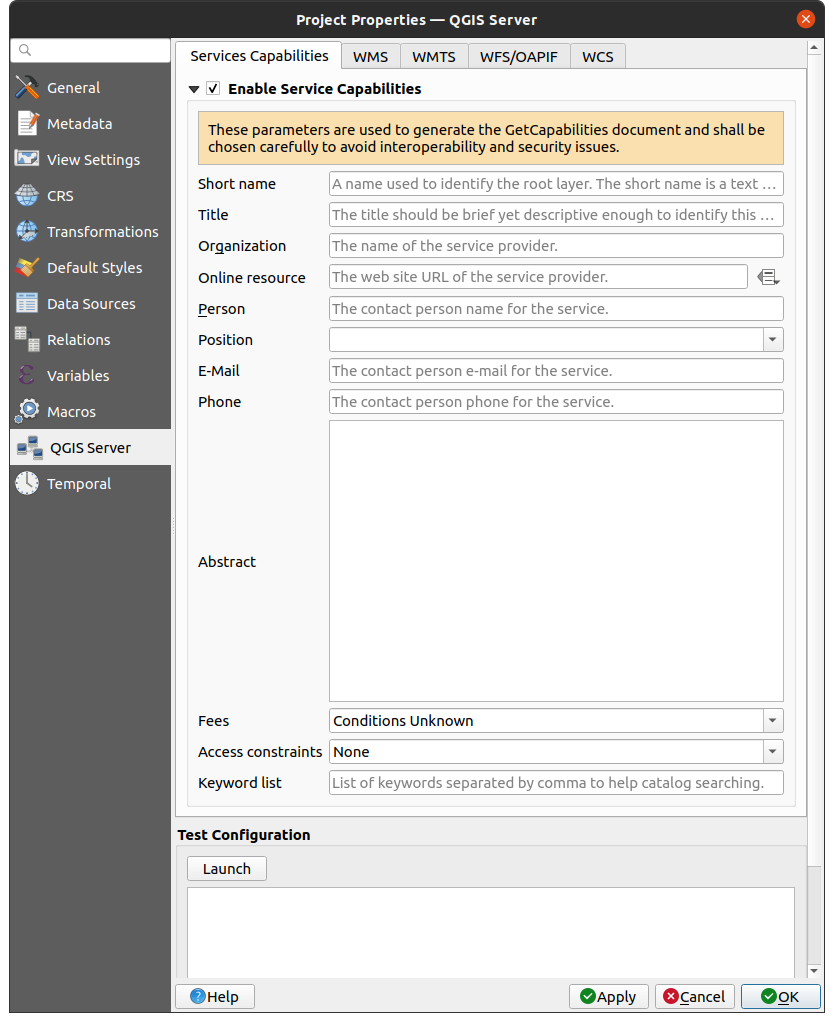
Fig. 2.3 Definitions for a QGIS Server WMS/WFS/WCS project
You have to Enable Service Capabilities first, if it is deactivated.
This will appear in the GetCapabilities response of the WMS, WFS or WCS.
If you don’t check  Enable Service capabilities,
QGIS Server will use the information given in the
Enable Service capabilities,
QGIS Server will use the information given in the wms_metadata.xml file
located in the cgi-bin folder.
2.4.1. Recursos WMS
Fig. 2.4 Definitions in the WMS tab
In the WMS tab, you can define the options for the WMS capabilities.
Check Advertised extent to define the extent advertised in the WMS GetCapabilities response. The spatial extent selector widget helps you enter the extent as a
xmin, xmax, ymin, ymaxtext or pick it from the map canvas, layers, bookmarks…
By checking
CRS restrictions, you can restrict
in which coordinate reference systems (CRS) QGIS Server will offer
to render maps. It is recommended that you restrict the offered CRS as this
reduces the size of the WMS GetCapabilities response.
Use the  button below to select those CRSs
from the Coordinate Reference System Selector, or click Used
to add the CRSs used in the QGIS project to the list.
button below to select those CRSs
from the Coordinate Reference System Selector, or click Used
to add the CRSs used in the QGIS project to the list.If you have print layouts defined in your project, they will be listed in the
GetProjectSettingsresponse, and they can be used by the GetPrint request to create prints, using one of the print layouts as a template. This is a QGIS-specific extension to the WMS 1.3.0 specification. If you want to exclude any print layout from being published by the WMS, check Exclude layouts and click the button below.
Then, select a print layout from the Select print layout dialog
in order to add it to the excluded layouts list.If you want to exclude any layer or layer group from being published by the WMS, check
Exclude Layers and click the button below.
This opens the Select restricted layers and groups dialog,
which allows you to choose the layers and groups that you don’t want to be published.
Use the Shift or Ctrl key if you want to select multiple entries.
It is recommended that you exclude from publishing the layers that you don’t need
as this reduces the size of the WMS GetCapabilities response
which leads to faster loading times on the client side.Layer and Feature Options
You can receive requested GetFeatureInfo as plain text, XML and GML. The default is XML.
If you check
Use layer ids as name, layer ids will be used
to reference layers in the GetCapabilitiesresponse orGetMap LAYERSparameter. If not, layer name or short name if defined (see Propriedades do Servidor QGIS) is used.By default, layer names are used to expose layers through WMS. If multiple layers have the same name, they will be merged to a single WMS layer and cannot be requested individually. You need to take care of these layers being compatible with each other. Using the Use layer ids as name option ensures that multiple layers with the same name can be requested as individual layers.
If you wish, you can check
Add geometry to feature response.
This will include the bounding box for each feature in the GetFeatureInfo response.
See also the WITH_GEOMETRY parameter.As many web clients can’t display circular arcs in geometries you have the option to segmentize the geometry before sending it to the client in a GetFeatureInfo response. This allows such clients to still display a feature’s geometry (e.g. for highlighting the feature). You need to check the
Segmentize feature info geometry to activate the option.You can also use the GetFeatureInfo geometry precision option to set the precision of the GetFeatureInfo geometry. This enables you to save bandwidth when you don’t need the full precision.
If one of your layers uses the Map Tip display (i.e. to show text using expressions) this will be listed inside the GetFeatureInfo output. If the layer uses a Value Map for one of its attributes, this information will also be shown in the GetFeatureInfo output.
Se você quiser que o QGIS Server anuncie URLs de solicitação específicas na resposta do WMS GetCapabilities, digite a URL correspondente no campo URL anunciada
Map and Legend Options
When a layer group is passed to
GetLegendGraphicrequest, all of its leaf layers are added to the legend picture (however without the groups’ labels). Check the Add layer groups in GetLegendGraphic option
if you want to also insert the layer groups (and subgroups) names
into the layer tree, just like in QGIS Desktop legend.When QGIS project contains layer groups, they are listed in WMS capabilities document alongside with layers. If a group (its name as listed in capabilities) is included in WMS GetMap
LAYERSparameter alongside with names of layers in that group, QGIS would duplicate the layers: once for the group and once for specific layer. If you check the Skip name attribute for groups option,
GetCapabilities will only return title attribute for the group but not its name attribute,
making it impossible to include groups in list of layers of GetMap request.Furthermore, you can restrict the maximum size of the maps returned by the requests by entering the maximum width and height into the respective fields under Maximum image size for GetMap and GetLegendGraphic requests.
You can change the Quality for JPEG and WebP images factor. The quality factor must be in the range 0 to 100. Specify 0 for maximum compression, 100 for no compression.
You can change the limit for atlas features to be printed in one request by setting the Maximum features for Atlas print requests field.
When QGIS Server is used in tiled mode (see TILED parameter), you can set the Tile buffer in pixels. The recommended value is the size of the largest symbol or line width in your QGIS project.
Depending on whether the map uses a projected CRS or a geographic CRS and if there is no information to evaluate the map unit sized symbols, you can provide reference for size through either a Default scale for legend or Default map units per mm in legend.
2.4.2. WMTS capabilities
In the WMTS tab you can select the layers you want to publish as WMTS and specify if you want to publish as PNG or JPEG.
Under Grids, for each restricted CRS,
you can indicate whether the tile matrices should be published
and configure their top-left corner, minimum and maximum scales
and the last level of the tile matrices.
Note that for EPSG:3857 and EPSG:4326 CRS, only the last level of the tile matrices can be edited.
You can also set a Minimum scale for the tiles display.
If you enter a URL in the Advertised URL field, QGIS Server will advertise this specific URL in the WMTS GetCapabilities response.
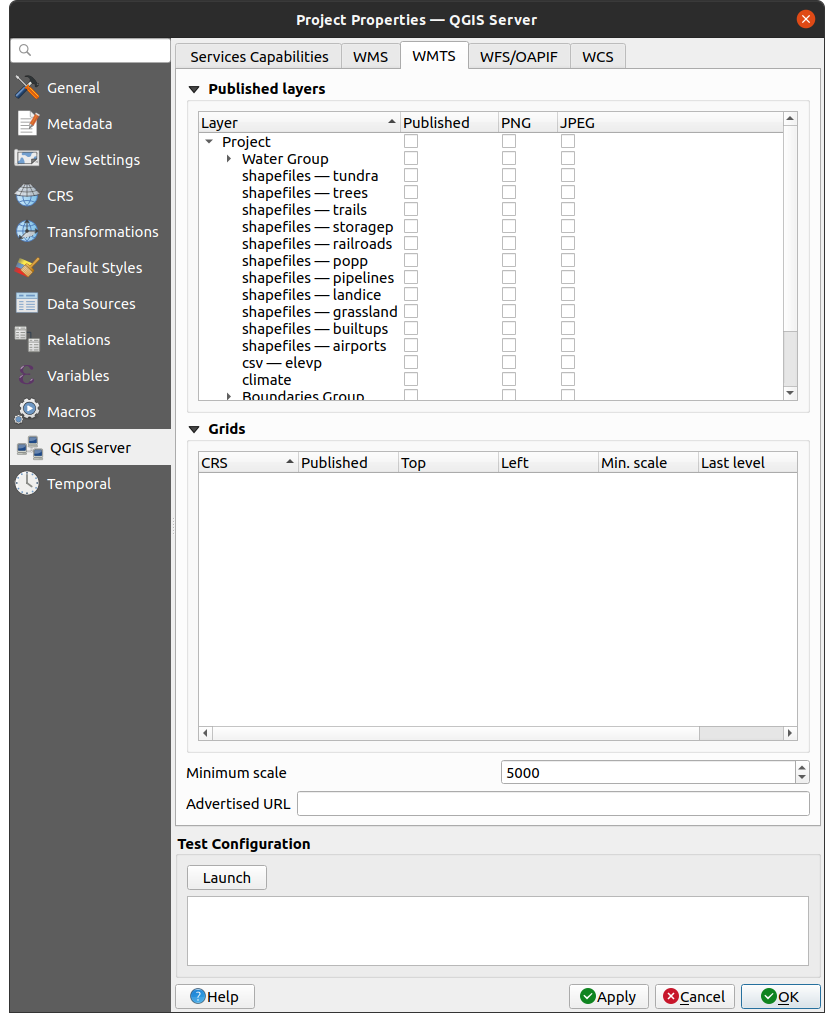
Fig. 2.5 Definitions in the WMTS tab
2.4.3. WFS/OAPIF capabilities
In the WFS/OAPIF tab, you can select the layers you want to publish as WFS or OAPIF, and specify if they will allow update, insert and delete operations.
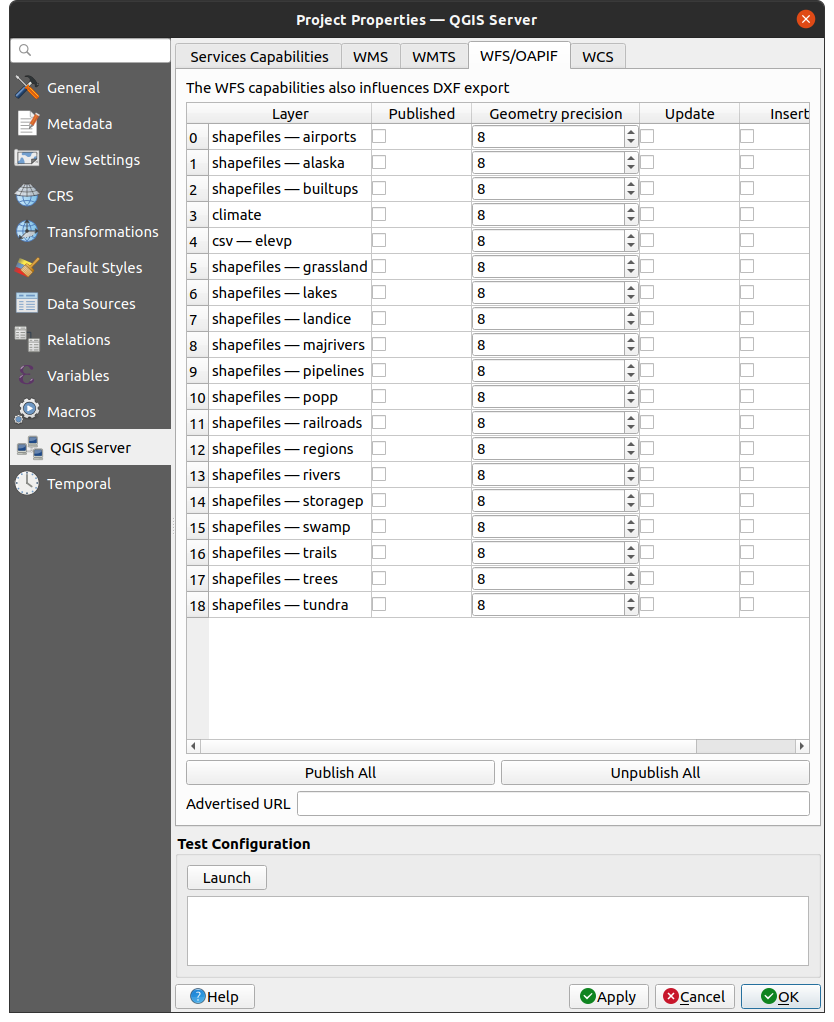
Fig. 2.6 Definitions in the WFS/OAPIF tab
If you enter a URL in the Advertised URL field, QGIS Server will advertise this specific URL in the WFS GetCapabilities response.
2.4.4. WCS capabilities
In the WCS tab, you can select the layers that you want to publish as WCS.
If you enter a URL in the Advertised URL field of the WCS capabilities section, QGIS Server will advertise this specific URL in the WCS GetCapabilities response.
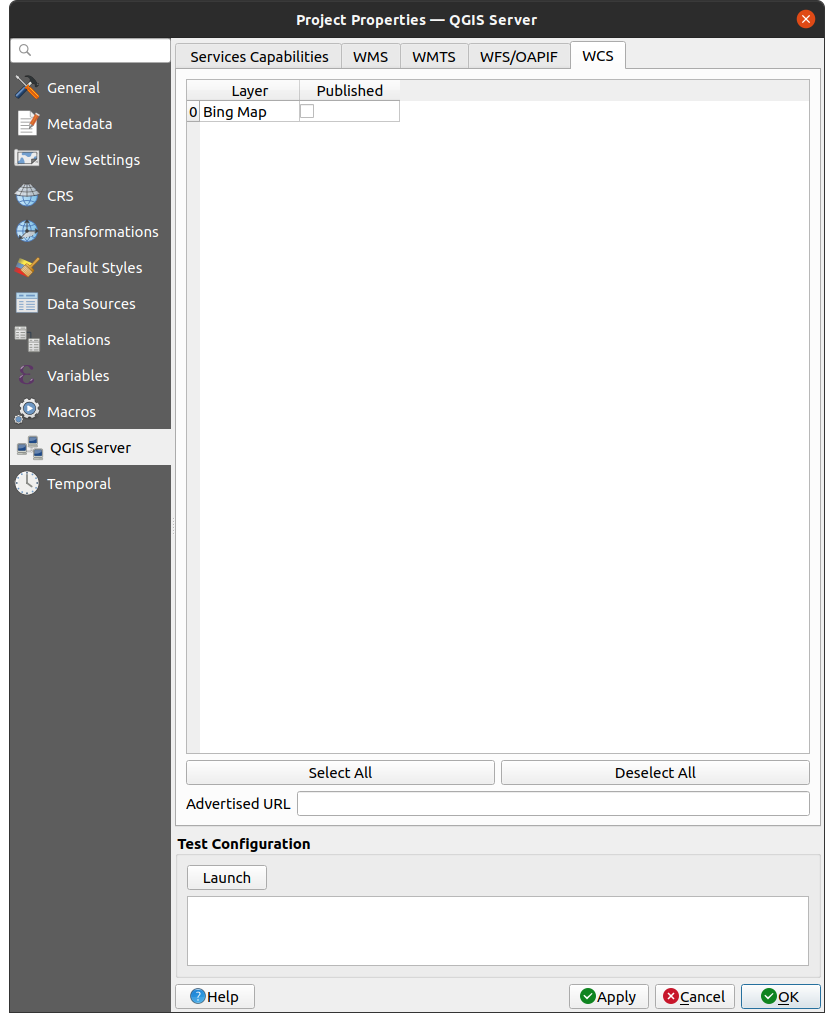
Fig. 2.7 Definitions in the WCS tab
2.4.5. Sintonia fina do seu OWS
Apart from configuring metadata individually for each layer, in QGIS you can fine tune your group of WMS layers. This is useful if you want the group to appear as a single entity in the WMS GetCapabilities, instead of exposing only its child layers. By setting metadata at the group level, you can provide a clearer description of related layers and improve the usability of your service. To configure metadata for a group of layers:
In the Layers panel, right-click the desired layer group and select Set Group WMS Data.
In the dialog that opens, fill in the information:
a Description: the abstract of the layer group.
a Attribution: the attribution of the layer group.
a Metadata URL: the URL of a metadata document for the layer group.
a Legend URL: the URL of a legend image for the layer group.
Optionally, you can check
Compute TIME dimension from children
to have QGIS Server compute the TIME dimension for the group
based on the TIME dimensions of its child layers.
For vector layers, the Fields tab of the dialog allows you to define for each attribute if it will be published or not. By default, all the attributes are published by your WMS and WFS. If you don’t want a specific attribute to be published, uncheck the appropriate checkbox in the Configuration column:
Do not expose in WFS
Do not expose in WMS
You can overlay watermarks over the maps produced by your WMS by adding text annotations or SVG annotations to the project file. See the Ferramentas de anotação section for instructions on creating annotations. For annotations to be displayed as watermarks on the WMS output, the Fixed map position checkbox in the Annotation text dialog must be unchecked. This can be accessed by double clicking the annotation while one of the annotation tools is active. For SVG annotations, you will need either to set the project to save absolute paths (in the General menu of the dialog) or to manually modify the path to the SVG image so that it represents a valid relative path.
2.5. Integração com terceiros
QGIS Server provides standard OGC web services like WMS, WFS, etc. thus it can be used by a wide variety of end user tools.
2.5.1. Integração com o QGIS Desktop
QGIS Desktop is the map designer where QGIS Server is the map server. The maps or QGIS projects will be served by the QGIS Server to provide OGC standards. These QGIS projects can either be files or entries in a database (by using in QGIS Desktop).
Além disso, deve ser estabelecido um fluxo de trabalho dedicado de atualização para atualizar um projeto utilizado por um Servidor QGIS (ou seja, copiar arquivos de projeto para a localização do servidor e reiniciar o Servidor QGIS). Por enquanto, os processos automatizados (como serviço de recarga de mensagens do servidor em fila de espera) ainda não estão implementados.
2.5.2. Integração com MapProxy
MapProxy is a tile cache server and as it can read and serve any WMS/WMTS map server, it can be directly connected to QGIS server web services and improve end user experience.
2.5.3. Integração com QWC2
QWC2 <https://github.com/qgis/qwc2>`_ é uma aplicação web responsiva e dedicada ao Servidor QGIS. Ele ajuda você a construir um visualizador de mapas altamente personalizado com seleção de camadas, informações de características, etc… Também estão disponíveis muitos plugins como autenticação ou serviço de impressão, a lista completa está disponível neste `repositório <https://github.com/qwc-services>>`_.