4. Translation Guidelines
This manual is aiming to help the translator. First the general process of how technically a translation is done is explained. Later the translation is explained from an actual English rst document that is translated to Dutch. Finally a summary of Rules of translation is given.
Note
Although these guidelines focus on QGIS documentation, the methods and the rules described below are also applicable to QGIS applications and website translation.
4.1. Translation process
QGIS Documentation is written in English with .rst files.
In order to provide translations:
A prebuild script creates translation files named
.pofiles for the English language in the folder/QGIS-Documentation/locale/en.The sentences in the
.pofiles are pushed to the Transifex web platform, and made available for translators who can begin to translate from English to their language with the editor.When a file is translated at 100%, the translated strings are automatically pulled back to the documentation repository, under
/QGIS-Documentation/locale/<language>.At the next build of the documentation (which occurs at least once a day – see time at the bottom of the page), a script reuses the sentences to create translated output.
For files not fully translated, a script pulls every two weeks translated strings from Transifex to Github and these are as well published at the next build.
Whenever an
.rstfile is updated, the English.pofile is updated and the changes are pushed to the corresponding file in Transifex. This means that when a new paragraph is added to an.rstdocument that was already translated, only the new/updated sentences are added to the translated.pofile and needs to be translated.
Note
Translating QGIS Desktop specificities
The main difference with translating QGIS applications is that instead of .po files,
all the translatable strings in the .py, .cpp, .yaml files
that shape a particular version of the application are pushed to and pulled from Transifex
as a single .ts file (e.g. qgis-application/qgis_en.ts (branch release-3_30) ).
Translations are pulled to Github in development branch (daily),
and at release time (for every released versions).
Two different tools are currently used to do translations in QGIS:
The Transifex web platform, the easiest and recommended way to translate QGIS, transparently does the process described above and pulls all the translatable texts in one place for the translator. Just pick the files you want and translate. Translated files are stored in the platform until another release is pushed.
Qt Linguist, a Qt development tool, requires the translator to pull locally the
.po(or.ts) files from the source code, translate and then push back.
Note that whatever tool you choose, rules of translations are the same.
4.2. Translate a file
To explain how translation works, we will use the heatmap plugin as an example. In this example we will translate it from English to Dutch, but it will be practically the same for other documents in all languages.
The source of the document can be found here:
QGIS-Documentation/source/docs/user_manual/plugins/plugins_heatmap.rst
So why did I choose this document?
It includes images, captions, headers, references and replacements.
I wrote it so it is easier for me to translate ;-)
The build process has created the English .po file which can be found here:
QGIS-Documentation/locale/en/LC_MESSAGES/docs/user_manual/plugins/plugins_heatmap.po
The equivalent Dutch .po file (basically a copy) can be found here:
QGIS-Documentation/locale/nl/LC_MESSAGES/docs/user_manual/plugins/plugins_heatmap.po
Along this file you will see a tiny .mo file which indicates that it
does not hold any translations yet.
4.2.1. Translation in Transifex
In order to translate using Transifex, you need to:
Once you are part of a language team, click on the corresponding project (in this case
QGIS Documentation). A list of available languages with their ratio of translation is displayed.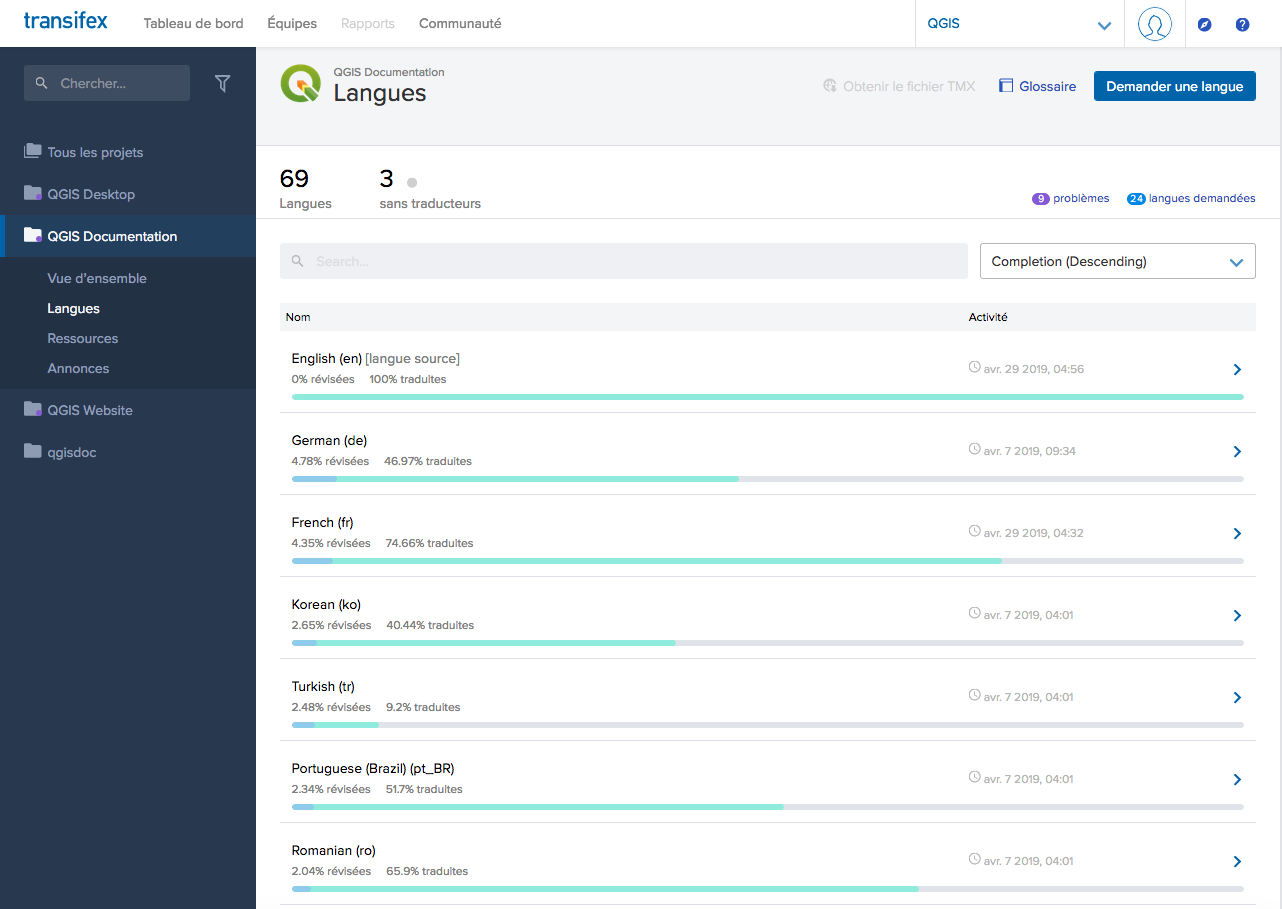
Fig. 4.20 Select language for translation in the Transifex menu
Hover over your language and click either:
View resources: translatable
.pofiles with their ratio of translation, number of strings and some more metadata are now displayed.or Translate: opens the interface of translation with all the available
.pofiles
Identify the file you’d like to translate (in our case we are looking for the
docs_user-manual_plugins_plugins-heatmap, the heatmap plugin file) or any unfinished file and click on it: strings in the files are loaded and you can use the interface to filter, translate, suggest translation…Tip
For the documentation or the website, clicking the
Fix melink in the footer of a page brings you directly to its corresponding translation page in Transifex.All you need to do is select each text and translate following the guidelines.
For further information on the use of Transifex Web Editor, see https://help.transifex.com/en/articles/6318216-translating-with-the-web-editor.
4.2.2. Translation in Qt Linguist
With Qt Linguist, you need to:
manually grab the
.poor.tsfile(s). This can be achieved by downloading the file(s) either from Transifex platform or from thelocale/$languagefolder of the source repository (in GitHub),proceed to the translation locally
upload the modified files to their sources (Transifex or GitHub).
While downloading and uploading translatable files can be done with Transifex, it’s not advised to use this process. Since there’s no versioning system on Transifex, the file you upload will simply replace the existing one and potentially overwrite any modification made by others on the platform in the meantime.
When you open the file in Qt Linguist for the first time you will see the following dialog:
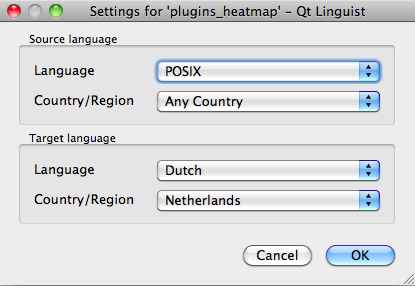
Fig. 4.21 Select language for translation in linguist menu
The Target language should be filled correctly. The Source language can be left as is with language POSIX and Country/Region on Any Country.
When you press the OK button Qt Linguist is filled with sentences and you can start translating, see Fig. 4.22.
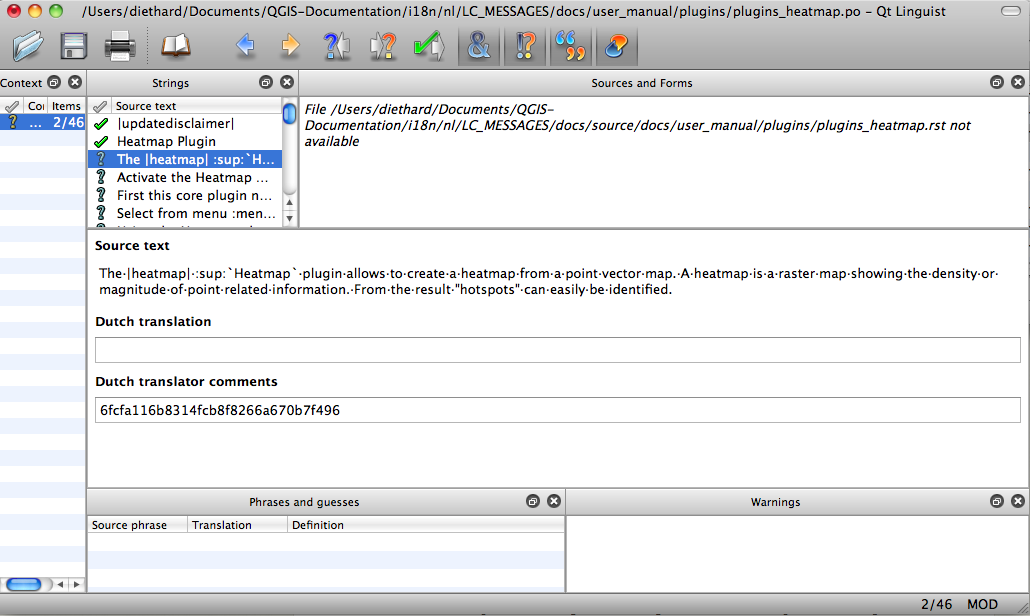
Fig. 4.22 Translate using the linguist menu
In the menu you see the following buttons which are convenient to use.
 The Translation Done Next button, is the most important
button. If the item needs translation, you enter a translation in the text
field, then hit this button. If the item does not need translation just leave the
text field for translation empty and also hit this button which indicates the
item is done and you continue with the next item.
The Translation Done Next button, is the most important
button. If the item needs translation, you enter a translation in the text
field, then hit this button. If the item does not need translation just leave the
text field for translation empty and also hit this button which indicates the
item is done and you continue with the next item. The Goto Previous button, can be used to go to the
previous translation item.
The Goto Previous button, can be used to go to the
previous translation item. The Goto Next button, can be used to go to the next
translation item.
The Goto Next button, can be used to go to the next
translation item. The Next Todo button, jumps to the first translation
item that still needs a translation. Handy when the original document has
changed and only several new/changed sentences need to be translated.
The Next Todo button, jumps to the first translation
item that still needs a translation. Handy when the original document has
changed and only several new/changed sentences need to be translated. The Previous Todo button, searches backward and
jumps to the first translation item it finds that still needs a translation.
The Previous Todo button, searches backward and
jumps to the first translation item it finds that still needs a translation.
For further information on the use of Qt Linguist, see https://doc.qt.io/qt-5/linguist-translators.html
Warning
If you want to download content to translate from the source
repository, never do this in the master branch. For translations
there are always translation branches available, once a document is fully
updated in English for a certain version. As an example, to translate
the manual of QGIS 2.8, you have to use the manual_en_v2.8 branch.
4.2.3. Translate a manual
Now we start to translate the plugin_heatmap manual!
Translating most of the sentences should be straightforward. During this translation session I will point out which parts (rst statements) need special translation.
Below we see an interesting sentence to translate:
The |heatmap| :sup:`Heatmap` plugin allows to create a heatmap from a
point vector map. A heatmap is a raster map showing the density or
magnitude of point related information. From the result "hotspots" can
easily be identified.
This sentence contains two rst statements:
|heatmap|words between|are replacements and these should never be translated! This will be replaced by the heatmap plugin icon!:sup:`Heatmap`, the:sup:statement is a superposition statement and prints the following text a bit higher. This is used to show the popup texts that appear when you hover above the toolbar item and this may be different when it is actually translated in the QGIS application. In the Dutch case it is not!
All other plain text in this sentence can be translated!
The next translation item contains the :ref: statement that is
commonly used to refer to another section somewhere in the manual! The text
following a :ref: statement should never be changed because it is a unique
identifier!
First this core plugin needs to be activated using the Plugin Manager
(see Section :ref:`load_core_plugin`). After activation the heatmap icon
|heatmap| can be found in the Raster Toolbar.
In this case load_core_plugin is a unique reference identifier placed before
an rst item that has a caption. The ref statement will be replaced with the text
of the header and turned into a hyperlink. When the header this reference is
referring to is translated, all references to this header will be automatically
translated as well.
The next item contains the rst-tag :menuselection: followed by text
actually displayed in a menu in QGIS application, this may be translated in the
application and therefore should be changed when this is the case.
Select from menu :menuselection:`View --> Toolbars --> Raster` to activate
the Raster Toolbar when it is not yet activated.
In above item “View –>” is actually translated to “Beeld –>” because this is the translation used in the Dutch localized QGIS application.
A bit further we meet the following tricky translation item:
The |heatmap| :sup:`Heatmap` tool button starts the Dialog of the Heatmap
plugin (see :numref:`figure_heatmap_settings`).
It holds a reference to a figure figure_heatmap_settings_, and like a reference
to a section this reference should not be changed!! The reference definition
from the rst-document is not included in the .po file and can therefore
not be changed. This means the reference to figures can not be translated. When
HTML is created you will see figure_heatmap_settings. When a PDF document is
created figure_heatmap_settings_ is replaced with a figure number.
The next translation item with rst attributes is the following item:
**Input Point dialog**: Provides a selection of loaded point vector maps.
Do not remove the stars in above line. It will print the text it holds in bold. The text itself is often text included in the dialog itself and may well be translated in the application.
The following translation item contains the :guilabel: rst tag.
When the |checkbox| :guilabel:`Advanced` checkbox is checked it will
give access to additional advanced options.
The text Advanced of the guilabel tag may well be translated in the QGIS
application and probably needs to be changed!
The following translation item contains ``airports``. The quotes are used to give the text another text font. In this case it is a literal value and does not need translation.
For the following example, we will use the ``airports`` vector point
layer from the QGIS sample dataset (see :ref:`label_sampledata`).
Another excellent QGIS tutorial on making heatmaps can be found on
`https://www.qgistutorials.com
<https://www.qgistutorials.com/en/docs/creating_heatmaps.html>`_.
This item also includes a hyperlink with an url and an external presentation.
The url should of course be left intact, you are allowed to change the external
text https://www.qgistutorials.com which is visible by the reader. Never
remove the underscore at the end of the hyperlink which forms an essential
part of it!!
4.2.4. Summary Rules for translation
Do not change text between two
|characters like|bronze|,|checkbox|,|labels|,|selectString|,|addLayer|… These are special tags used to replace imagesDo not change references that start with roles like
:ref:,:file:,:numref:unless they include a title. In that case, you can translate the title but keep unchanged the link (i.e., the text between<and>)Tip
When a title is provided for a reference, Transifex may display a number in the English source text in replacement of the link part. Click on the number in the source text to add the reference link next to the title being translated.
Do not change references that end with an underscore like
figure_labels_1_Do not change the url in hyperlinks, but you may change the external description. Leave the underscore at the end of the hyperlink, without additional spacing (
>`_)Change the text inside quotes following
:index:,:sup:,:guilabel:and:menuselection:tags. Check if/how it is translated in the QGIS Application. Do not change the tag itself.Text between double stars and double quotes often indicate values or fieldnames, sometimes they need translation sometimes not.
Be aware to use exactly the same (number of) special characters of the source text such as
`,``,*,**,::. These contribute to the cosmetics of the information providedDo not begin nor end the text hold by special characters or tags with a space
Do not end the translated strings with a new paragraph, otherwise the text will not be translated during the html generation.
Stick to above presented rules and the translated document will look fine!
For any question, please contact the QGIS Community Team or the QGIS Translation Team.