重要
翻訳は あなたが参加できる コミュニティの取り組みです。このページは現在 76.92% 翻訳されています。
12.4. レイヤをまたいでデータを接続・編集する
異なるレイヤのデータを接続する能力は、GISソフトウェアの手腕の一つです。このような接続は、地物間の空間的関係、またはそれらが共有している属性に基づくことができます。QGISは、これらの関連付けを処理する次のようなツールを提供しています:
プロセシングアルゴリズム、つまり 属性の空間結合, 属性の最近傍結合, 属性テーブルで結合(table join), ...は、接続の結果として新しいレイヤを作成できます
プロパティを結合する または リレーションの設定 は、属性のマッチングに基づいて、与えられたレイヤの地物の属性を、別のレイヤの属性を使って一時的に拡張します。
結合とリレーションはデータベースから借用した技術的な概念で、テーブルに格納されたデータを、その内容を結合することによって、最大限に活用するものです。つまり、異なるレイヤ(テーブル)の地物(行)同士を関連づけることができます。お互いに一致する行の数は任意です(0、1、多数)。
12.4.1. 二つのレイヤの地物を結合する
QGISの 結合 では、現在のレイヤの地物を、読み込まれた別のベクタレイヤの地物に関連付けることができます。空間的に有効であるかどうかや、ジオメトリのタイプは関係ありません。結合は、レイヤが共有する属性に基づき、1対1の関係で行われます。
レイヤ(以下 ターゲットレイヤ と表記)上で結合を作成するには:
レイヤの
 テーブル結合 タブに移動します
 新規結合を追加 ボタンをクリックします。 ベクタ結合を追加 ダイアログが現れます。
ターゲットベクタレイヤと結合させたい 結合するレイヤ を選択します。
(
結合するレイヤの) 結合基準の属性 と (ターゲットレイヤの) ターゲット属性 を指定します。これらは両方のレイヤで一致する地物を見つけるために使用されるフィールドなので、共通の値を持つ必要があります。OK ボタンを押すと、選択したパラメータの概要が テーブル結合 パネルに表示されます。
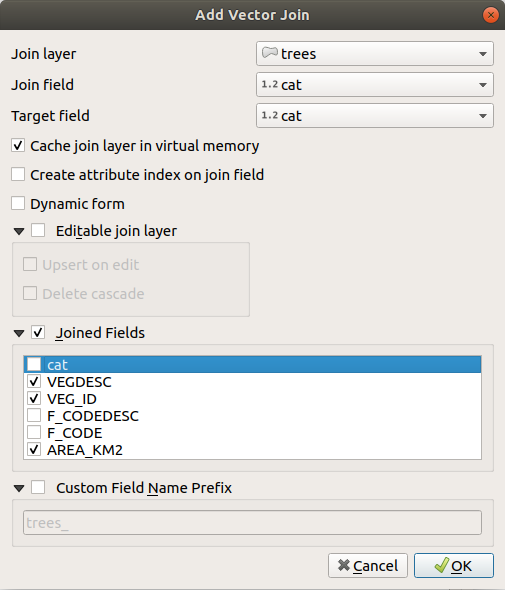
図 12.109 既存のベクタレイヤに属性テーブルを結合する
上記のステップでは、結合レイヤで 最初に一致した地物 の 全ての 属性がターゲットレイヤの地物に追加される結合が作成されます。結合処理では以下のロジックを使って地物を組にします:
一致するかどうかに関係なくターゲットレイヤの全ての地物が返されます
ターゲット属性に重複する値が含まれる場合、それらの地物には結合するレイヤの同じ地物が割り当てられます。
結合基準の属性に、重複して一致する値が含まれている場合、最初に取得された地物のみが選択されます。
注釈
QGISでの結合はひとつのフィールドの一致に基づいているため、たいていの場合、一致可能なフィールドの値が一意であることを確認したいでしょう。
QGISでは、結合を微調整するためのオプションがいくつか用意されています:
 結合レイヤをキャッシュ :探索を高速化するために、結合レイヤの値を(ジオメトリなしで)メモリにキャッシュできるようになります。
 結合属性にインデックスを作成 して探索を高速化
- 動的フォーム(結合レイヤと連動) : ターゲット属性 の変更に応じて結合属性をオンザフライで同期できるようになります。これにより、結合属性の制約条件も適切に更新されます。たくさんの地物や無数の結合がある場合には非常に時間がかかることがあるため、この機能はデフォルトでは無効化されていることに注意してください。
ターゲットレイヤが編集可能な場合には、フィールドの横の属性テーブルにはステータスを知らせるためのアイコンが表示されます:
 :結合レイヤが編集可能に設定されていません。ターゲットの属性テーブルから結合地物を編集できるようにしたい場合は、 編集可能な結合レイヤ オプションにチェックを入れる必要があります。
 :結合レイヤは編集可能に設定されていますが、現在のステータスは読み取り専用です。
 :結合レイヤは編集可能ですが、同期メカニズムは有効ではありません。ターゲットレイヤに地物が作成されたときに、結合レイヤに地物を自動的に追加したい場合には、 編集時Upsert オプションにチェックを入れる必要があります。対称的に、結合した地物を自動的に削除したい場合には、 カスケード削除 を有効にする必要があります。
- 結合属性 :結合するレイヤの全てのフィールドを追加するのではなく、その一部分を指定することができます。
- カスタムフィールド名の接頭辞 :名前の衝突を回避するために付けられる結合属性の接頭辞
12.4.2. 複数のレイヤ間のリレーションを設定する
2つのレイヤにわたる地物間の1対1のリンクを定義する結合とは異なり、リレーションは2つ以上のレイヤにわたる複数の地物間の相互接続を構築するのに役立ちます。リレーションはプロジェクトレベルの設定であり、  リレーション タブで設定します。そこから、次の操作が可能です:
- リレーションを追加 タイプは次のいずれかです:
多態リレーション は、アクションのドロップダウンメニューにある専用ツールで追加または編集できます。
注釈
一度作成された非多態リレーションを編集する簡単な方法はまだありません。名前のみダブルクリックで編集できます。そのようなリレーションの他のパラメータを編集するには、一度削除して再作成する必要があります。
- リレーションを検索: QGISはサポートされているデータベース形式(PostgreSQL、GeoPackage、ESRI File Geodatabaseなど)から既存のリレーションを検出することができます。これはリレーションの定義を容易にする良い方法です。
 リレーションを削除
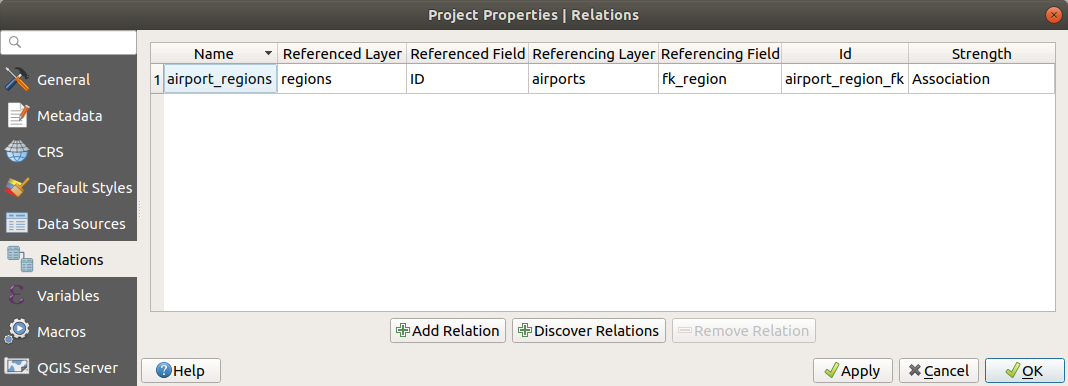
図 12.110 リレーションタブ
12.4.2.1. 1対多(1対N)のリレーション
例として、アラスカのすべての地域(ポリゴン)を有するレイヤがあり、名前、地域タイプ、(主キーとして機能する)ユニークIDといった属性を持っているとします。
それから、地域にある空港の情報を持った別のポイントレイヤまたはテーブルがあり、これらの情報も把握したいとします。ほとんどの地域には複数の空港があるため、これらを地域レイヤに追加する場合は、外部キーを使って1対多のリレーションを作成する必要があります。
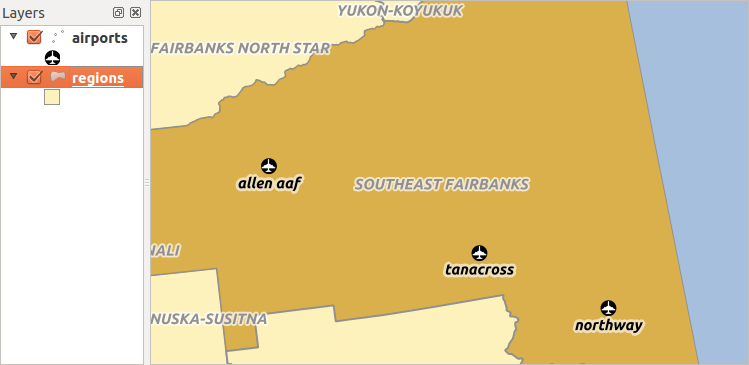
図 12.111 空港とアラスカの地域
レイヤとキー
QGISでは、テーブルとベクタレイヤの間に違いはありません。基本的には、ベクタレイヤとはジオメトリを持っているテーブルのことです。このため、テーブルはベクタレイヤとして追加することができます。 1対Nリレーションの例示として、 サンプルデータセットの regions と airports レイヤを読み込んでみましょう。実際、各空港は正確に1つの地域に属しますが、各地域は任意の数の空港を持つことができます(典型的な1対多リレーション)。
空港を説明する属性に加え、空港レイヤには外部キーとして機能するもうひとつのフィールド fk_region があります(データベースを持っている場合は、おそらくこのフィールドに制約を定義したいと思うでしょう)。この fk_region フィールドには、常に地域のIDが含まれます。これは、その属する地域へのポインタのように見ることができます。
QGISにレイヤ間のリレーションを伝えるだけで、編集用のカスタム編集フォームを設計でき、QGISが設定を管理します。それはさまざまなプロバイダで動作します(ですからシェープファイルやCSVファイルでも使用できます)。
1対Nリレーションの定義
まず最初に行うのは、レイヤ間の関係をQGISに知らせることです。これは、 で行います。 リレーション タブを開き、 リレーションを追加 をクリックします。
名前 はタイトルとして使用されます。これはリレーションが何のために用いられるのかを説明する、人が読める文字列であるべきです。ここでは、単に airport_relation と名前を付けましょう。
参照先レイヤ(親) 親レイヤとも呼ばれ、主キーを持っており、参照されるレイヤです。この例では、
regionsレイヤです。参照先レイヤの主キーを定義する必要があり、ここではIDを指定します。参照元レイヤ(子) 子レイヤとも呼ばれ、外部キーフィールドを持ったレイヤです。この例では、
airportsレイヤが該当します。参照元レイヤには他のレイヤを指す参照フィールドを指定する必要があり、ここではfk_regionとします。注釈
場合によっては、レイヤ内の地物を一意に識別するためには複数のフィールドが必要となることがあります。このようなレイヤとのリレーションを作成するためには、 複合キー 、すなわち、一致するフィールドの複数ペアが必要です。
複合外部キーとしてペアのフィールドを追加 ボタンを使用して、必要な数のペアを追加できます。Id は内部的な目的で使用され、ユニークでなければなりません。これは カスタムフォーム を作成するために必要となる場合があります。空のままにしておくと自動でIdを作成しますが、扱いやすいように自分でIdを指定することもできます。
リレーションの強度 は、親子レイヤ間のリレーションの強さを設定します。デフォルトの Association タイプは、親レイヤが子レイヤに 単に リンクされていることを意味します。 一方、 コンポジション タイプでは、親レイヤを複製するときに子レイヤも複製され、親レイヤの地物を削除すると子レイヤの地物も削除されます。これはすべてのレベルにカスケードしていきます(つまり、子レイヤのそのまた子レイヤ...も一緒に削除されます)。
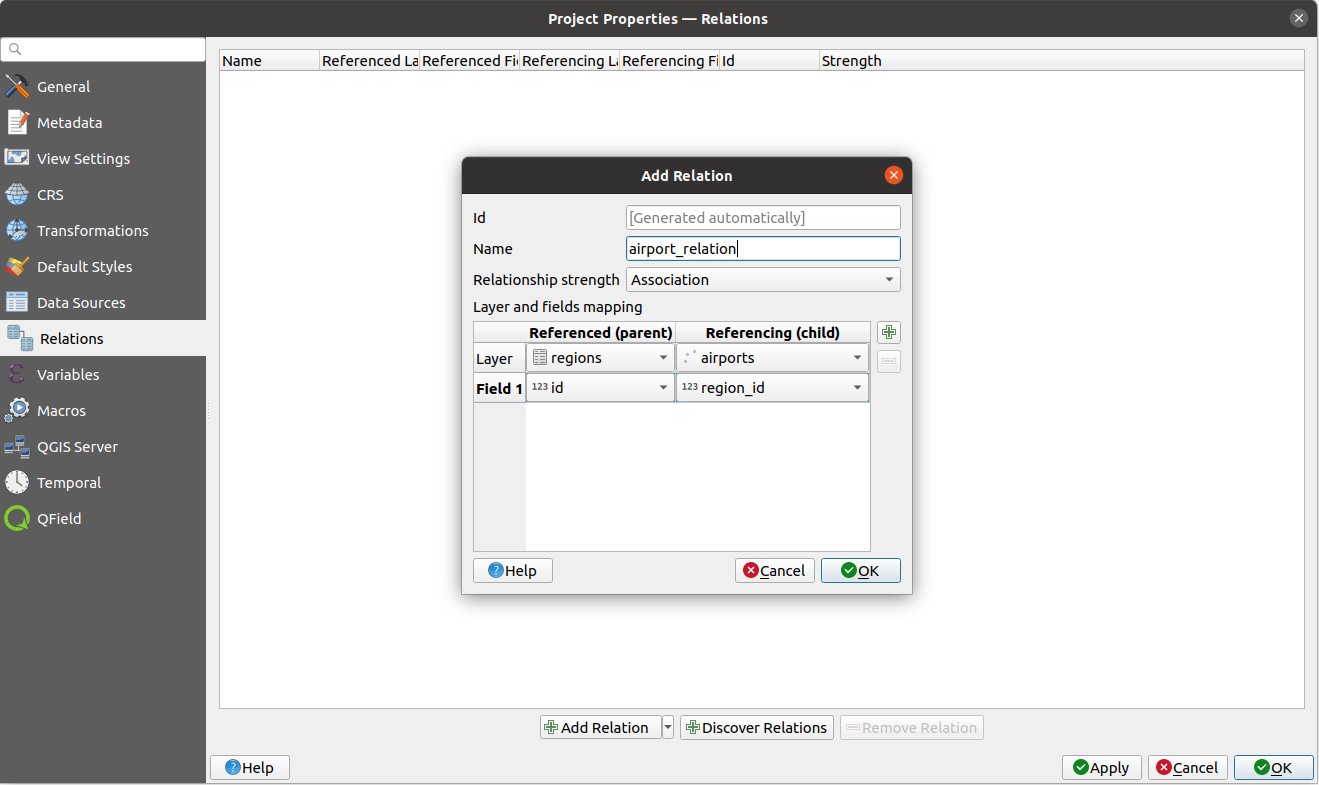
図 12.112 regionsレイヤとairportsレイヤ間のリレーションの追加
リレーション タブでは、 リレーションを検索 ボタンを押して、読み込んだレイヤの利用可能なリレーションをプロバイダから取得することもできます。この機能はPostgreSQLやSpatiaLiteといったデータプロバイダに保存されたレイヤで使用可能です。
1対Nリレーションのフォーム
これで、QGISはリレーションを把握できました。これはQGISが生成するフォームを改善するために利用されます。デフォルトのフォームのメソッド(自動生成)を変更していないので、改善はフォームに新しいウィジェットが追加されるのみです。それでは、凡例のregionsレイヤを選択して、識別ツールを使ってみましょう。設定によってはフォームが直接開くこともありますが、識別ダイアログのアクションから選択して地物フォームを開く必要があるかもしれません。
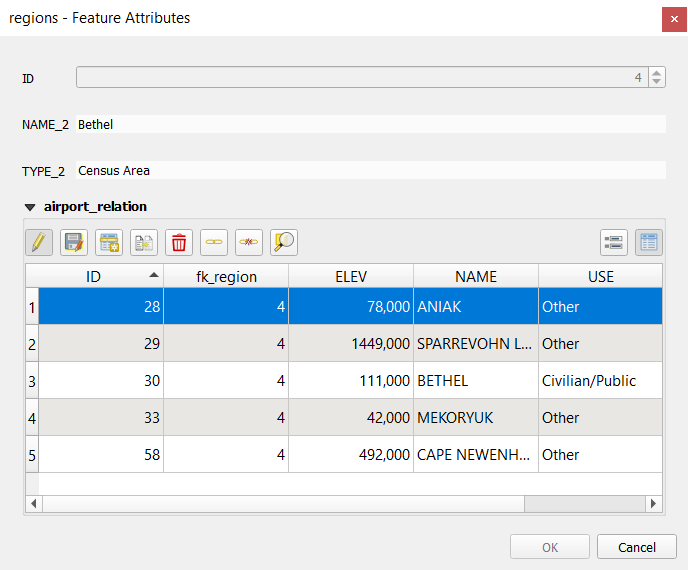
図 12.113 airportsへのリレーションを持つregionsの識別ダイアログ
見ればわかるとおり、この特定の地域に割り当てられた空港が全てテーブル表示されています。また、いくつかのボタンも用意されています。早速見てみましょう。
 ボタンは編集モードを切り替えるためのものです。regionsレイヤの地物の地物フォームを開いていますが、このボタンはairportsレイヤの編集モードを切り替えることに注意してください。ただしこのテーブルは、airportsレイヤの地物を表しています。
 ボタンは、子レイヤ(airports)の編集の全てを保存します。
 ボタンを使用するとマップキャンバス上でairportsレイヤのジオメトリのデジタイズを行うことができ、デフォルトで現在のregionに新しい地物を割り当てます。アイコンはジオメトリタイプによって変わることに注意してください。
 ボタンは、airportsレイヤの属性テーブルに新しいレコードを追加します。この新しい地物はデフォルトで現在のregionに割り当てられます。ジオメトリは、 部分を追加 デジタイジングツールを使用して後から追加できます。
 ボタンは、子レイヤ内の一つまたは複数の子地物を複製することができます。複製した子地物は後から別の親地物に割り当てることもできますし、属性値を編集することもできます。
 ボタンは、選択した空港(複数可)を永久的に削除します。
 シンボルをクリックすると、新しいダイアログが開き、既存の空港を選択して現在の地域に割り当てることができます。これは、誤って違う地域の上に空港を作成してしまった場合に便利です。
 シンボルは、選択した空港(複数可)を現在の地域からリンク解除し、効果的に未割り当て状態(外部キーをNULLに設定)にします。
 ボタンを押すと、選択した子地物にマップをズームさせます。
右にある
 と
と  の2つのボタンは、リレーションのある子地物の テーブル表示とフォーム表示 を切り替えます。
regionsレイヤの地物に ドラッグ&ドロップデザイナー を使用している場合には、どのツールを利用可能か選択できます。新しい地物が追加されたときに新しいフォームを開くかどうかは、 地物追加時のフォームを表示しない オプションで決めることができます。このオプションが正しく動作するためには、NULLでない属性は有効なデフォルト値をとる必要があることに注意してください。
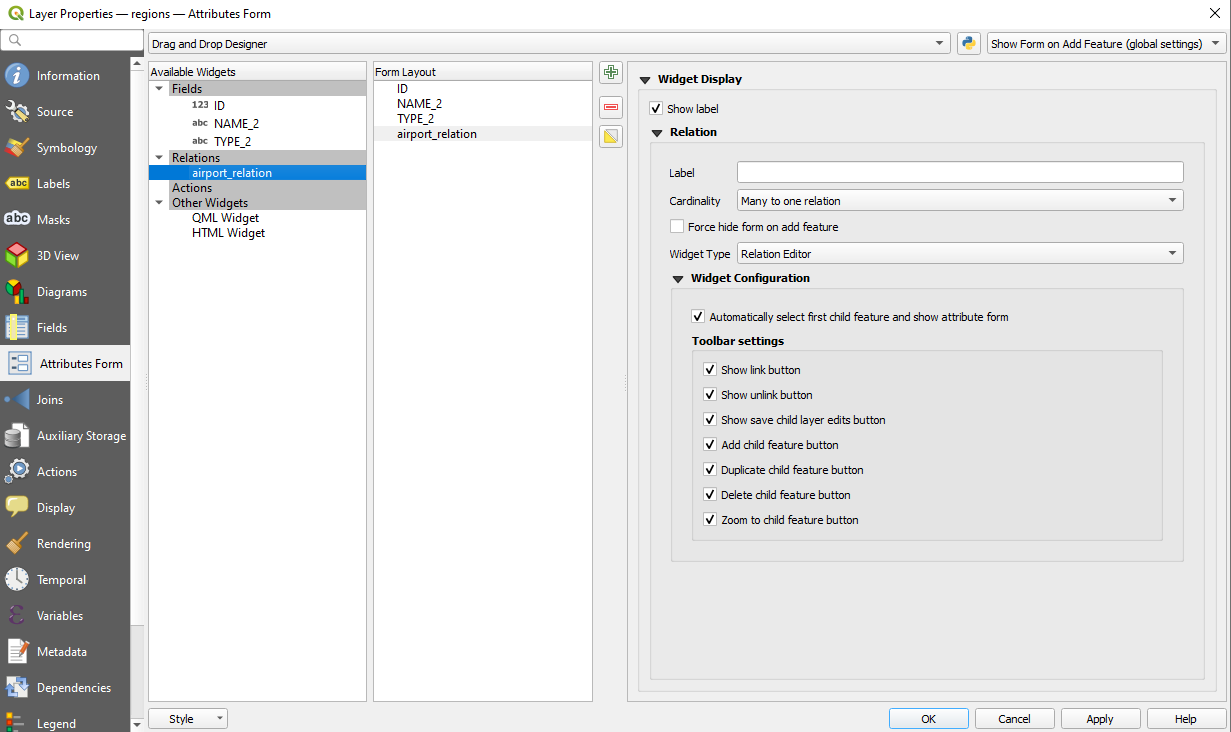
図 12.114 regionsレイヤとairportsレイヤのリレーションツールを設定するドラッグ&ドロップデザイナー
上記の例では、参照元レイヤがジオメトリを持っている(つまり、単なる英数字のテーブルではない)ので、上記の手順では、対応するジオメトリ地物を持たないエントリがレイヤの属性テーブルに作成されます。ジオメトリを追加するには、以下の操作を行います。
参照元レイヤの
を選択します。被参照レイヤの地物フォーム内で追加したレコードを選択します。
 部分を追加 デジタイジングツールを使用して、選択した属性テーブルのレコードとジオメトリを結びつけます。
airportsテーブルで作業しているのなら、 fk_region フィールド(リレーションを作成するために使用するフィールド)には、「リレーションの参照」ウィジェットが自動的に設定されます。詳細は リレーションの参照ウィジェット を参照してください。
airportsレイヤのフォームには、 fk_region フィールドの右側に ボタンがあることがわかります。このボタンをクリックすると、regionsレイヤのフォームが開きます。このウィジェットで、簡単に素早くリンクしている親地物のフォームを開くことができます。
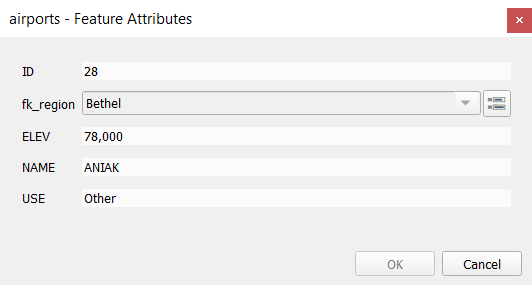
図 12.115 regionsへのリレーションを持つairportsの識別ダイアログ
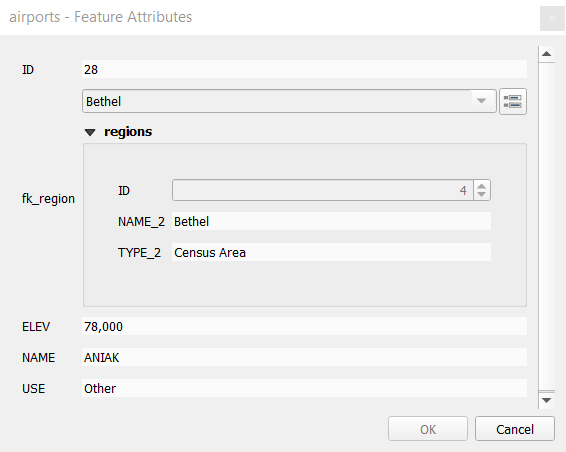
「リレーションの参照」ウィジェットには、親レイヤのフォームを子レイヤに埋め込むオプションもあります。これは、airportsレイヤの メニューから設定できます。 fk_region フィールドを選択して、 埋め込みフォームの表示 オプションにチェックを入れてください。
今、地物ダイアログを見ると、regionsのフォームがairportsのフォームの中に組み込まれていて、現在の空港を別の地域に割り当てることができるコンボボックスもあることが分かります。
さらに、airportsレイヤの編集モードを切り替えると、 fk_region フィールドにオートコンプリート機能も追加されます。入力中に regionsレイヤの id フィールドの値がすべて表示されることがわかります。ここで、airportsレイヤの メニューの 新しい地物の追加 オプションを選択した場合、 ボタンを使用してregionsレイヤのポリゴンをデジタイズすることができます。
子レイヤは、 値による地物選択 ツールで子レイヤの属性に基づいて親レイヤの地物を選択するために使うこともできます。
図 12.116 では、空港の平均高度が海抜500mより高い地域すべてを選択しています。
フォームには多数のさまざまな集計関数があることがわかります。
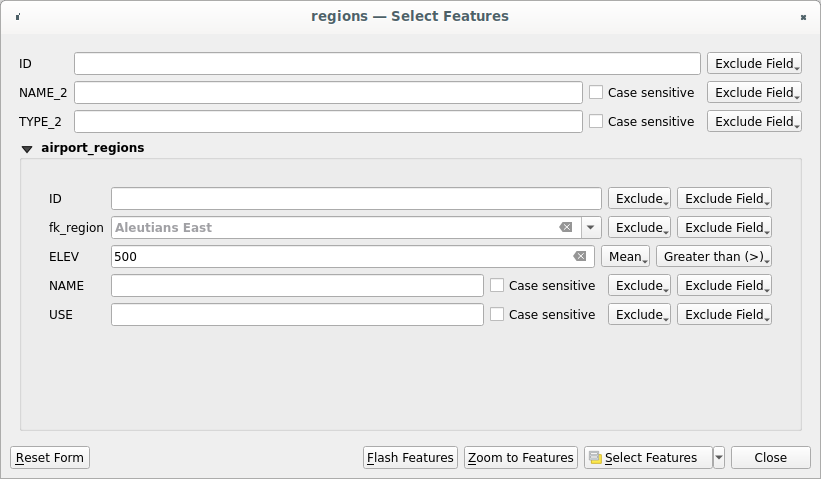
図 12.116 子レイヤの値で親レイヤの地物を選択する
12.4.2.2. 多対多(N対M)リレーション
N対Mのリレーションとは、2つのテーブル間の多数対多数の関係のことです。例えば、 airports レイヤと airlines レイヤを考えてみましょう。空港には複数の航空会社が乗り入れており、航空会社は複数の空港に乗り入れています。
This SQL code creates the three tables we need for an N-M relationship
in a PostgreSQL schema named locations.
You can run the code using the for PostgreSQL
or external tools such as pgAdmin.
The airports table stores the airports layer and the airline table stores the airlines layer.
In both tables few fields are used for clarity.
The tricky part is the airports_airlines table.
We need it to list all airlines for all airports (or vice versa).
This kind of table is known as a pivot table.
The constraints in this table force that an airport can be associated with an airline
only if both already exist in their layers.
CREATE SCHEMA locations;

CREATE TABLE locations.airports
(
   id serial NOT NULL,
   geom geometry(Point, 4326) NOT NULL,
   airport_name text NOT NULL,
   CONSTRAINT airports_pkey PRIMARY KEY (id)
);

CREATE INDEX airports_geom_idx ON locations.airports USING gist (geom);

CREATE TABLE locations.airlines
(
   id serial NOT NULL,
   geom geometry(Point, 4326) NOT NULL,
   airline_name text NOT NULL,
   CONSTRAINT airlines_pkey PRIMARY KEY (id)
);

CREATE INDEX airlines_geom_idx ON locations.airlines USING gist (geom);

CREATE TABLE locations.airports_airlines
(
   id serial NOT NULL,
   airport_fk integer NOT NULL,
   airline_fk integer NOT NULL,
   CONSTRAINT airports_airlines_pkey PRIMARY KEY (id),
   CONSTRAINT airports_airlines_airport_fk_fkey FOREIGN KEY (airport_fk)
      REFERENCES locations.airports (id)
      ON DELETE CASCADE
      ON UPDATE CASCADE
      DEFERRABLE INITIALLY DEFERRED,
   CONSTRAINT airports_airlines_airline_fk_fkey FOREIGN KEY (airline_fk)
      REFERENCES locations.airlines (id)
      ON DELETE CASCADE
      ON UPDATE CASCADE
      DEFERRABLE INITIALLY DEFERRED
 );
PostgreSQLの代わりに、GeoPackageを使うこともできます。この場合には、3つのテーブルは を使用して手動で作成します。GeoPackageにはスキーマが無いため、 locations の接頭辞は不要です。
airports_airlines テーブルの外部キー制約は、 や では作成することができません。このため、このテーブルは を使用して作成する必要があります。GeoPackageは ADD CONSTRAINT 文をサポートしていないため、 airports_airlines テーブルは2段階で作成する必要があります。:
を使用して、
idフィールドのみを持つテーブルを準備します。を使用して、以下のSQLコードを入力し実行します:
ALTER TABLE airports_airlines
   ADD COLUMN airport_fk INTEGER
   REFERENCES airports (id)
   ON DELETE CASCADE
   ON UPDATE CASCADE
   DEFERRABLE INITIALLY DEFERRED;

ALTER TABLE airports_airlines
   ADD COLUMN airline_fk INTEGER
   REFERENCES airlines (id)
   ON DELETE CASCADE
   ON UPDATE CASCADE
   DEFERRABLE INITIALLY DEFERRED;
それから、上で説明したようにQGISで2つの 1対多のリレーション を設定します。
airlinesテーブルとピボットテーブルの間のリレーションairportsテーブルとピボットテーブルとの間の第2のリレーション
これを行うためのより簡単な方法(PostgreSQLのみ)は、 の リレーションを検索 を使用することです。QGISは自動的にデータベース内の全てのリレーションを読み込むので、必要な2つのリレーションを選択するだけで設定ができます。最初にQGISプロジェクトに3つのテーブルを読み込むことを忘れないようにしてください。
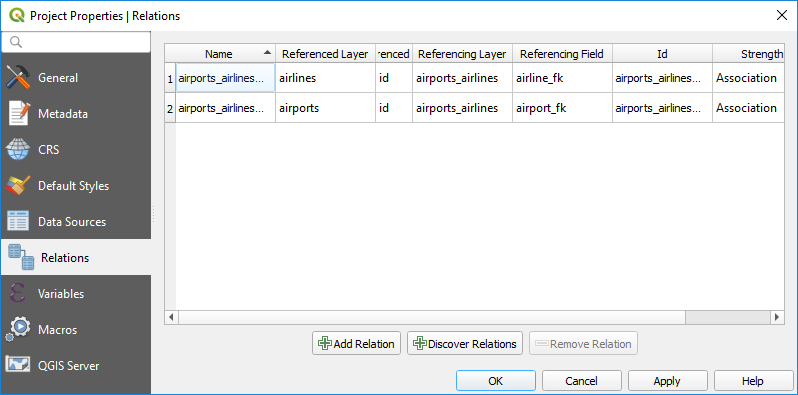
図 12.117 リレーションと自動検索
airport や airline を削除する場合、QGISは airports_airlines テーブルの関連するレコードを削除しません。この作業は、現在の例のようにピボットテーブルの作成時に正しい 制約 を指定すれば、データベースによって行われます。
注釈
N対Mのリレーションと自動トランザクショングループを組み合わせる
このようなコンテキストで作業する場合は、 でトランザクションモードを有効にする必要があります。 QGISは、すべてのテーブル(航空会社、空港、ピボットテーブル)の行を追加または更新できる必要があります。
最後に、 で、 airports レイヤと airlines レイヤに対して正しい「要素数」を選択する必要があります。最初のレイヤには airlines (id) オプションを、2番目のレイヤには airports (id) オプションを選択する必要があります。

図 12.118 関係の要素数の設定
これで、サブフォーム内で 子地物の追加 や 既存の子地物をリンク を使用してairlineにairportを(そしてairportにairlineを)関連付けることができるようになりました。 airports_airlines テーブルにはレコードが自動的に挿入されます。
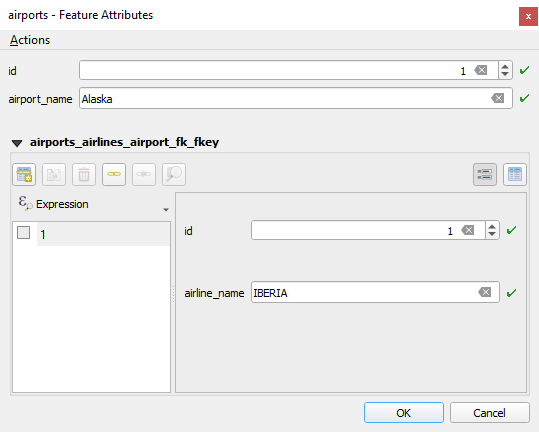
図 12.119 airportsとairlinesのN対Mリレーション
注釈
多対1リレーション 要素数を使用する
N対Mリレーションでピボットテーブルを隠すことが望ましくない場合があります。これは主に、リレーションが確立されたときにのみ値を持つことができる属性がリレーションにあるというのが理由です。テーブルがジオメトリフィールドを持つ場合、ピボットテーブルの外部キーフィールドで 地図上の地物特定 オプション( )を有効にするとよいかもしれません。
注釈
ピボットテーブルの主キー
ピボットテーブルの主キーには複数のフィールドを使用しないでください。QGIS は単一の主キーを想定しているため、 constraint airports_airlines_pkey primary key (airport_fk, airline_fk) のような制約は機能しません。
12.4.2.3. 多態リレーション
目的
多態リレーションは1-N関係の特殊なケースであり、1つの参照元(ドキュメント)レイヤ内に複数の参照先レイヤの地物が含まれます。これは、参照先レイヤごとに異なる参照元レイヤを必要とする通常のリレーションとは異なっています。参照元(ドキュメント)レイヤに layer_field カラムを追加することで単一の参照元(ドキュメント)レイヤとすることができ、ここには参照先レイヤを識別する情報を格納します。最も単純な形は、参照元(ドキュメント)レイヤはこのフィールドに参照先レイヤのレイヤ名を入れるだけです。
より正確に言うならば、多態リレーションは、参照元レイヤが同じ通常のリレーションの集合ですが、参照先レイヤは動的に定義されるものです。レイヤの多態リレーションの設定は、テーブル名、レイヤID、レイヤ名など、参照先レイヤのいくつかのプロパティと一致しなければならない式を使用することで解決されます。
公園に行き、そこで見かけたさまざまな種類の植物 plants や動物 animals の写真を撮ることを考えてみましょう。それぞれの植物や動物には複数の写真が関連付けられているので、通常の 1:N リレーションで写真を保存する場合、 animal_images と plant_images という2つの別々のテーブルが必要です。テーブル2つならば問題とはならないかもしれませんが、キノコや鳥などの写真も別々に撮影したいとしたらどうでしょうか。
多態リレーションは、参照元の全ての地物を同一の documents テーブルに格納することでこの問題を解決します。各地物の referenced_layer フィールドには参照先レイヤが、 referenced_id フィールドには参照先の地物ID が格納されます。
多態リレーションの定義
最初に、QGISにレイヤ間の多態リレーションについて知らせましょう。これは、 から行えます。 リレーション タブを開き、 リレーションを追加 ボタンの横にある小さな下向き矢印のボタンをクリックします。新しく現れたドロップダウンメニューから、 多態リレーションを追加 オプションを選択します。
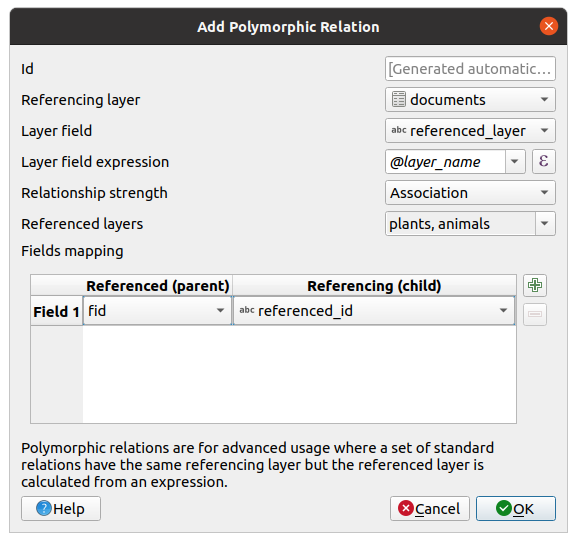
図 12.120 参照元レイヤとして documents を、参照先レイヤとして animals と plants を使用した多態リレーションを追加します。
Id は内部的な目的で使用され、ユニークでなければなりません。これは カスタムフォーム を作成するために必要となる場合があります。空のままにしておくと自動でIdを作成しますが、扱いやすいように自分でIdを指定することもできます。
参照元レイヤ(子) は子レイヤとも呼ばれ、外部キーのフィールドを持っているレイヤです。この例では
documentsレイヤです。このレイヤには他のレイヤを指す参照元フィールドを追加する必要があり、これがreferenced_idです。注釈
場合によっては、レイヤ内の地物を一意に識別するためには複数のフィールドが必要となることがあります。このようなレイヤとのリレーションを作成するためには、 複合キー 、すなわち、一致するフィールドの複数ペアが必要です。
複合外部キーとしてペアのフィールドを追加 ボタンを使用して、必要な数のペアを追加できます。レイヤのフィールド は、評価されたレイヤ式の結果を格納する参照元テーブルのフィールドです。これは、この地物がどのレイヤに属するかの参照元テーブルです。この例では、
referenced_layerフィールドがこれに該当します。レイヤのフィールド式 は、レイヤのユニークな識別子を評価します。これは、レイヤ名
@layer_nameやレイヤのID@layer_id、レイヤのテーブル名decode_uri(@layer, 'table')など、レイヤを一意に識別できるものであれば何でも利用できます。リレーションの強度 は、親子レイヤ間に生成されたリレーションの強さを設定します。デフォルトの Association タイプは、親レイヤが子レイヤに 単に リンクされていることを意味します。 一方、 コンポジション タイプでは、親レイヤを複製するときに子レイヤも複製され、親レイヤの地物を削除すると子レイヤの地物も削除されます。これはすべてのレベルにカスケードしていきます(つまり、子レイヤのそのまた子レイヤ...も一緒に削除されます)。
参照先レイヤ は親レイヤとも呼ばれ、主キーを持ち、指し示される側のレイヤです。この例では、
plantsレイヤとanimalsレイヤがこれに該当します。参照先レイヤの主キーをドロップダウンメニューから定義する必要があり、この例ではfidです。有効な主キーを定義するには、全ての参照先レイヤで同じ名前のフィールドが存在する必要があることに注意してください。そのようなフィールドが存在しない場合には、多態リレーションを保存することができません。
一度追加したら、この多態リレーションは 多態リレーションを編集 メニューエントリから編集ができます。
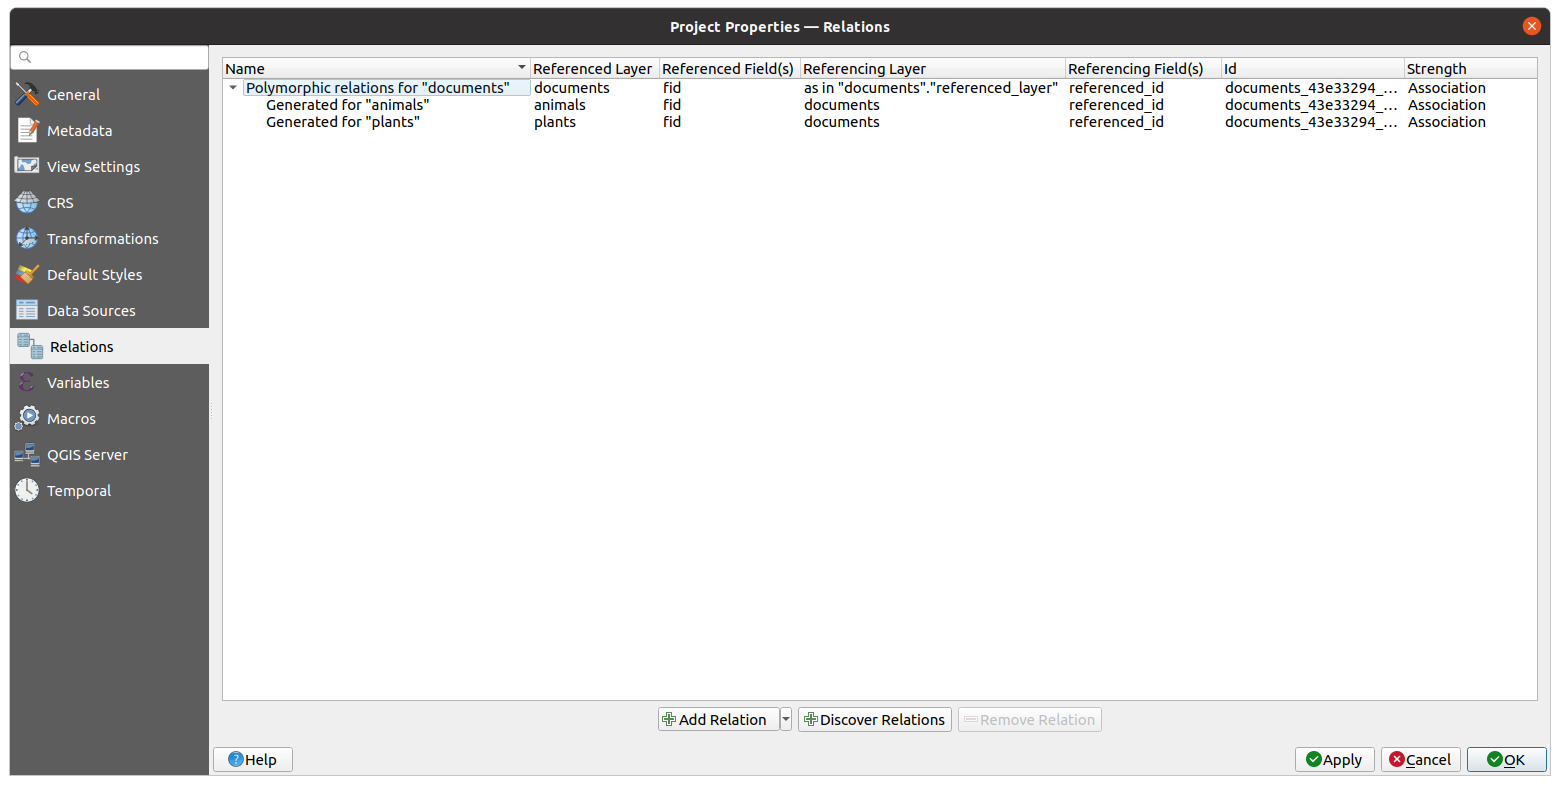
図 12.121 新規作成した多態リレーションとanimalsとplantsに関する子リレーションのプレビュー
上記の例では、以下のデータベーススキーマを使用しています:
CREATE SCHEMA park;

CREATE TABLE park.animals
(
   fid serial NOT NULL,
   geom geometry(Point, 4326) NOT NULL,
   animal_species text NOT NULL,
   CONSTRAINT animals_pkey PRIMARY KEY (fid)
);

CREATE INDEX animals_geom_idx ON park.animals USING gist (geom);

CREATE TABLE park.plants
(
   fid serial NOT NULL,
   geom geometry(Point, 4326) NOT NULL,
   plant_species text NOT NULL,
   CONSTRAINT plants_pkey PRIMARY KEY (fid)
);

CREATE INDEX plants_geom_idx ON park.plants USING gist (geom);

CREATE TABLE park.documents
(
   fid serial NOT NULL,
   referenced_layer text NOT NULL,
   referenced_id integer NOT NULL,
   image_filename text NOT NULL,
   CONSTRAINT documents_pkey PRIMARY KEY (fid)
);
Once relations are established, the Identify Features result panel will display related features, allowing you to view associated data directly.
12.4.2.4. Dataset-stored Relationships
Other than the above mentioned relationships that are created in the project properties
and apply only in the active project,
QGIS can also read database-level relations, i.e., connections defined between layers
in the dataset.
This is supported for database providers such as PostgreSQL, SpatiaLite, GeoPackage, ESRI FileGeodatabase.
When such parent and child layers are loaded in a project, QGIS can automatically detect
the relation settings and fill appropriately the tab.
This can also be triggered using the Discover relations button.
For some data types (e.g., GeoPackage, SpatiaLite or ESRI FileGeodatabase), QGIS also allows to create and edit the relations between the tables in the database. This can be managed through the Browser Panel. From the Browser panel, right-click on the database entry, select New relationship..., and in the new dialog, fill the following options:
Name: set the name of the new relationship.
Cardinality: define the cardinality of the relationship.
Strength: specify the strength of the relationship.
Under the Tables group, set your Parent and Child tables.
Under the Fields group, set your Parent field and Child field.
Under the Advanced section, depending on the database type, you can set:
Related table type:
features: for standard feature tables.
media: for tables storing media files.
simple_attributes: for tables with simple attribute data.
attributes: for tables with complex attribute data.
tiles: for tables storing tile data.
Forward label: a name to uniquely identify the relationship when navigating from the parent table to the child table.
Reverse label: a name to uniquely identify the relationship when navigating from the child table to the parent table.
Applying the dialog will add a Relationships node under the database entry, with the new relationship as child item.
Editing or deleting existing relationships can be done by right-clicking on the relationship in the Browser Panel.

図 12.122 Managing dataset-stored relationships in the Browser Panel
12.4.3. Storing and fetching an external resource
A field may target a resource stored on an external storage system. Attribute forms can be configured so they act as a client to an external storage system in order to store and fetch those resources, on users demand, directly from the forms.
12.4.3.1. Configuring an external storage
In order to setup an external storage, you have to first configure it from the vector attribute form properties and select the Attachment widget.
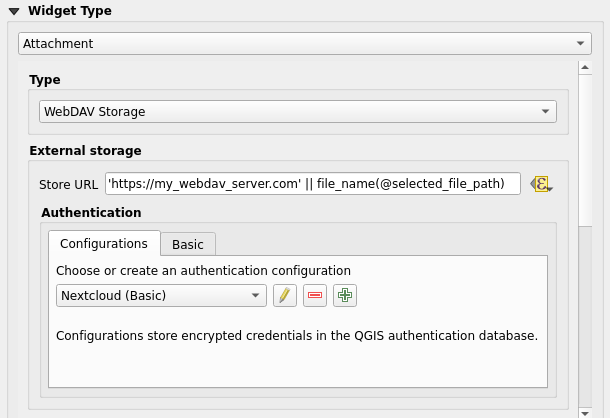
図 12.123 Editing a WebDAV external storage for a given field
From the Attachment widget, you have to first select the Storage type:
Select Existing File: The target URL already exists. When you select a resource, no store operation is achieved, the attribute is simply updated with the URL.
Simple Copy: Stores a copy of the resource on a file disk destination (which could be a local or network shared file system) and the attribute is updated with the path to the copy.
WebDAV Storage: The resource is pushed to a HTTP server supporting the WebDAV protocol and the attribute is updated with its URL. Nextcloud, Pydio or other file hosting software support this protocol.
AWS S3: The resource is pushed to a server supporting AWS Simple Storage Service protocol and the attribute is updated with its URL. Amazon Web Service and MinIO hosting software support this protocol.
Then, you have to set up the Store URL parameter, which provides the URL to be used when a new resource needs to be stored. It's possible to set up an expression using the data defined override widget in order to have specific values according to feature attributes.
The variable @selected_file_path could be used in that expression and represent the absolute file path of the user selected file (using the file selector or drag'n drop).
注釈
Using the WebDAV or AWS S3 external storage, if the URL ends with a "/", it is considered as a folder and the selected file name will be appended to get the final URL.
If the external storage system needs to, it's possible to configure an authentication.
注釈
To use the AWS S3 external storage, you must use an AWS S3 authentication type.
12.4.3.2. Using an external storage
Once configured, you can select a local file using the button ... when editing a feature's attribute. Depending on the configured storage type, the file will be stored on the external storage system (except if Select existing file has been selected) and the field will be updated with the new resource URL.
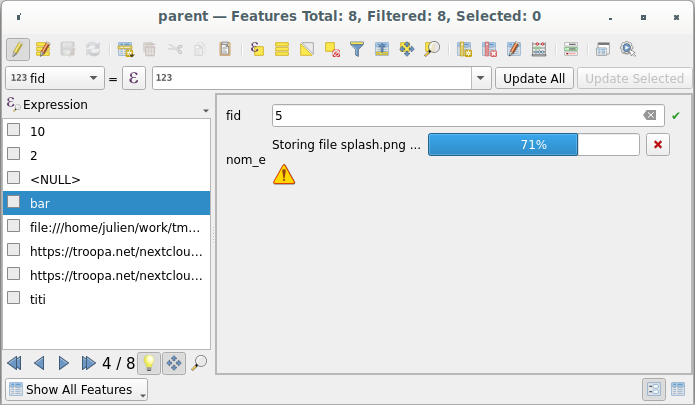
図 12.124 Storing a file to a WebDAV external storage
注釈
User can also achieve the same result if he drags and drops a file on the whole attachment widget.
Use the  Cancel button to abort the storing process.
It's possible to configure a viewer using the Integrated document viewer
so the resource will be automatically fetched from the external storage system and
displayed directly below the URL.
The above
Cancel button to abort the storing process.
It's possible to configure a viewer using the Integrated document viewer
so the resource will be automatically fetched from the external storage system and
displayed directly below the URL.
The above  icon indicates that the resource cannot be fetched
from the external storage system. In that case, more details might appear in the
ログメッセージパネル.
icon indicates that the resource cannot be fetched
from the external storage system. In that case, more details might appear in the
ログメッセージパネル.