GISのラスターデータは、地球の表面上、地下、上空の地物を表す離散セルの行列です。ラスターグリッドの各セルは同じ大きさであり、そしてセルは通常は矩形です(QGISでは常に矩形でしょう)。典型的なラスターデータセットとは、航空写真や衛星画像などのリモートセンシングデータ、標高マトリックスなどのモデル化されたデータ、などです。
Unlike vector data, raster data typically do not have an associated database
record for each cell. They are geocoded by pixel resolution and the x/y
coordinate of a corner pixel of the raster layer. This allows QGIS to position
the data correctly in the map canvas.
QGISではデータを適切に表示するために、ラスターレイヤー内の(例えば GeoTiff )または適切なワールドファイル内のジオリファレンス情報を利用します。
Many of the features available in QGIS work the same, regardless the vector
data source. However, because of the differences in formats specifications
(ESRI shapefiles, MapInfo and MicroStation file formats, AutoCAD DXF, PostGIS,
SpatiaLite, DB2, Oracle Spatial and MSSQL Spatial databases, and many more),
QGIS may handle differently some of their properties.
This section describes how to work with these specificities.
ノート
QGISでサポートするのは、(マルチ)ポイント、(マルチ)ライン、(マルチ)ポリゴン、CIRCULARSTRING、CompoundCurve、CurvePolygon、MULTICURVE、MultiSurface地物タイプ、すべてのZおよび/またはM値を有します。
いくつかのドライバがCIRCULARSTRING、CompoundCurve、CurvePolygon、MULTICURVE、MultiSurface地物タイプといった、これらの地物の種類のいくつかをサポートしていないことにも注意してください。QGISではそれらを(マルチ)ポリゴン地物に変換します。
The ESRI shapefile is still one of the most used vector file format in QGIS.
However, this file format has some limitation that some other file format have
not (like Geopackage, spatialite). Support is provided by the
OGR Simple Feature Library.
A shapefile actually consists of several files. The following three are
required:
.shp ファイルは地物のジオメトリを持ちます.
.dbf ファイルはdBase形式で属性を保持します.
.shx 索引ファイル
Shapefiles also can include a file with a .prj suffix, which contains
the projection information. While it is very useful to have a projection file,
it is not mandatory. A shapefile dataset can contain additional files. For
further details, see the ESRI technical specification at
http://www.esri.com/library/whitepapers/pdfs/shapefile.pdf.
Improving Performance for Shapefiles
To improve the performance of drawing a shapefile, you can create a spatial
index. A spatial index will improve the speed of both zooming and panning.
Spatial indexes used by QGIS have a .qix extension.
これらの手順で索引を作成できます:
- Load a shapefile (see ブラウザパネル);
- Open the Layer Properties dialog by double-clicking on the
shapefile name in the legend or by right-clicking and choosing
from the context menu.
- In the General tab, click the [Create Spatial Index] button.
Problem loading a shape .prj file
If you load a shapefile with a .prj file and QGIS is not able to read the
coordinate reference system from that file, you will need to define the proper
projection manually within the General tab of the
Layer Properties dialog of the layer by clicking the
[Specify...] button. This is due to the fact that .prj files
often do not provide the complete projection parameters as used in QGIS and
listed in the CRS dialog.
For the same reason, if you create a new shapefile with QGIS, two different
projection files are created: a .prj file with limited projection
parameters, compatible with ESRI software, and a .qpj file, providing
the complete parameters of the used CRS. Whenever QGIS finds a .qpj
file, it will be used instead of the .prj.
Tabular data is a very common and widely used format because of its simplicity
and readability – data can be viewed and edited even in a plain text editor.
A delimited text file is an attribute table with each column separated by a
defined character and each row separated by a line break. The first row usually
contains the column names. A common type of delimited text file is a CSV
(Comma Separated Values), with each column separated by a comma.
Such data files can also contain positional information in two main forms:
- As point coordinates in separate columns
- As well-known text (WKT) representation of geometry
QGIS allows you to load a delimited text file as a layer or ordinal table. But
first check that the file meets the following requirements:
- The file must have a delimited header row of field names. This must be the
first line in the text file.
- The header row must contain field(s) with geometry definition. These field(s)
can have any name.
- The X and Y coordinates (if geometry is defined by coordinates) must be
specified as numbers. The coordinate system is not important.
文字列(テキスト)でなく、そのファイルがCSVファイルであるデータがある場合は、CSVTファイルが必要です(セクション CSVT Files 参照)。
有効なテキスト・ファイルの例として、標高地点データファイルのインポート elevp.csv QGISサンプルデータセットが付属しています( Sample Data セクションを参照):
X;Y;ELEV
-300120;7689960;13
-654360;7562040;52
1640;7512840;3
[...]
このサンプルテキストファイルについての解説:
例のテキストファイルでは ; (セミコロン) を区切り文字として使用しています。どんな文字でもフィールドの区切り文字として使用できます。
最初の行は見出しです。ここには X 、 Y および ELEV というフィールドが含まれています。
引用符(")はテキストフィールドを区切るために使用されます。
X座標は X フィールドに含まれています。
Y座標は Y フィールドに含まれています。
CSVファイルをロードするとき、OGRドライバは、特に指示がない限り、すべてのフィールドが文字列(すなわちテキスト)であるとみなします。 CSVTファイルを作成して、OGR(およびQGIS)に異なる列がどのデータ型であるかを伝えることができます。
タイプ
|
名前
|
例
|
|---|
整数値
|
Integer |
4 |
小数点付き数値
|
Real |
3.456 |
日付
|
Date (YYYY-MM-DD) |
2016-07-28 |
時刻
|
Time (HH:MM:SS+nn) |
18:33:12+00 |
日付と時刻
|
DateTime (YYYY-MM-DD HH:MM:SS+nn) |
2016-07-28 18:33:12+00 |
CSVTファイルは、データ型が引用符で囲まれ、コンマで区切られた 一行 のプレーンテキストファイルです(例:::)
"Integer","Real","String"
各列の幅と精度を指定することもできます、例::
"Integer(6)","Real(5.5)","String(22)"
このファイルは .csv ファイルと同じフォルダに同じ名前で保存されますが、拡張子は .csvt です。
You can find more information at GDAL CSV Driver.
PostGISレイヤーは、PostgreSQLデータベースに格納されています。PostGISの利点は、それが提供する空間索引、フィルタおよびクエリー機能です。PostGISを使用すると、選択や識別などのベクター関数は、QGISでのOGRレイヤーでよりもより正確に機能します。
ちなみに
PostGIS Layers
通常、PostGISのレイヤーはGEOMETRY_COLUMNSテーブル内のエントリによって定義されます。QGISはGEOMETRY_COLUMNSテーブルにエントリを持っていないレイヤーを読み込むことができます。これは、テーブルとビューの両方を含んでいます。空間ビューを定義すると、データを視覚化するための強力な手段を提供します。ビューの作成については、お使いのPostgreSQLのマニュアルを参照してください。
このセクションでは、QGISは、PostgreSQLのレイヤーにアクセスする方法についていくつかの詳細が含まれています。ほとんどの時間、QGISは単純にロードできるデータベースのテーブルのリストを提供する必要があり、それはリクエストに応じてそれらをロードします。しかしながら、QGISにPostgreSQLのテーブルをロードするのがうまくいかない場合は、以下の情報が任意のQGISのメッセージを理解するのに役立ち、QGISでそれをロードできるようにするためにPostgreSQLのテーブルやビューの定義を変更することについての指示になるかもしれません。
QGISは、PostgreSQLレイヤーがレイヤーの一意のキーとして使用できる列を含むことが必要です。テーブルの場合、これは通常、テーブルに主キー、またはそれに一意制約を持つ列を必要とすることを意味します。QGISでは、この列は、型INT4(サイズ4バイトの整数)であることが必要です。あるいは、CTID列が主キーとして使用できます。テーブルには、これらの項目がない場合、OID列が代わりに使用されます。列が索引化されると性能が向上します(主キーはPostgreSQLでは自動的に索引化されていることに注意)。
QGISではデフォルトで有効化されているチェックボックス IDで選択 を提供しています。このオプションは、ほとんどの場合、高速である属性なしのIDを取得します。
PostgreSQLのレイヤーがビューである場合は、同じ要件が存在しますが、ビューはいつでもそれらの上にユニーク制約に主キーまたは列を持ってはいません。ビューをロードする前に、QGISダイアログ内の主キーフィールド(整数である必要があります)を定義する必要があります。適切な列がビューに存在しない場合、QGISはそのレイヤーをロードしません。このような場合、解決は、適切な列(整数の種類と主キーまたは一意性制約のいずれか、好ましくは索引付け)が含まないようにビューを変更することです。
テーブルに関しては、チェックボックス IDで選択 がデフォルトで有効になっています(チェックボックスの意味については上記参照)。高価なビューを使用する場合は、このオプションを無効にすることができます。
If you want to make a backup of your PostGIS database using the pg_dump and
pg_restore commands, and the default layer styles as saved by QGIS fail to
restore afterwards, you need to set the XML option to DOCUMENT and the
restore will work.
QGISではサーバー側ですでに地物をフィルタできます。  チェックボックスをチェックしてそうします。サポートされる式だけが、データベースに送信されます。サポートされていない演算子や関数を使用する式は、優雅にローカルな評価にフォールバックします。
Most of common data types are supported by the PostgreSQL provider: integer, float,
varchar, geometry and timestamp.
Array data types are not supported.
データはDB Managerプラグインとコマンドラインツールのshp2pgsqlとogr2ogrなど、いくつかのツールを使用して、PostgreSQL/ PostGISにインポートできます。
QGIS comes with a core plugin named  DB Manager. It can
be used to load shapefiles and other data formats, and it includes support for
schemas. See section DB マネージャプラグイン for more information.
DB Manager. It can
be used to load shapefiles and other data formats, and it includes support for
schemas. See section DB マネージャプラグイン for more information.
PostGIS includes an utility called shp2pgsql that can be used to import
shapefiles into a PostGIS-enabled database. For example, to import a
shapefile named lakes.shp into a PostgreSQL database named
gis_data, use the following command:
shp2pgsql -s 2964 lakes.shp lakes_new | psql gis_data
ここで gis_data データベースに lakes_new という名前の新しいレイヤーが作成されます. 新しいレイヤーは2964という空間参照識別子 (SRID) を持ちます。空間参照系と投影についてはセクション 投影法の利用方法 を参照。
ちなみに
PostGISからデータセットをエキスポートする
Like the import tool shp2pgsql, there is also a tool to export
PostGIS datasets as shapefiles: pgsql2shp. This is shipped within
your PostGIS distribution.
shp2pgsql と DB Manager とともに PostGISにデータを供給する別のツールもあります: ogr2ogr です. GDALインストールの一部です.
To import a shapefile into PostGIS, do the following:
ogr2ogr -f "PostgreSQL" PG:"dbname=postgis host=myhost.de user=postgres
password=topsecret" alaska.shp
This will import the shapefile alaska.shp into the PostGIS database
postgis using the user postgres with the password topsecret on host
server myhost.de.
注 PostGISをサポートする場合はOGRがPostgreSQLを組み込んでビルドされていなければなりません.次のようにタイプすると確認できます(  の場合)
の場合)
ogrinfo --formats | grep -i post
もしデフォルトの INSERT INTO メソッドの代わりに PostgreSQLの COPY -command を使いたい場合は以下の環境変数をエクスポートできます(少なくても と  の場合は可能です):
ogr2ogr は shp2pgsl のように空間索引を作成しません。空間索引を作るためには特別ステップとして手動で通常のSQLコマンド CREATE INDEX を発行する必要があります (次のセクション パフォーマンスの改善 で説明しています)。
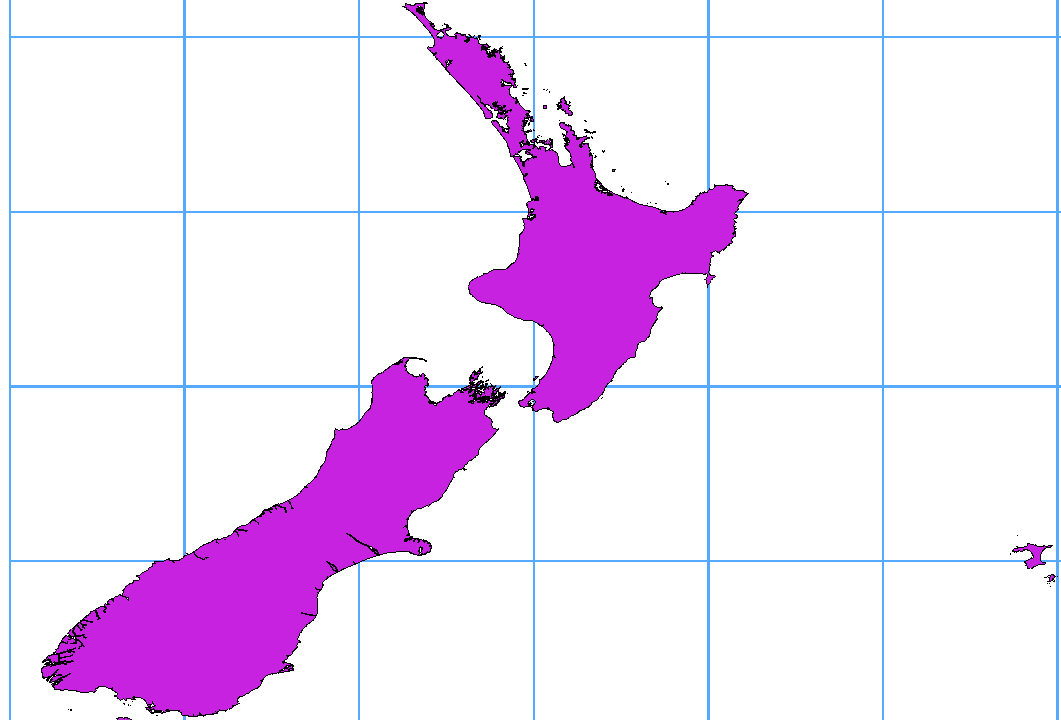
Many GIS packages don’t wrap vector maps with a geographic reference system
(lat/lon) crossing the 180 degrees longitude line
(http://postgis.refractions.net/documentation/manual-2.0/ST_Shift_Longitude.html).
As result, if we open such a map in QGIS, we will see two far, distinct locations,
that should appear near each other. In Figure_vector_crossing, the tiny point on the far
left of the map canvas (Chatham Islands) should be within the grid, to the right of the
New Zealand main islands.
この問題の回避方法は経度の値を PostGIS の ST_Shift_Longitude 関数を使って変換することです この関数はジオメトリの各地物の各コンポーネント中の点/頂点を読み、その経度が < 0° の場合 360° を加算します。その結果は 0° - 360° の間になり 180° が中心の地図にプロットできます。
DBマネージャプラグインを利用したPostGIS (PostgreSQLへデータをインポートする) へのデータインポート例.
PostGISコマンドラインインターフェイスを利用して以下のコマンドを発行して下さい (これは例で “TABLE” のところはあなたのPostGISテーブルの実際の名前にして下さい): gis_data=# update TABLE set the_geom=ST_Shift_Longitude(the_geom);
すべてがうまくいけば更新された地物の数についての確認を求められます,それから地図をロードして違いを見ることができるでしょう (Figure_vector_crossing_map).
If you want to save a vector layer to SpatiaLite format, you can do this by
right clicking the layer in the legend. Then, click on ,
define the name of the output file, and select ‘SpatiaLite’ as format and the CRS.
Also, you can select ‘SQLite’ as format and then add SPATIALITE=YES in the
OGR data source creation option field. This tells OGR to create a SpatiaLite
database. See also http://www.gdal.org/ogr/drv_sqlite.html.
QGISはSpatiaLiteで編集可能なビューもサポートしています。
新しいSpatiaLiteレイヤを作成したい場合は 新しいSpatiaLiteレイヤーを作成する を参照して下さい。
ちなみに
SpatiaLite データ管理プラグイン
SpatiaLiteのデータ管理のために、いくつかのPythonプラグインも使用できます:QSpatiaLite、SpatiaLite Manager、または DBマネージャ (コア・プラグイン、推奨)。必要な場合は、プラグインのインストーラでダウンロードしてインストールできます。
IBM DB2 for Linux、UnixおよびWindows(DB2 LUW)、IBM DB2 for z / OS(メインフレーム)およびIBM DashDB製品では、空間データを関係テーブルの列に格納および分析できます。 QGISのDB2プロバイダーは、これらのデータベースの空間データの視覚化、分析、操作の全範囲をサポートしています。
これらの機能に関するユーザーマニュアルは、 DB2 z/OS KnowledgeCenter, DB2 LUW KnowledgeCenter と DB2 DashDB KnowledgeCenter にあります。
DB2空間機能の操作の詳細については、IBM DeveloperWorksの DB2 Spatial Tutorial を参照してください。
DB2プロバイダーは現在、Windows ODBCドライバーを介してWindows環境のみをサポートしています。
QGISを実行しているクライアントには、次のいずれかがインストールされている必要があります。
- DB2 LUW
IBMデータサーバードライバパッケージ
IBMデータサーバークライアント
同じマシン上のDB2 LUWデータベースにアクセスしている場合、またはDB2 LUWをクライアントとして使用している場合は、DB2の実行可能ファイルとサポートファイルをWindowsのパスに含める必要があります。これは、db2.bat という名前のバッチファイルを作成し、それを %OSGEO4W_ROOT%/etc/ini ディレクトリに含めることによって実行できます。
@echo off
REM Point the following to where DB2 is installed
SET db2path=C:\Program Files (x86)\sqllib
REM This should usually be ok - modify if necessary
SET gskpath=C:\Program Files (x86)\ibm\gsk8
SET Path=%db2path%\BIN;%db2path%\FUNCTION;%gskpath%\lib64;%gskpath%\lib;%path%