` `
Plugin Cattura Coordinate
Il plugin Cattura Coordinate è facile da usare e ti permette di mostrare sulla mappa coordinate in due sistemi di riferimento (SR) distinti.
Plugin Cattura Coordinate
- Start QGIS, select
 Project Properties from the
Settings (KDE, Windows) or File (Gnome, macOS) menu
and click on the Projection tab. As an alternative, you can also
click on the
Project Properties from the
Settings (KDE, Windows) or File (Gnome, macOS) menu
and click on the Projection tab. As an alternative, you can also
click on the  CRS status icon in the lower
right-hand corner of the status bar.
CRS status icon in the lower
right-hand corner of the status bar. Attiva
 Abilita la riproiezione al volo e seleziona un sistema di coordinate proiettate a scelta (vedi anche Lavorare con le proiezioni).
- Activate the coordinate capture plugin in the Plugin Manager (see
La finestra di dialogo Plugins) and ensure that the dialog is visible by going to
View ‣ Panels and ensuring that
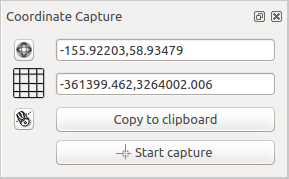
Coordinate Capture is enabled. The coordinate capture dialog
appears as shown in Figure figure_coordinate_capture. Alternatively,
you can also go to Vector ‣ Coordinate Capture and see
if Coordinate Capture is enabled.
Clicca su
 Clicca per selezionare il SR da usare per la visualizzazione delle coordinate e seleziona un SR diverso da quello selezionato precedentemente.
- To start capturing coordinates, click on [Start capture]. You can now click anywhere on the map canvas and the plugin will show the coordinates for both of your selected CRS.
Per abilitare la tracciatura via mouse delle coordinate seleziona l’icona
 Clicca per abilitare la tracciatura via mouse. Clicca sula mappa per terminare.
Puoi anche copiare le coordinate selezionate negli appunti.