QGIS uses the OGR library to read and write vector data formats,
including ESRI shapefiles, MapInfo and MicroStation file formats, AutoCAD DXF,
PostGIS, SpatiaLite, DB2, Oracle Spatial and MSSQL Spatial databases, and many more.
GRASS vector and PostgreSQL support is supplied by native QGIS data provider
plugins. Vector data can also be loaded in read mode from zip and gzip archives
into QGIS. As of the date of this document, 69 vector formats are supported by
the OGR library (see OGR-SOFTWARE-SUITE in Literature and Web References). The
complete list is available at http://www.gdal.org/ogr/ogr_formats.html.
This section describes how to work with several common formats: ESRI
shapefiles, PostGIS layers, SpatiaLite layers, OpenStreetMap vectors, and Comma
Separated data (CSV). Many of the features available in QGIS work the same,
regardless of the vector data source. This is by design, and it includes the
identify, select, labelling and attributes functions.
Note
QGIS supports (multi)point, (multi)line, (multi)polygon, CircularString,
CompoundCurve, CurvePolygon, MultiCurve, MultiSurface feature types, all
with Z and/or M values.
You should note also that some drivers don’t support some of these feature
types like CircularString, CompoundCurve, CurvePolygon, MultiCurve,
MultiSurface feature type. QGIS will convert them to (multi)polygon feature.
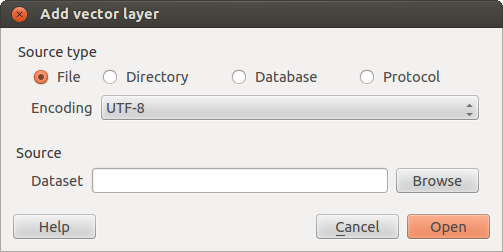
 To load a layer from a file (like a Shapefile, a Mapinfo or a dxf
layer), click on the Add Vector Layer toolbar button; or
type Ctrl+Shift+V. This will bring up a new window (see
figure_vector_add).
To load a layer from a file (like a Shapefile, a Mapinfo or a dxf
layer), click on the Add Vector Layer toolbar button; or
type Ctrl+Shift+V. This will bring up a new window (see
figure_vector_add).
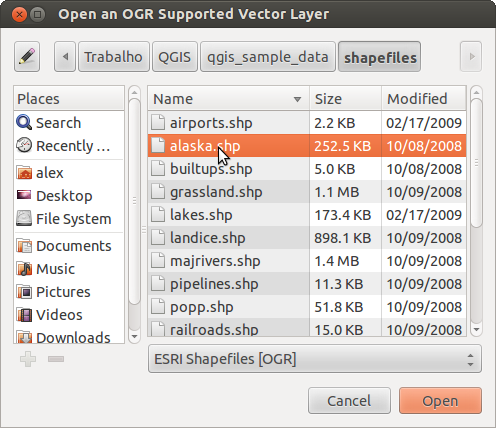
From the available options check  File. Click on
[Browse]. That will bring up a standard open file dialog
(see figure_vector_open), which allows you to navigate the file system and load a
shapefile or other supported data source. The selection box Filter
File. Click on
[Browse]. That will bring up a standard open file dialog
(see figure_vector_open), which allows you to navigate the file system and load a
shapefile or other supported data source. The selection box Filter
 allows you to preselect some OGR-supported file formats.
You can also select the encoding for the file if desired.
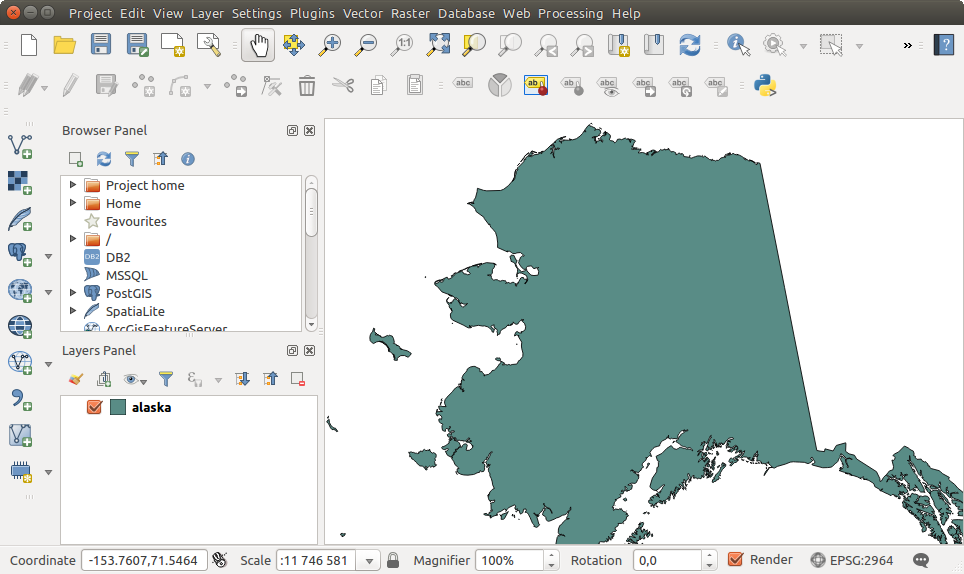
Selecting a file from the list and clicking [Open] loads it into QGIS.
Figure_vector_loaded shows QGIS after loading the alaska.shp file.
Tip
Layer Colors
When you add a layer to the map, it is assigned a random color. When adding
more than one layer at a time, different colors are assigned to each layer.
Once a file is loaded, you can zoom around it using the map navigation tools.
To change the style of a layer, open the Layer Properties dialog
by double clicking on the layer name or by right-clicking on the name in the
legend and choosing from the context menu. See
section Style Properties for more information on setting symbology of
vector layers.
Tip
Load layer and project from mounted external drives on macOS
On macOS, portable drives that are mounted beside the primary hard drive
do not show up as expected under .
We are working on a more macOS-native open/save dialog to fix this.
As a workaround, you can type /Volumes in the File name box
and press Enter. Then you can navigate to external drives and network
mounts.
Note
DXF files containing several geometry types (point, line and/or
polygon), the name of the layer will be made from <filename.dxf> entities
<geometry type>.
Note
You can also drag and drop the file(s) into the Layers
Panel from either the files browser or the QGIS Browser panel. If the layer
contains several geometry types, a new windows will ask you to select the
sublayer. This often occurs with GPX, Mapinfo or DXF files format.
The ESRI shapefile is still one of the most used vector file format in QGIS.
However, this file format has some limitation that some other file format have
not (like Geopackage, spatialite). Support is provided by the
OGR Simple Feature Library.
A shapefile actually consists of several files. The following three are
required:
- .shp file containing the feature geometries
- .dbf file containing the attributes in dBase format
- .shx index file
Shapefiles also can include a file with a .prj suffix, which contains
the projection information. While it is very useful to have a projection file,
it is not mandatory. A shapefile dataset can contain additional files. For
further details, see the ESRI technical specification at
http://www.esri.com/library/whitepapers/pdfs/shapefile.pdf.
Improving Performance for Shapefiles
To improve the performance of drawing a shapefile, you can create a spatial
index. A spatial index will improve the speed of both zooming and panning.
Spatial indexes used by QGIS have a .qix extension.
Use these steps to create the index:
- Load a shapefile by clicking on the Add Vector Layer
toolbar button or pressing Ctrl+Shift+V.
- Open the Layer Properties dialog by double-clicking on the
shapefile name in the legend or by right-clicking and choosing
from the context menu.
- In the General tab, click the [Create Spatial Index] button.
Problem loading a shape .prj file
If you load a shapefile with a .prj file and QGIS is not able to read the
coordinate reference system from that file, you will need to define the proper
projection manually within the General tab of the
Layer Properties dialog of the layer by clicking the
[Specify...] button. This is due to the fact that .prj files
often do not provide the complete projection parameters as used in QGIS and
listed in the CRS dialog.
For the same reason, if you create a new shapefile with QGIS, two different
projection files are created: a .prj file with limited projection
parameters, compatible with ESRI software, and a .qpj file, providing
the complete parameters of the used CRS. Whenever QGIS finds a .qpj
file, it will be used instead of the .prj.
Tabular data is a very common and widely used format because of its simplicity
and readability – data can be viewed and edited even in a plain text editor.
A delimited text file is an attribute table with each column separated by a
defined character and each row separated by a line break. The first row usually
contains the column names. A common type of delimited text file is a CSV
(Comma Separated Values), with each column separated by a comma.
Such data files can also contain positional information in two main forms:
- As point coordinates in separate columns
- As well-known text (WKT) representation of geometry
QGIS allows you to load a delimited text file as a layer or ordinal table. But
first check that the file meets the following requirements:
- The file must have a delimited header row of field names. This must be the
first line in the text file.
- The header row must contain field(s) with geometry definition. These field(s)
can have any name.
- The X and Y coordinates (if geometry is defined by coordinates) must be
specified as numbers. The coordinate system is not important.
- If you have any data that is not a string (text) and the file is a CSV file,
you must have a CSVT file (see section CSVT Files).
As an example of a valid text file, we import the elevation point data file
elevp.csv that comes with the QGIS sample dataset (see section
Sample Data):
X;Y;ELEV
-300120;7689960;13
-654360;7562040;52
1640;7512840;3
[...]
Some items to note about the text file:
- The example text file uses ; (semicolon) as delimiter. Any character can
be used to delimit the fields.
- The first row is the header row. It contains the fields X, Y and
ELEV.
- No quotes (") are used to delimit text fields.
- The X coordinates are contained in the X field.
- The Y coordinates are contained in the Y field.
Click the toolbar icon  Add Delimited Text Layer in the
Manage layers toolbar to open the Create a Layer from a
Delimited Text File dialog, as shown in figure_delimited_text.
Add Delimited Text Layer in the
Manage layers toolbar to open the Create a Layer from a
Delimited Text File dialog, as shown in figure_delimited_text.
First, select the file to import (e.g., qgis_sample_data/csv/elevp.csv)
by clicking on the [Browse] button. Once the file is selected, QGIS
attempts to parse the file with the most recently used delimiter. To enable QGIS to properly parse the
file, it is important to select the correct delimiter. You can specify a
delimiter by activating Custom delimiters, or by activating
Regular expression delimiter and entering
text into the Expression field. For example, to
change the delimiter to tab, use \t (this is a regular expression for the
tab character).
Once the file is parsed, set Geometry definition to
Point coordinates and choose the X and Y
fields from the dropdown lists. If the coordinates are defined as
degrees/minutes/seconds, activate the  DMS coordinates
checkbox.
DMS coordinates
checkbox.
Finally, enter a layer name (e.g., elevp), as shown in
figure_delimited_text. To add the layer to the map, click [OK]. The
delimited text file now behaves as any other map layer in QGIS.
There is also a helper option that allows you to trim leading and trailing
spaces from fields — Trim fields. Also, it is possible
to Discard empty fields. If necessary, you can force a comma
to be the decimal separator by activating Decimal separator is
comma.
If spatial information is represented by WKT, activate the
Well Known Text option and select the field with the WKT definition for
point, line or polygon objects. If the file contains non-spatial data, activate
No geometry (attribute only table) and it will be
loaded as an ordinal table.
Additionally, you can enable:
- Use spatial index to improve the performance of displaying
and spatially selecting features.
- Use subset index.
- Watch file to watch for changes to the file by other
applications while QGIS is running.
When loading CSV files, the OGR driver assumes all fields are strings (i.e. text)
unless it is told otherwise. You can create a CSVT file to tell OGR (and QGIS)
what data type the different columns are:
| Type |
Name |
Example |
|---|
| Whole number |
Integer |
4 |
| Decimal number |
Real |
3.456 |
| Date |
Date (YYYY-MM-DD) |
2016-07-28 |
| Time |
Time (HH:MM:SS+nn) |
18:33:12+00 |
| Date & Time |
DateTime (YYYY-MM-DD HH:MM:SS+nn) |
2016-07-28 18:33:12+00 |
The CSVT file is a ONE line plain text file with the data types in quotes
and separated by commas, e.g.:
"Integer","Real","String"
You can even specify width and precision of each column, e.g.:
"Integer(6)","Real(5.5)","String(22)"
This file is saved in the same folder as the .csv file, with the same
name, but .csvt as the extension.
You can find more information at GDAL CSV Driver.
PostGIS layers are stored in a PostgreSQL database. The advantages of PostGIS
are its spatial indexing, filtering and querying capabilities it provides. Using
PostGIS, vector functions such as select and identify work more accurately than they do
with OGR layers in QGIS.
 The first time you use a PostGIS data source, you must
create a connection to the PostgreSQL database that contains the data. Begin by
clicking on the Add PostGIS Layer toolbar
button, selecting the
option from the menu, or typing Ctrl+Shift+D. You
can also open the Add Vector Layer dialog and select
Database. The Add PostGIS Table(s)
dialog will be displayed. To access the connection manager, click on the
[New] button to display the Create a New PostGIS Connection
dialog. The parameters required for a connection are:
The first time you use a PostGIS data source, you must
create a connection to the PostgreSQL database that contains the data. Begin by
clicking on the Add PostGIS Layer toolbar
button, selecting the
option from the menu, or typing Ctrl+Shift+D. You
can also open the Add Vector Layer dialog and select
Database. The Add PostGIS Table(s)
dialog will be displayed. To access the connection manager, click on the
[New] button to display the Create a New PostGIS Connection
dialog. The parameters required for a connection are:
- Name: A name for this connection. It can be the same as Database.
- Service: Service parameter to be used alternatively to hostname/port (and
potentially database). This can be defined in pg_service.conf.
Check the Service connection file section for more details.
- Host: Name of the database host. This must be a resolvable host name
such as would be used to open a telnet connection or ping the host. If the
database is on the same computer as QGIS, simply enter ‘localhost’ here.
- Port: Port number the PostgreSQL database server listens on. The default
port is 5432.
- Database: Name of the database.
- SSL mode: How the SSL connection will be negotiated with the server. Note
that massive speed-ups in PostGIS layer rendering can be achieved by disabling
SSL in the connection editor. The following options are available:
- Disable: Only try an unencrypted SSL connection.
- Allow: Try a non-SSL connection. If that fails, try an SSL connection.
- Prefer (the default): Try an SSL connection. If that fails, try a
non-SSL connection.
- Require: Only try an SSL connection.
- Username: User name used to log in to the database.
- Password: Password used with Username to connect to the database.
Optionally, you can activate the following checkboxes:
- Save Username
- Save Password
- Only look in the geometry_columns table
- Don’t resolve type of unrestricted columns (GEOMETRY)
- Only look in the ‘public’ schema
- Also list tables with no geometry
- Use estimated table metadata
Once all parameters and options are set, you can test the connection
by clicking on the [Test Connect] button.
Tip
Use estimated table metadata to speed up operations
When initializing layers, various queries may be needed to establish the
characteristics of the geometries stored in the database table. When the
Use estimated table metadata option is checked, these queries
examine only a sample of the rows and use the table statistics, rather than
the entire table. This can drastically speed up operations on large datasets,
but may result in incorrect characterization of layers (eg. the feature count
of filtered layers will not be accurately determined) and may even cause strange
behaviour in case columns that are supposed to be unique actually are not.
Once you have one or more connections defined, you can
load layers from the PostgreSQL database. Of course, this requires having data in
PostgreSQL. See section Importing Data into PostgreSQL for a discussion on
importing data into the database.
To load a layer from PostGIS, perform the following steps:
- If the Add PostGIS layers dialog is not already open,
selecting the
option from the menu or typing Ctrl+Shift+D
opens the dialog.
- Choose the connection from the drop-down list and click [Connect].
- Select or unselect Also list tables with no geometry.
- Optionally, use some Search Options to define
which features to load from the layer, or use the [Build query] button
to start the Query builder dialog.
- Find the layer(s) you wish to add in the list of available layers.
- Select it by clicking on it. You can select multiple layers by holding
down the Shift key while clicking. See section
Query Builder for information on using the PostgreSQL
Query Builder to further define the layer.
- Click on the [Add] button to add the layer to the map.
Tip
PostGIS Layers
Normally, a PostGIS layer is defined by an entry in the geometry_columns
table. QGIS can load layers that do not have an entry in the geometry_columns
table. This includes both tables and views. Defining a spatial view provides
a powerful means to visualize your data. Refer to your PostgreSQL manual for
information on creating views.
The service connection file allows PostgreSQL connection parameters to be
associated with a single service name. That service name can then be specified
by a client and the associated settings will be used.
It’s called .pg_service.conf under *nix systems (GNU/Linux, macOS etc.) and
pg_service.conf on Windows.
The service file looks like:
[water_service]
host=192.168.0.45
port=5433
dbname=gisdb
user=paul
password=paulspass

[wastewater_service]
host=dbserver.com
dbname=water
user=waterpass
Note
There are two services in the above example: water_service
and wastewater_service. You can use these to connect from QGIS,
pgAdmin etc. by specifying only the name of the service you want to
connect to (without the enclosing brackets).
If you want to use the service with psql you need to do something
like export PGSERVICE=water_service before doing your psql commands.
Note
You can find all the parameters here
Note
If you don’t want to save the passwords in the service file you can
use the .pg_pass
option.
On *nix operating systems (GNU/Linux, macOS etc.) you can save the
.pg_service.conf file in the user’s home directory and
the PostgreSQL clients will automatically be aware of it.
For example, if the logged user is web, .pg_service.conf should
be saved in the /home/web/ directory in order to directly work (without
specifying any other environment variables).
You can specify the location of the service file by creating a PGSERVICEFILE
environment variable (e.g. run the export PGSERVICEFILE=/home/web/.pg_service.conf
command under your *nix OS to temporarily set the PGSERVICEFILE variable)
You can also make the service file available system-wide (all users) either by
placing it at pg_config --sysconfdir``**/.pg_service.conf** or by adding the
``PGSYSCONFDIR environment variable to specify the directory containing
the service file. If service definitions with the same name exist in the user
and the system file, the user file takes precedence.
Warning
There are some caveats under Windows:
- The service file should be saved as pg_service.conf
and not as .pg_service.conf.
- The service file should be saved in Unix format in order to work.
One way to do it is to open it with Notepad++
and .
- You can add environmental variables in various ways; a tested one, known to work reliably,
is adding PGSERVICEFILE and
the path of the type C:UsersJohnpg_service.conf
- After adding an environment variable you may also need to restart the computer.
This section contains some details on how QGIS accesses PostgreSQL layers.
Most of the time, QGIS should simply provide you with a list of database
tables that can be loaded, and it will load them on request. However, if you have
trouble loading a PostgreSQL table into QGIS, the information below may
help you understand any QGIS messages and give you direction on changing
the PostgreSQL table or view definition to allow QGIS to load it.
QGIS requires that PostgreSQL layers contain a column that can be used
as a unique key for the layer. For tables, this usually means that the table
needs a primary key, or a column with a unique constraint on it. In QGIS,
this column needs to be of type int4 (an integer of size 4 bytes).
Alternatively, the ctid column can be used as primary key. If a table lacks
these items, the oid column will be used instead. Performance will be
improved if the column is indexed (note that primary keys are automatically
indexed in PostgreSQL).
QGIS offers a checkbox Select at id that is activated by default. This
option gets the ids without the attributes which is faster in most cases.
If the PostgreSQL layer is a view, the same requirement exists, but views
do not always have primary keys or columns with unique constraints on them. You
have to define a primary key field (has to be integer) in the QGIS dialog before
you can load the view. If a suitable column does not exist in the view, QGIS
will not load the layer. If this occurs, the solution is to alter the view so
that it does include a suitable column (a type of integer and either a primary
key or with a unique constraint, preferably indexed).
As for table, a checkbox Select at id is activated by default (see above
for the meaning of the checkbox). It can make sense to disable this option when
you use expensive views.
If you want to make a backup of your PostGIS database using the pg_dump and
pg_restore commands, and the default layer styles as saved by QGIS fail to
restore afterwards, you need to set the XML option to DOCUMENT and the
restore will work.
QGIS allows to filter features already on server side. Check the
checkbox to do so. Only supported expressions will be
sent to the database. Expressions using unsupported operators or functions will
gracefully fallback to local evaluation.
Most of common data types are supported by the PostgreSQL provider: integer, float,
varchar, geometry and timestamp.
Array data types are not supported.
Data can be imported into PostgreSQL/PostGIS using several tools, including the
DB Manager plugin and the command line tools shp2pgsql and ogr2ogr.
QGIS comes with a core plugin named  DB Manager. It can
be used to load shapefiles and other data formats, and it includes support for
schemas. See section DB Manager Plugin for more information.
DB Manager. It can
be used to load shapefiles and other data formats, and it includes support for
schemas. See section DB Manager Plugin for more information.
PostGIS includes an utility called shp2pgsql that can be used to import
shapefiles into a PostGIS-enabled database. For example, to import a
shapefile named lakes.shp into a PostgreSQL database named
gis_data, use the following command:
shp2pgsql -s 2964 lakes.shp lakes_new | psql gis_data
This creates a new layer named lakes_new in the gis_data database.
The new layer will have a spatial reference identifier (SRID) of 2964.
See section Working with Projections for more information on spatial
reference systems and projections.
Tip
Exporting datasets from PostGIS
Like the import tool shp2pgsql, there is also a tool to export
PostGIS datasets as shapefiles: pgsql2shp. This is shipped within
your PostGIS distribution.
Besides shp2pgsql and DB Manager, there is another tool for feeding geodata
in PostGIS: ogr2ogr. This is part of your GDAL installation.
To import a shapefile into PostGIS, do the following:
ogr2ogr -f "PostgreSQL" PG:"dbname=postgis host=myhost.de user=postgres
password=topsecret" alaska.shp
This will import the shapefile alaska.shp into the PostGIS database
postgis using the user postgres with the password topsecret on host
server myhost.de.
Note that OGR must be built with PostgreSQL to support PostGIS.
You can verify this by typing (in  )
)
ogrinfo --formats | grep -i post
If you prefer to use PostgreSQL’s COPY command instead of the default
INSERT INTO method, you can export the following environment variable
(at least available on and  ):
):
ogr2ogr does not create spatial indexes like shp2pgsl does. You
need to create them manually, using the normal SQL command CREATE INDEX
afterwards as an extra step (as described in the next section
Improving Performance).
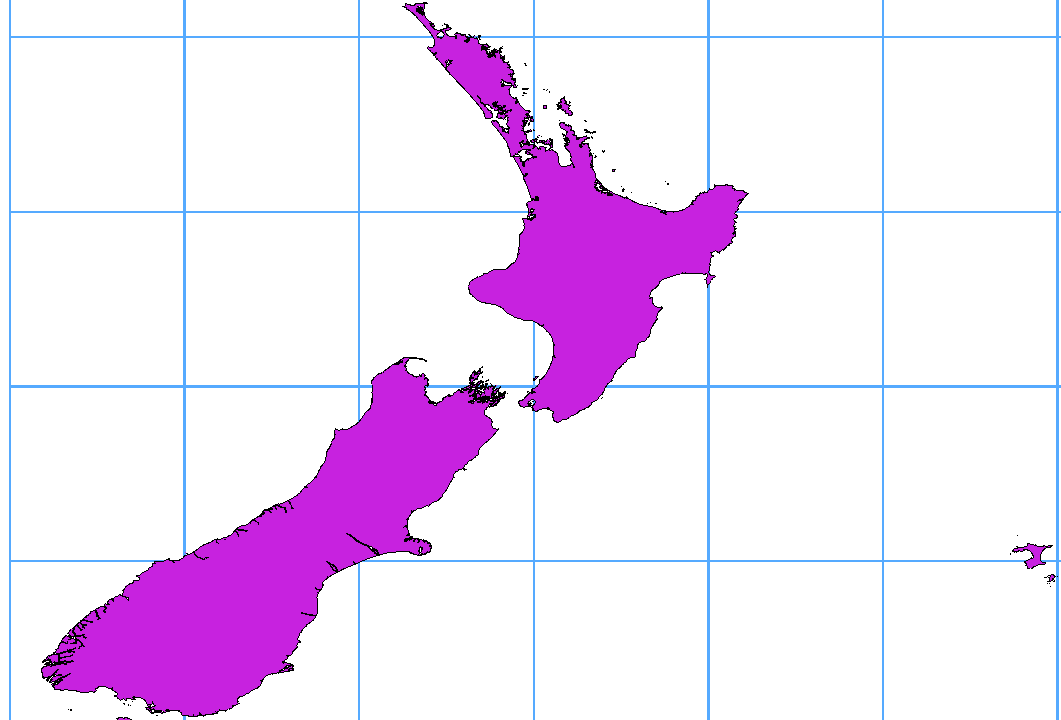
Many GIS packages don’t wrap vector maps with a geographic reference system
(lat/lon) crossing the 180 degrees longitude line
(http://postgis.refractions.net/documentation/manual-2.0/ST_Shift_Longitude.html).
As result, if we open such a map in QGIS, we will see two far, distinct locations,
that should appear near each other. In Figure_vector_crossing, the tiny point on the far
left of the map canvas (Chatham Islands) should be within the grid, to the right of the
New Zealand main islands.
A work-around is to transform the longitude values using PostGIS and the
ST_Shift_Longitude function. This function reads every point/vertex in every
component of every feature in a geometry, and if the longitude coordinate is
< 0°, it adds 360° to it. The result is a 0° - 360°
version of the data to be plotted in a 180°-centric map.
- Import data into PostGIS (Importing Data into PostgreSQL) using,
for example, the DB Manager plugin.
- Use the PostGIS command line interface to issue the following command
(in this example, “TABLE” is the actual name of your PostGIS table):
gis_data=# update TABLE set the_geom=ST_Shift_Longitude(the_geom);
- If everything went well, you should receive a confirmation about the
number of features that were updated. Then you’ll be able to load the
map and see the difference (Figure_vector_crossing_map).
 The first time you load data from a SpatiaLite
database, begin by clicking on the
Add SpatiaLite Layer toolbar button, or by selecting the
option
from the menu, or by typing Ctrl+Shift+L.
This will bring up a window that will allow you either to connect to a
SpatiaLite database already known to QGIS, which you can choose from the
drop-down menu, or to define a new connection to a new database. To define a
new connection, click on [New] and use the file browser to point to
your SpatiaLite database, which is a file with a .sqlite extension.
The first time you load data from a SpatiaLite
database, begin by clicking on the
Add SpatiaLite Layer toolbar button, or by selecting the
option
from the menu, or by typing Ctrl+Shift+L.
This will bring up a window that will allow you either to connect to a
SpatiaLite database already known to QGIS, which you can choose from the
drop-down menu, or to define a new connection to a new database. To define a
new connection, click on [New] and use the file browser to point to
your SpatiaLite database, which is a file with a .sqlite extension.
If you want to save a vector layer to SpatiaLite format, you can do this by
right clicking the layer in the legend. Then, click on ,
define the name of the output file, and select ‘SpatiaLite’ as format and the CRS.
Also, you can select ‘SQLite’ as format and then add SPATIALITE=YES in the
OGR data source creation option field. This tells OGR to create a SpatiaLite
database. See also http://www.gdal.org/ogr/drv_sqlite.html.
QGIS also supports editable views in SpatiaLite.
If you want to create a new SpatiaLite layer, please refer to section
Creating a new SpatiaLite layer.
Tip
SpatiaLite data management Plugins
For SpatiaLite data management, you can also use several Python plugins:
QSpatiaLite, SpatiaLite Manager or DB Manager (core plugin, recommended).
If necessary, they can be downloaded and installed with the Plugin Installer.
The spatial features in Oracle Spatial aid users in managing geographic and
location data in a native type within an Oracle database. QGIS now has
support for such layers.
 The first time you use an Oracle Spatial data source,
you must create a connection to the database that contains the data. Begin by
clicking on the Add Oracle Spatial Layer toolbar
button, selecting the option from the menu, or typing
Ctrl+Shift+O. To access the connection manager, click on the [New]
button to display the Create a New Oracle Spatial Connection dialog.
The parameters required for a connection are:
The first time you use an Oracle Spatial data source,
you must create a connection to the database that contains the data. Begin by
clicking on the Add Oracle Spatial Layer toolbar
button, selecting the option from the menu, or typing
Ctrl+Shift+O. To access the connection manager, click on the [New]
button to display the Create a New Oracle Spatial Connection dialog.
The parameters required for a connection are:
- Name: A name for this connection. It can be the same as Database
- Database: SID or SERVICE_NAME of the Oracle instance.
- Host: Name of the database host. This must be a resolvable host name
such as would be used to open a telnet connection or ping the host. If the
database is on the same computer as QGIS, simply enter ‘localhost’ here.
- Port: Port number the Oracle database server listens on. The default
port is 1521.
- Username: Username used to login to the database.
- Password: Password used with Username to connect to the database.
- Workspace: Workspace to switch to.
Optionally, you can activate following checkboxes:
- Save Username Indicates whether to save the database
username in the connection configuration.
- Save Password Indicates whether to save the database
password in the connection settings.
- Only look in meta data table Restricts the displayed
tables to those that are in the all_sdo_geom_metadata view. This can speed
up the initial display of spatial tables.
- Only look for user’s tables When searching for spatial
tables, restrict the search to tables that are owned by the user.
- Also list tables with no geometry Indicates that
tables without geometry should also be listed by default.
- Use estimated table statistics for the layer metadata
When the layer is set up, various metadata are required for the Oracle table.
This includes information such as the table row count, geometry type and
spatial extents of the data in the geometry column. If the table contains a
large number of rows, determining this metadata can be time-consuming. By
activating this option, the following fast table metadata operations are
done: Row count is determined from all_tables.num_rows. Table extents
are always determined with the SDO_TUNE.EXTENTS_OF function, even if a layer
filter is applied. Table geometry is determined from the first 100
non-null geometry rows in the table.
- Only existing geometry types Only list the existing
geometry types and don’t offer to add others.
Warning
In the Authentication tab, saving username and password
will keep unprotected credentials in the connection configuration. Those
credentials will be visible if, for instance, you shared the project file
with someone. Therefore, it’s advisable to save your credentials in a
Authentication configuration instead (configurations tab).
See Authentication System for more details.
Once all parameters and options are set, you can test the connection by
clicking on the [Test Connect] button.
Tip
QGIS User Settings and Security
Depending on your computing environment, storing passwords in your QGIS
settings may be a security risk. Passwords are saved in clear text in the
system configuration and in the project files!
Your customized settings for QGIS are stored based on the operating system:
- The settings are stored in your home directory in ~/.qgis2.
 The settings are stored in the registry.
Once you have one or more connections defined, you can
load layers from the Oracle database. Of course, this requires having data in
Oracle.
To load a layer from Oracle Spatial, perform the following steps:
- If the Add Oracle Spatial layers dialog is not already open,
click on the Add Oracle Spatial Layer toolbar
button.
- Choose the connection from the drop-down list and click [Connect].
- Select or unselect Also list tables with no geometry.
- Optionally, use some Search Options to define
which features to load from the layer or use the [Build query] button
to start the Query builder dialog.
- Find the layer(s) you wish to add in the list of available layers.
- Select it by clicking on it. You can select multiple layers by holding
down the Shift key while clicking. See section
Query Builder for information on using the Oracle
Query Builder to further define the layer.
- Click on the [Add] button to add the layer to the map.
Tip
Oracle Spatial Layers
Normally, an Oracle Spatial layer is defined by an entry in the
USER_SDO_METADATA table.
IBM DB2 for Linux, Unix and Windows (DB2 LUW), IBM DB2 for z/OS (mainframe)
and IBM DashDB products allow
users to store and analyse spatial data in relational table columns.
The DB2 provider for QGIS supports the full range of visualization, analysis
and manipulation of spatial data in these databases.
User documentation on these capabilities can be found at the
DB2 z/OS KnowledgeCenter, DB2 LUW KnowledgeCenter
and DB2 DashDB KnowledgeCenter.
For more information about working with the DB2 spatial capabilities, check out
the DB2 Spatial Tutorial on IBM DeveloperWorks.
The DB2 provider currently only supports the Windows environment through the Windows ODBC driver.
The client running QGIS needs to have one of the following installed:
- DB2 LUW
- IBM Data Server Driver Package
- IBM Data Server Client
If you are accessing a DB2 LUW database on the same machine or using DB2 LUW as a client,
the DB2 executables and supporting files need to be included in the Windows path.
This can be done by creating a batch file like the following with the name db2.bat
and including it in the directory %OSGEO4W_ROOT%/etc/ini.
@echo off
REM Point the following to where DB2 is installed
SET db2path=C:\Program Files (x86)\sqllib
REM This should usually be ok - modify if necessary
SET gskpath=C:\Program Files (x86)\ibm\gsk8
SET Path=%db2path%\BIN;%db2path%\FUNCTION;%gskpath%\lib64;%gskpath%\lib;%path%
 The DB2 provider uses ODBC to connect to a DB2 database.
Windows includes ODBC by default.
The DB2 provider uses ODBC to connect to a DB2 database.
Windows includes ODBC by default.
The first time you use an DB2 Spatial data source,
you must create a connection to the database that contains the data.
A connection can be created by:
- Right-clicking on
 in the QGIS Browser panel
and selecting
in the QGIS Browser panel
and selecting
or
- Selecting the option from the menu.
To access the connection manager, click on the [New]
button to display the Create a New DB2 Connection dialog.
The connection can be specified using either a Service/DSN name defined to ODBC
or using the driver, host and port information.
All connections require:
- Connection Name: A name for this connection. It can be the same as Database
- Database: The DB2 database name.
- User name and password. See more information below.
An ODBC Service/DSN connection requires in addition:
- Service/DSN: The service name defined to ODBC
A driver / host / host connection requires in addition:
- Driver: Name of the DB2 driver. Typically this would be IBM DB2 ODBC DRIVER.
- DB2 Host: Name of the database host. This must be a resolvable host name
such as would be used to open a telnet connection or ping the host. If the
database is on the same computer as QGIS, simply enter ‘localhost’ here.
- DB2 Port: Port number the DB2 database server listens on. The default
DB2 LUW port is 50000. The default DB2 z/OS port is 446.
Warning
In the Authentication tab, saving username and password
will keep unprotected credentials in the connection configuration. Those
credentials will be visible if, for instance, you shared the project file
with someone. Therefore, it’s advisable to save your credentials in a
Authentication configuration instead (configurations tab).
See Authentication System for more details.
Once all parameters and options are set, you can test the connection by
clicking on the [Test connection] button.
Once you have one or more connections defined, you can
load layers from the DB2 database. A DB2 Spatial layer is defined by a row in the
DB2GSE.ST_GEOMETRY_COLUMNS view.
To load a layer from DB2 Spatial, perform the following steps:
- If the Add DB2 Spatial layers dialog is not already open,
click on the Add DB2 Spatial Layer toolbar
button.
- Choose the connection from the drop-down list and click [Connect].
- Optionally, use some Search Options to define
which features to load from the layer or use the [Build query] button
to start the Query builder dialog.
- Find the layer(s) you wish to add in the list of available layers.
- Select it by clicking on it. You can select multiple layers by holding
down the Shift key while clicking. See section
Query Builder for information on using the
Query Builder to further define the layer.
- Click on the [Add] button to add the layer to the map.
Or more simply, expand the connection in the QGIS Browser panel
and double-click the name of the layer.
Note
In order to work effectively with DB2 spatial tables in QGIS, it is important that
tables have an INTEGER or BIGINT column defined as PRIMARY KEY and if new features
are going to be added, this column should also have the GENERATED characteristic.
It is also helpful for the spatial column to be registered with a specific spatial
reference identifier (most often 4326 for WGS84 coordinates).
A spatial column can be registered by calling the ST_Register_Spatial_Column stored
procedure.