Docs for ‘QGIS testing’. Visit http://docs.qgis.org/2.8 for QGIS 2.8 docs and translations.
Raster Calculator
The Raster Calculator in the Raster menu allows you to perform calculations on the basis of existing raster pixel values (see figure_raster_10). The results are written to a new raster layer with a GDAL-supported format.
Figure Raster 10:
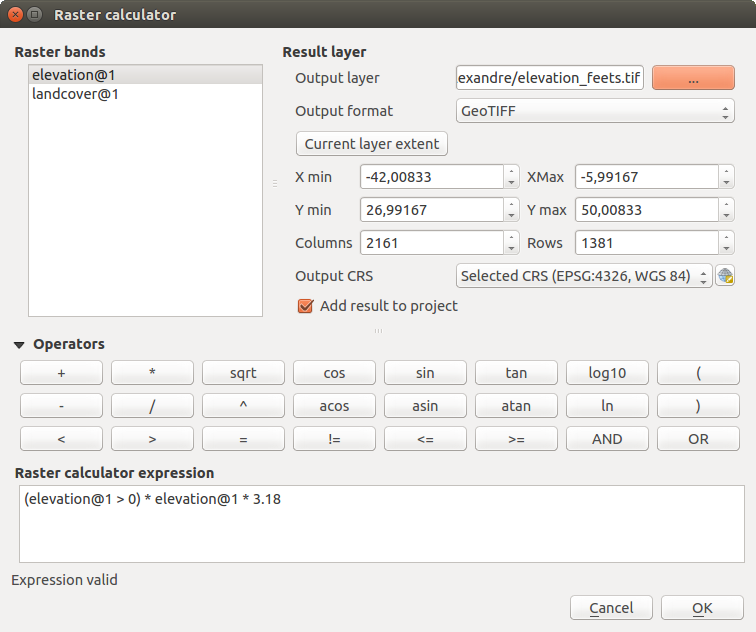
Raster Calculator
The Raster bands list contains all loaded raster layers that can be used. To add a raster to the raster calculator expression field, double click its name in the Fields list. You can then use the operators to construct calculation expressions, or you can just type them into the box.
In the Result layer section, you will need to define an output layer. You can then define the extent of the calculation area based on an input raster layer, or based on X,Y coordinates and on columns and rows, to set the resolution of the output layer. If the input layer has a different resolution, the values will be resampled with the nearest neighbor algorithm.
The Operators section contains all available operators. To add an operator to the raster calculator expression box, click the appropriate button. Mathematical calculations (+, -, *, ... ) and trigonometric functions (sin, cos, tan, ... ) are available. Stay tuned for more operators to come!
With the  Add result to project checkbox, the result layer
will automatically be added to the legend area and can be visualized.
Add result to project checkbox, the result layer
will automatically be added to the legend area and can be visualized.
Examples
Convert elevation values from meters to feet
Creating an elevation raster in feet from a raster in meters, you need to use the conversion factor for meters to feet: 3.28. The expression is:
"elevation@1" * 3.28
Using a mask
If you want to mask out parts of a raster – say, for instance, because you are only interested in elevations above 0 meters – you can use the following expression to create a mask and apply the result to a raster in one step.
("elevation@1" >= 0) * "elevation@1"
In other words, for every cell greater than or equal to 0, set its value to 1. Otherwise set it to 0. This creates the mask on the fly.
If you want to classify a raster – say, for instance into two elevation classes, you can use the following expression to create a raster with two values 1 and 2 in one step.
("elevation@1" < 50) * 1 + ("elevation@1" >= 50) * 2
In other words, for every cell less than 50 set its value to 1. For every cell greater than or equal 50 set its value to 2.