Importante
Translation is a community effort you can join. This page is currently translated at 63.55%.
10. Trabalhando com Projeções
Um Sistema de Referência de Coordenadas, ou SRC, é um método de associar coordenadas numéricas com uma posição na superfície da Terra. O QGIS tem suporte para aproximadamente 7.000 SRCs padrão, cada um com diferentes casos de uso, prós e contras! Escolher um sistema de referência apropriado para seus projetos e dados QGIS pode ser uma tarefa complexa, mas felizmente o QGIS ajuda a guiá-lo através desta escolha, e torna o trabalho com diferentes CRSs tão transparente e preciso quanto possível.
10.1. Visão geral do Suporte a Projeções
QGIS has support for approximately 7,000 known CRSs. These standard CRSs
are based on those defined by the European Petroleum Search Group (EPSG)
and the Institut Geographique National de France (IGNF), and are made
available in QGIS through the underlying “Proj” projection library. Commonly,
these standard projections are identified through use of an authority:code
combination, where the authority is an organisation name such as “EPSG” or
“IGNF”, and the code is a unique number associated with a specific CRS. For
instance, the common WGS 84 latitude/longitude CRS is known by the identifier
EPSG:4326, and the web mapping standard CRS is EPSG:3857.
Custom, user-created CRSs are stored in a user CRS database. See section Sistema de Referência de Coordenadas personalizado for information on managing your custom coordinate reference systems.
10.2. Sistemas de referência de coordenadas da camada
In order to correctly project data into a specific target CRS, either your data
must contain information about its coordinate reference system or you will need
to manually assign the correct CRS to the layer. For PostGIS layers, QGIS uses
the spatial reference identifier that was specified when that PostGIS layer was
created. For data supported by GDAL, QGIS relies on the presence of a
recognized means of specifying the CRS. For instance, for the Shapefile format
this is a file containing an ESRI Well-Known Text (WKT)
representation of the layer’s CRS. This projection file has the same base name
as the .shp file and a .prj extension. For example,
alaska.shp would have a corresponding projection file named
alaska.prj.
Whenever a layer is loaded into QGIS, QGIS attempts to automatically determine the correct CRS for that layer. In some cases this is not possible, e.g. when a layer has been provided without retaining this information. You can configure QGIS behavior whenever it cannot automatically determine the correct CRS for a layer:
Abrir :menuseleção:`Configurações-->`


Fig. 10.1 A guia SRC na Caixa de Diálogo de Opções QGIS
Under the CRS for layers group, set the action to do when a new layer is created, or when a layer is loaded that has no CRS. One of:
 Leave as unknown CRS (take no action):
there will be no prompt to select a CRS when a layer without CRS is loaded,
defering CRS choice to a later time. Convenient when loading a lot of
layers at once. Such layers will be identifiable in the Layers
panel by the
Leave as unknown CRS (take no action):
there will be no prompt to select a CRS when a layer without CRS is loaded,
defering CRS choice to a later time. Convenient when loading a lot of
layers at once. Such layers will be identifiable in the Layers
panel by the  icon next to them.
They’ll also be un-referenced, with coordinates from the layer treated as
purely numerical, non-earth values, i.e. the same behavior as all layers
get when a project is set to have no CRS.
icon next to them.
They’ll also be un-referenced, with coordinates from the layer treated as
purely numerical, non-earth values, i.e. the same behavior as all layers
get when a project is set to have no CRS. Prompt for CRS: it will prompt you to
manually select the CRS. Selecting the correct choice is crucial,
as a wrong choice will place your layer in the wrong position on the
Earth’s surface! Sometimes, accompanying metadata will describe the
correct CRS for a layer, in other cases you will need to contact the
original author of the data to determine the correct CRS to use.
Prompt for CRS: it will prompt you to
manually select the CRS. Selecting the correct choice is crucial,
as a wrong choice will place your layer in the wrong position on the
Earth’s surface! Sometimes, accompanying metadata will describe the
correct CRS for a layer, in other cases you will need to contact the
original author of the data to determine the correct CRS to use.- Usar SRC do projeto
- Use default layer CRS, as set in the
Default CRS for layers combobox above.
Dica
Atribuir o mesmo SRC a várias camadas que não tenham SRC ou que tenham um SRC errado em uma única operação:
Selecione as camadas no painel :guilabel:`Camadas’.
Pressione Ctrl+Shift+C. Você também pode clicar com o botão direito sobre uma das camadas selecionadas ou ir para
Encontre e selecione o CRS adequado para usar
E pressione OK. Você pode confirmar que ela foi definida corretamente na aba Fonte das propriedades das camadas.
Observe que mudar o SRC neste cenário não altera de forma alguma a fonte de dados subjacente, mas apenas muda a forma como o QGIS interpreta as coordenadas brutas da camada no projeto QGIS atual.
10.3. Sistemas referência de coordenadas projetadas
Cada projeto no QGIS também tem um Sistema de Referência de Coordenadas associado. O projeto SRC determina como os dados são projetados de suas coordenadas brutas subjacentes para o mapa plano renderizado em sua tela de mapa QGIS.
QGIS supports “on the fly” CRS transformation for both raster and vector data. This means that regardless of the underlying CRS of particular map layers in your project, they will always be automatically transformed into the common CRS defined for your project. Behind the scenes, QGIS transparently reprojects all layers contained within your project into the project’s CRS, so that they will all be rendered in the correct position with respect to each other!
É importante fazer uma escolha apropriada de SRC para seus projetos QGIS. Escolher um SRC inadequado pode fazer com que seus mapas pareçam distorcidos e reflitam mal os tamanhos relativos do mundo real e as posições das feições. Normalmente, ao trabalhar em áreas geográficas menores, haverá vários SRCs padrão usados em um determinado país ou área administrativa. É importante pesquisar quais SRCs são escolhas apropriadas ou padrão para a área que você está mapeando e garantir que seu projeto QGIS siga esses padrões.
Por padrão, o QGIS inicia cada novo projeto usando uma projeção padrão global. Este SRC padrão é EPSG:4326 (também conhecido como “WGS 84”), e é um sistema de referência global baseado na latitude/longitude. Este SRC padrão pode ser alterado através da configuração SRC para Novos Projetos na guia SRC em (veja figura_opções_de_projeção). Há uma opção para definir automaticamente o SRC do projeto para corresponder ao SRC da primeira camada carregada em um novo projeto ou, alternativamente, você pode selecionar um SRC padrão diferente para utilizar em todos os projetos recém-criados. Esta escolha será salva para uso em sessões subseqüentes do QGIS.
O projeto SRC também pode ser definido através da guia SRC do :menuselection:`Projeto –> Propriedades…`janela. Também será mostrado na parte inferior direita da barra de status QGIS.
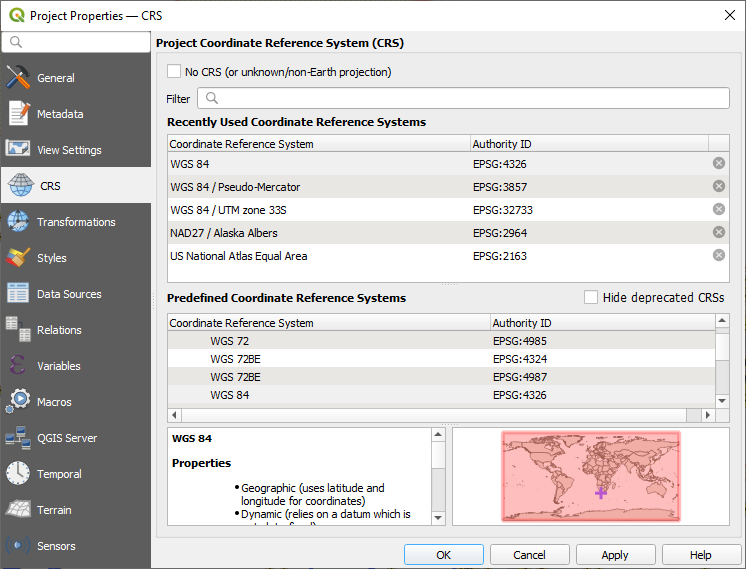
Fig. 10.2 Caixa de Diálogo de Propriedades de Projeto
As opções disponíveis são:
 No CRS (or unknown/non-Earth projection):
Checking this setting will disable ALL projection handling within the QGIS
project, causing all layers and map coordinates to be treated as simple 2D
Cartesian coordinates, with no relation to positions on the Earth’s surface.
It can be used to guess a layer CRS (based on its raw coordinates or when
using QGIS for non earth uses like role-playing game maps, building mapping
or microscopic stuff. In this case:
No CRS (or unknown/non-Earth projection):
Checking this setting will disable ALL projection handling within the QGIS
project, causing all layers and map coordinates to be treated as simple 2D
Cartesian coordinates, with no relation to positions on the Earth’s surface.
It can be used to guess a layer CRS (based on its raw coordinates or when
using QGIS for non earth uses like role-playing game maps, building mapping
or microscopic stuff. In this case:Nenhuma reprojeção é feita durante a renderização das camadas: as feições são apenas desenhadas usando suas coordenadas brutas.
A elipsóide é bloqueada e forçada a “Nenhum/Planimétrico”.
As unidades de distância e área, e a exibição de coordenadas são bloqueadas e forçadas a “unidades desconhecidas”; todas as medições são feitas em unidades de mapa desconhecidas, e nenhuma conversão é possível.
or an existing coordinate reference system that can be geographic, projected or user-defined. A preview of the CRS extent on earth is displayed to help you select the appropriate one. Layers added to the project are translated on-the-fly to this CRS in order to overlay them regardless of their original CRS. Use of units and ellipsoid setting are available and make sense and you can perform calculations accordingly.
Sempre que você selecionar um novo SRC para seu projeto QGIS, as unidades de medida serão automaticamente alteradas na guia Geral da janela Propriedades do projeto () para combinar com o SRC selecionado. Por exemplo, alguns SRCs definem suas coordenadas em pés ao invés de metros, portanto, definir seu projeto QGIS para um desses SRCs também irá definir seu projeto para medir utilizando pés por padrão.
Dica
Configurando a projeção SRC a partir de uma camada
Você pode atribuir um SRC ao projeto usando um SRC de camada:
No painel Camadas, clique com o botão direito do mouse sobre a camada que você quer escolher o SRC
Selecione Configurar SRC do projeto a partir da Camada.
The project’s CRS is redefined using the layer’s CRS. Map canvas extent, coordinates display are updated accordingly and all the layers in the project are on-the-fly translated to the new project CRS.
10.4. Seletor do Sistemas de Referência de Coordenadas
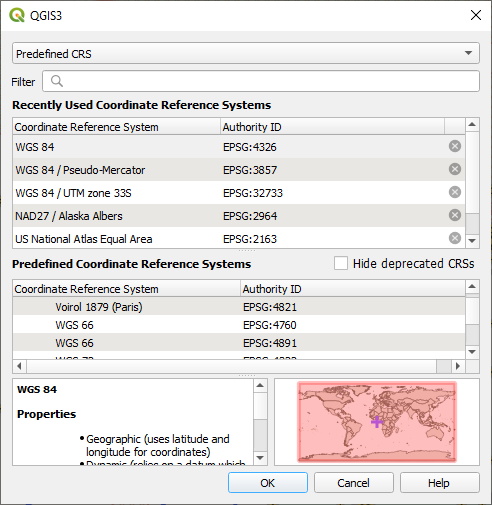
Fig. 10.3 CRS Selector
Este diálogo ajuda a atribuir um Sistema de Referência Coordenada a um projeto ou uma camada, desde que um conjunto de bancos de dados de projeção. Os itens na janela são:
Filtro: Se você conhece o código EPSG, o identificador ou o nome de um Sistema de Referência de Coordenadas, você pode usar o recurso de busca para encontrá-lo. Digite o código EPSG, o identificador ou o nome.
** Sistemas de referência de coordenadas recentemente utilizados**: Se você tiver certos SRCs que você usa freqüentemente em seu trabalho diário de SIG, estes serão exibidos nesta lista. Clique em um destes itens para selecionar o SRC associado.
Sistemas de referência coordenados do mundo: Esta é uma lista de todos os SRCs suportados pelo QGIS, incluindo os sistemas de referência de coordenadas geográficas, projetadas e personalizadas. Para definir um SRC, selecione-o da lista expandindo o nó apropriado e selecionando o SRC. O SRC ativo é pré-selecionado.
PROJ text: This is the CRS string used by the PROJ projection engine. This text is read-only and provided for informational purposes.
If you want to remove a recently used CRS from the list that can be done in several ways:
Press
 Remove from recently used CRS button on the right
side.
Remove from recently used CRS button on the right
side.Press Del after selecting CRS that you want to remove.
Right-click on used CRS and choose
Remove selected CRS from recently used CRS to remove
selected CRS
or  Clear all recently used CRS to remove all used
CRS.
Clear all recently used CRS to remove all used
CRS.
The CRS selector also shows a rough preview of the geographic area for which a selected CRS is valid for use. Many CRSs are designed only for use in small geographic areas, and you should not use these outside of the area they were designed for. The preview map shades an approximate area of use whenever a CRS is selected from the list. In addition, this preview map also shows an indicator of the current main canvas map extent.
10.5. Sistema de Referência de Coordenadas personalizado
Se o QGIS não fornece o sistema de referência de coordenadas(SRC) que você precisa, você pode definir um SRC personalizado. Para definir um SRC, selecione  Customizar SRC… no menu :menuselection:`Configurações’. Os SRC personalizados são armazenados em seu banco de dados de usuários QGIS. Além de seus SRCs personalizados, este banco de dados também contém seus marcadores espaciais e outros dados personalizados.
Defining a custom CRS in QGIS requires a good understanding of the PROJ projection library. To begin, refer to “Cartographic Projection Procedures for the UNIX Environment - A User’s Manual” by Gerald I. Evenden, U.S. Geological Survey Open-File Report 90-284, 1990 (available at https://pubs.usgs.gov/of/1990/of90-284/ofr90-284.pdf).
Este manual descreve o uso de proj e utilitários de linha de comando relacionados. Os parâmetros cartográficos utilizados com o proj estão descritos no manual do usuário e são os mesmos que os utilizados pelo QGIS.
A janela Definição de Sistema de Referência de Coordenadas personalizado exige apenas dois parâmetros para definir um SRC ao usuário:
Um nome descritivo
Os parâmetros cartográficos em formato PROJ ou WKT
Para criar um novo SRC:
Clique no botão
 Adicionar novo SRC.
Insira um nome descritivo
Select the format: it can be Proj String or WKT
Adicionar ao SRC Parâmetros.
Nota
Preferir o armazenamento da definição de SRC no formato WKT
Although both
Proj StringandWKTformats are supported, it’s highly recommended to store projection definitions in the WKT format. Therefore, if the available definition is in the proj format, select that format, enter the parameters and then switch to WKT format. QGIS will convert the definition to the WKT format that you can later save.Click Validate to test whether the CRS definition is an acceptable projection definition.
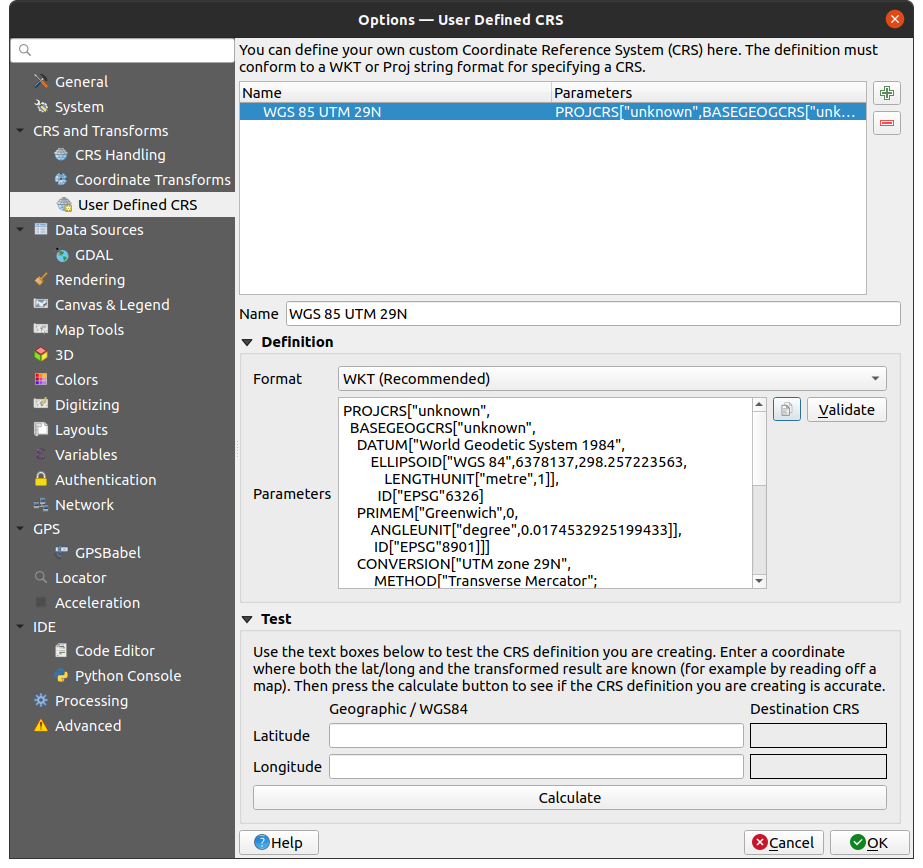
Fig. 10.4 Custom CRS Dialog
Você pode testar seus parâmetros SRC para ver se eles dão resultados coerentes. Para fazer isso, digite os valores conhecidos de latitude e longitude WGS 84 nos campos Norte e Leste, respectivamente. Clique em Calcular, e compare os resultados com os valores conhecidos em seu sistema de referência de coordenadas.
10.5.1. Integrate an NTv2-transformation in QGIS
To integrate an NTv2 transformation file in QGIS you need one more step:
Place the NTv2 file (.gsb) in the CRS/Proj folder that QGIS uses (e.g.
C:\OSGeo4W64\share\projfor windows users)Add nadgrids (
+nadgrids=nameofthefile.gsb) to the Proj definition in the Parameters field of the Custom Coordinate Reference System Definition ().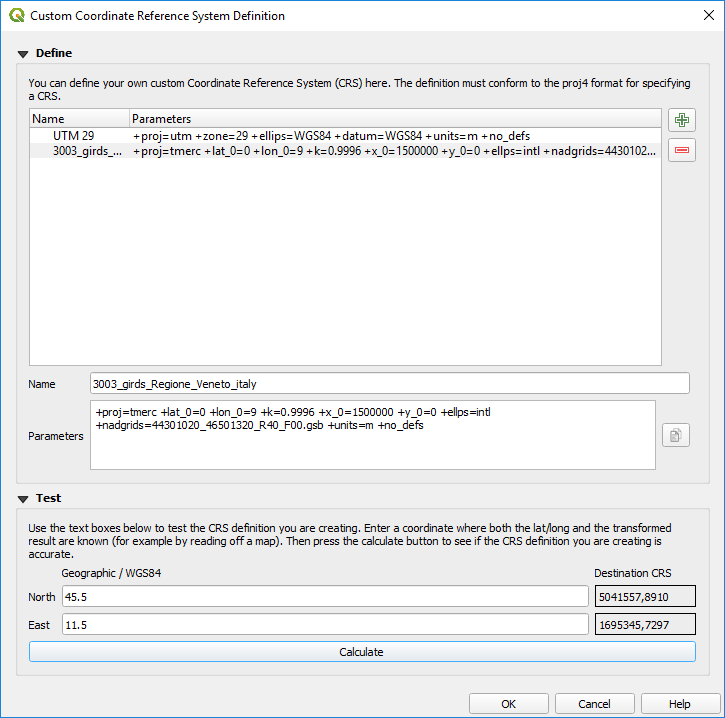
Fig. 10.5 Configurar uma transformação NTv2
10.6. Transformações de Datum
In QGIS, ‘on-the-fly’ CRS transformation is enabled by default, meaning that whenever you use layers with different coordinate systems QGIS transparently reprojects them to the project CRS. For some CRS, there are a number of possible transforms available to reproject to the project’s CRS!
By default, QGIS will attempt to use the most accurate transformation available.
However, in some cases this may not be possible, e.g. whenever additional
support files are required to use a transformation. Whenever a more accurate
transformation is available, but is not currently usable, QGIS will show
an informative warning message advising you of the more accurate transformation
and how to enable it on your system. Usually, this requires download of
an external package of transformation support files, and extracting these
to the proj folder under your QGIS user profile
folder.
Se desejar, o QGIS também pode lhe solicitar sempre que várias transformações possíveis possam ser feitas entre dois CRSs, e permitir que você faça uma seleção informada de qual é a transformação mais apropriada para usar para seus dados.
This customization is done in the
tab menu under the
Default datum transformations group:
using
 Ask for datum transformation if several are
available: when more than one appropriate datum transformation exist for a
source/destination CRS combination, a dialog will automatically be opened
prompting users to choose which of these datum transformations to use for
the project. If the Make default checkbox is ticked when
selecting a transformation from this dialog, then the choice is remembered
and automatically applied to any newly created QGIS projects.
Ask for datum transformation if several are
available: when more than one appropriate datum transformation exist for a
source/destination CRS combination, a dialog will automatically be opened
prompting users to choose which of these datum transformations to use for
the project. If the Make default checkbox is ticked when
selecting a transformation from this dialog, then the choice is remembered
and automatically applied to any newly created QGIS projects.ou definir uma lista de transformações de dados apropriadas para usar como padrão ao carregar uma camada em um projeto ou ao reprojetar uma camada.
Use the
button to open the Select Datum Transformations
dialog. Then:Choose the Source CRS of the layer, using the drop-down menu or the
 Select CRS widget.
Fornecer o Destino SRC da mesma forma.
Uma lista das transformações disponíveis da origem ao destino será mostrada na tabela. Clicando em uma linha serão mostrados detalhes sobre as configurações aplicadas e a correspondente precisão e área de uso da transformação.
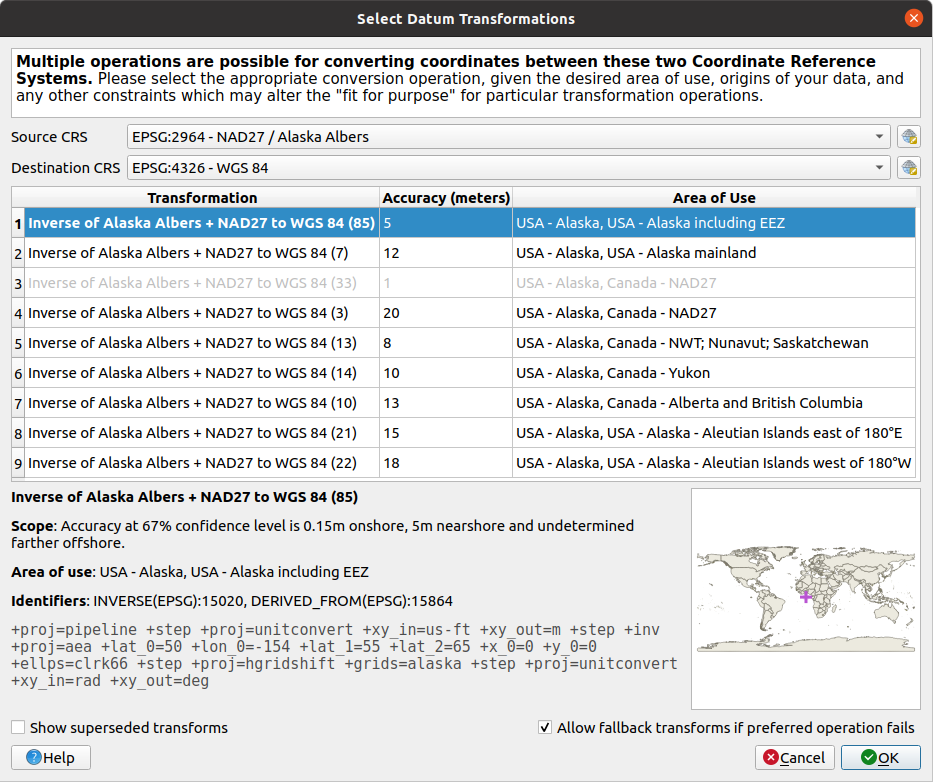
Fig. 10.6 Selecionando uma transformação padrão de datum preferida
In some cases a transformation may not be available for use on your system. In this case, the transformation will still be shown (greyed) in this list but can not be picked until you install the required package of transformation support. Usually, a button is provided to download and install the corresponding grid, which is then stored under the
projfolder in the active user profile directory.Encontre a transformação de sua preferência e selecione
Defina se você
Permitir transformações em caso de falha na operação preferida.Clique OK.
A row is added to the table under Default Datum Transformations with information about the Source CRS, the Destination CRS, the Operation applied for the transformation and whether Allow fallback Transforms is enabled.
From now, QGIS automatically uses the selected datum transformations for further transformation between these two CRSs until you remove it (
 ) from the list or change the entry (
 ) in
the list.
) in
the list.
Datum transformations set in the
tab will be inherited by all
new QGIS projects created on the system. Additionally, a particular project
may have its own specific set of transformations specified via the
CRS tab of the Project properties dialog
(). These settings apply
to the current project only.